Installing the iPower™ 70 Room Camera
Copyright © 2000-2002: Polycom, Inc. Polycom, Inc., 4750 Willow Road, Pleasanton, CA 94588 www.polycom.com Polycom and the Polycom logo are registered trademarks of Polycom, Inc. Concorde, Venue, and WorldCart are trademarks of PictureTel Corporation. Velcro is a registered trademark of Velcro USA, Inc. All other company and product names are the trademarks or registered trademarks of their respective owners. The information contained in this document is subject to change without notice.
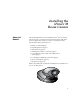
Installing the iPower 70 Room Camera About this Booklet This booklet describes how to install the iPower® 70 room camera. The iPower 70 is a pan-tilt-zoom (PTZ) camera that is used with a iPower collaboration system as a main or an auxiliary camera.
INSTALLING THE IPOWER 70 ROOM CAMERA Before Installing Warning Before you begin this procedure, make sure you turn off your collaboration system’s power switch. To install this camera, you will need: ❑ The 8-pin camera cable a (labeled with the 8 icon on both cable collars) that came with your collaboration system, the WorldCart™, or the Premier Cart. (A camera cable is not supplied with this camera.) ❑ One of the following systems: • iPower 900 system, software version 1.
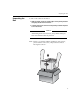
Unpacking the Box Unpacking the Box To remove the camera from the box: 1. With two hands, grasp the outside edges of the packing material and gently lift the unit from the box. 2. Carefully remove the camera from the packing material and place it on a flat surface. Caution When lifting the iPower 70 camera, always lift the unit by its base. Never lift the camera by its head.
INSTALLING THE IPOWER 70 ROOM CAMERA Important Note About Moving the Camera The iPower 70 camera is designed to be controlled (moved) from the collaboration system wireless keypad, the keyboard, or the remote control. Be sure that your system is turned on before you move the camera. You should not manually move the camera from side to side (pan) or up and down (tilt). If you manually move the iPower 70 camera head, you may experience unexpected camera pointing behavior when you use camera presets.
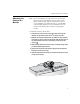
Attaching the Camera to a Monitor Attaching the Camera to a Monitor Note: If you are installing a second monitor for a iPower 900 system, be sure to install the iPower 70 camera on the NTSC or PAL monitor and not on the VGA monitor. If you are installing a second monitor for a Concorde•4500 or Venue•2000 system, be sure to install the iPower 70 camera on the main monitor and not on the graphics monitor. To attach the camera to the monitor: 1. Clean the top of the monitor using a dry cloth.
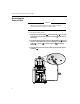
INSTALLING THE IPOWER 70 ROOM CAMERA Connecting the Camera Cable Caution Whenever you plug a cable into this camera, hold the camera by its base, not by the camera head. To connect the camera cable: 1. Plug the 8-pin camera cable a (labeled with the 8 icon on both cable collars) into the 8-pin camera connector b on the back of the camera. 2. Locate the desired camera connector (labeled with the 8 icon) on the back of the collaboration system computer box or electronics module c .
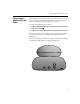
Connecting an Additional Power Cable Connecting an Additional Power Cable Although the camera cable provides power to the iPower 70 camera, if you are using a camera cable longer than 32.8 feet (10 meters), you must use an additional power cable for the camera. To connect an additional power cable: 1. Plug the additional power cable into the power connector on the back of the camera a . 2. Plug the other end of this cable into an appropriate power source.
INSTALLING THE IPOWER 70 ROOM CAMERA Service and Support For support or service, please contact your Polycom service provider or call Polycom Technical Support. You can find phone numbers for Technical Support in your area at the Polycom web site, www.polycom.com. Specifications Physical Specifications Dimensions: Length: 7.2 in. (18.3 cm) Width: 7 in. (17.8 cm) Height: 5.4 in. (13.7 cm ) Weight: 3.5 lb. (1.