Please contact your Polycom Authorized Reseller for assistance. Polycom, Inc. 4750 Willow Road, Pleasanton, CA 94588 http://www.polycom.com Copyright Notice Copyright © 2007, 2008 Polycom, Inc. All rights reserved under the International and pan-American Copyright Conventions.
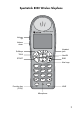
SpectraLink 8020 Wireless Telephone SpectraLink 8020 Volume up Volume down Headset jack Softkeys NavOK START END Nav keys 1 2ABC 3DEF 4GHI 5JKL 6MNO 7PQRS 8TUV 9WXYZ 0 FCN LINE Function key (FCN) LINE Microphone 2
SpectraLink 8030 Wireless Telephone SpectraLink 8030 Volume up Volume down Headset jack Softkeys TALK NavOK START END Nav keys 1 2ABC 3DEF 4GHI 5JKL 6MNO 7PQRS 8TUV 9WXYZ 0 FCN LINE Function key (FCN) LINE Microphone 3
Notice Polycom, Inc. has prepared this document for use by Polycom personnel and customers. The drawings and specifications contained herein are the property of Polycom and shall be neither reproduced in whole or in part without the prior written approval of Polycom, nor be implied to grant any license to make, use, or sell equipment manufactured in accordance herewith.
INTRODUCTION Your SpectraLink 8020/8030 Wireless Telephone uses radio wave technology to send and receive voice transmissions. It is designed to operate like a cell phone. However, the handset uses the private telephone system installed in your facility and will not operate outside the area covered by this system. About This Guide This guide is meant to provide general information about your handset.
TABLE OF CONTENTS THE HANDSET .......................................................................... 8 Modes of Operation ..............................................................................8 Menu Navigation .................................................................................8 Shortcut Keys ..................................................................................9 Handset Displays ..................................................................................
ACCESSORIES .........................................................................33 Battery Packs ....................................................................................33 Notes on Battery Packs ..................................................................34 Charger Models ..................................................................................34 Charging Status .............................................................................35 Single Charger ....................
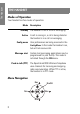
The Handset THE HANDSET Modes of Operation Your handset has five modes of operation: Mode Standby Active Description The handset is not in a call or messaging. A call is coming in, a call is being dialed or the handset is in a call or messaging. Config menu User preferences are being accessed in the Config Menu. In this mode the handset is on, but will not receive calls. Message alert Custom text messaging applications may be programmed for your facility. This mode is activated through the FCN menu.
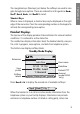
Shortcut Keys When a menu is displayed, a shortcut key may be displayed on the right edge of the menu line. Press the corresponding number on the keypad to activate the corresponding menu option. Handset Displays The top row of the display provides status indicators for various handset conditions. It is referred to as the status bar. The middle lines display information about the handset identity, user profile, calls in progress, menu options, and data from telephone system.
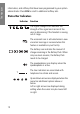
The Handset information, and softkeys that have been programmed by your system administrator. Press FCN to scroll to additional softkey sets. Status Bar Indicators Indicator Function The signal-strength icon indicates the strength of the signal and can assist the user in determining if the handset is moving out of range. The voicemail icon is activated when a new voicemail message is received when this feature is available in your facility.
Function Telephone ring icon. A regular telephone call is coming in. Messaging ring icon. A call is coming in from a Messaging application. The PTT ring icon. A PTT call is coming in. The priority PTT ring icon. A call is coming in on the priority PTT channel. This call will override any other. Muted The muted indicator displays after the Mute softkey has been pressed. It indicates that the microphone is not transmitting sound. Press the Mute softkey again to unmute the microphone.
The Handset Indicator Function The download icon indicates that the handset is downloading code. This icon only appears while the handset is running the over-the-air downloader. It appears to the right of the signal strength icon in the same location as the voicemail icon. Location Service (RTLS) is enabled. Softkey Labels The bottom row of the handset displays labels associated with the four softkeys just below it. When a softkey is active, a label appears to describe its function.
Description Action Cncl Cancel Returns to the previous menu display without saving any data that might have been entered. Del Delete Deletes the character to the left of the cursor. Finished Exits a list when more than one selection is possible. Edit Edit Opens an editing window so you can change information about an entry in the phonebook. Exit Exit Exits out of the menus. Lock Lock Keys Locks the keypad to prevent accidental activation. See Unlk softkey below.
The Handset Label Description Action Redl Redial Displays a list of the last 10 numbers dialed. Save Save Saves the current entry to the phonebook. Set From the speed-dial assignment display, opens the phonebook listing for assigning a phonebook entry to a speed-dial key. Spdl Speed-dial Opens the list of speed-dial numbers. Spkr Speakerphone Toggles speakerphone function. Unlk Unlock keys Press Unlk, then the # key to unlock a locked keypad.
GETTING STARTED Place the handset into the charger for a minimum of two hours. The handset's Battery Pack must be fully charged before its first use. See the section Charger Models for full information. Basic Handset Operation Summary If you want to Then Remove the Battery Pack Press down on the latch on the Battery Pack at the back of the handset and pull the Battery Pack towards you. The Battery Pack releases outward.
Getting Started If you want to Then Turn handset off Press and hold the END key. One chirp will sound. If you are in a call, hang up first, then turn off the handset. Unlock the keypad Press the Unlk softkey, then #, to unlock the keypad. Lock the keypad Press the Lock softkey. Make an internal call Press the START key, wait for a dial tone, then dial the extension. Make an external call Press the START key, wait for a dial tone, then dial the number just as you would from your desk phone.
Then Dial a number Once you hear a dial tone, press the number keys to dial the number. Predial a number From standby mode, press the keypad to enter up to 28 numbers. Then dial the call by pressing START, NavOK or the Spkr softkey. Redial a number Press the Redl softkey from standby mode. A list of recently-dialed numbers displays. Select the number and press START, NavOK or the Spkr softkey. Make a speed-dial call Press and hold the speed-dial key assigned to the number.
If you want to Getting Started Answer a call on a second line Answer with headset Silence while ringing Change the ring volume Activate or deactivate the speakerphone If you are on a call and hear subdued ringing, a call is coming in on a second line. The line number on the display may be flashing. To answer this call, put your first call on hold and press the LINE key, then the line number of the second call. Press any key (other than END) to answer a call when a headset is plugged in.
If you want to Then Press the Mute softkey. End the call Press the END key. Be sure to do this at the end of each call to return to the standby mode. Change the profile Press the Prof softkey and use the Nav keys to select a new profile while in standby mode. The selected profile is marked with an asterisk (*). Edit the phonebook Press the Phbk softkey from standby mode.
If you want to Getting Started Use message alerts 20 Then If programmed in your facility, message alerts may be activated by pressing the designated softkey assigned by the system administrator. Press the FCN key to scroll through the softkey sets. In certain messaging applications, the back-arrow/asterisk (< *) key is used for left and up navigation and the forward-arrow/ pound (# >) key is used for right and down navigation.
ADVANCED FEATURES Facility-Specific Features Press the FCN key while off-hook or in a call to display the the softkeys programmed for advanced telephony features such as transfer, conference, and voicemail. The features may be activated by pressing the corresponding shortcut key. Contact your system administrator for more information about custom features available in your facility.
Toggle Options Some menu options that have only two possibilities operate on a toggle basis. The current setting is shown on the second row of the display, called the info line. Highlight the option and press NavOK to toggle between the settings. For example, when Ring in Headset is the menu option, Ring in Speaker will show on the info line as the active setting.
Changing Ring Settings To change the ring tone or any other ring setting for any profile, go to User Profiles and select the profile. Select Ring Settings and then select Telephone for standard phone calls or one of the Message Alerts for text messages. Then select the ring option you want to adjust. See page 24 for the diagram that shows this sequence graphically.
Config Menu Options Lock Keys User Profiles Silent Advanced Features Vibrate Loud Soft Custom continued on next page 24 Set as Active Ring Settings Noise Mode Ring in Headset Ring in Speaker Warning Tones Key Tones Push-to-talk Telephone Message Alert 1 Message Alert 2 Ring Cadence Ring Tone Ring Volume Vibrate Cadence Ring Delay
continued from previous page Phone Settings Extension Info Keypad Autolock Display Contrast Extension Number Extension Name Use Hearing Aid Use No Hearing Aid Startup Song Play/Inhibit Advanced Features Predial Enable/Disable Push-to-talk Default Channel Subscribed Channels PTT Audio Volume PTT Tone Volume System Info Phone IP Address SVP IP Address Firmware Version 25
Data Entry and Editing Enter numbers by pressing the buttons on the keypad. The blinking underscore identifies the current cursor position. When entering alphanumeric strings, the CAPS/caps softkey will appear and may be pressed to toggle between upper and lower-case letters. Enter letters by repeatedly pressing the corresponding key until the desired letter displays on the screen. Use the CAPS softkey to change the case as needed.
Speakerphone Your system administrator can enable or disable the speakerphone mode. If the speakerphone is enabled, it is activated by pressing the Spkr softkey. Press the Spkr softkey again to end speakerphone mode. The audio then transfers to the handset earpiece. When speakerphone mode is disabled, Spkr will not appear as a softkey label. Predial Predial may be disabled in the Config Menu. Redial The Redl softkey is available in the standby mode.
Phonebook The phonebook in your SpectraLink 8020/8030 Wireless Telephone can store up to 20 user-defined numbers. Open the phonebook list by pressing the Phbk softkey from the standby mode or by pressing the Save softkey during predial. You may add, delete, or edit a phonebook entry, open the speed-dial list or start a call from the phonebook. The phonebook list is sorted alphabetically.
Phonebook Edit Entry Options If you want to Dial number Assign a speed-dial number to this entry Edit an entry Return to phonebook list Then Press START or the Spkr softkey. Press the Spdl softkey. Use the Nav keys to highlight an empty slot and then press NavOK. Press the Edit softkey to open the enter number display and edit the existing number. Press the Back softkey or NavOK. The SpectraLink 8020/8030 Wireless Telephone can assign up to 10 speed-dial keys to numbers entered into the phonebook.
You may also use the Nav keys to highlight a number or listing and then press START or the Spkr softkey to dial the number. The Exit softkey returns you to the standby mode. A phonebook entry may be assigned to a speed-dial key from the speeddial list. Select the speed-dial key that you wish to assign and then press the Set softkey to open the phonebook list. Use the search routine or the Nav keys to select the desired entry.
Push-to-talk (PTT) The PTT feature allows SpectraLink 8030 Series Wireless Telephones to operate in a group broadcast mode that allows the handsets to behave like walkie-talkies, where a single handset can transmit to multiple listeners.
Advanced Features If you want to Then End one PTT call and start another one Press the END key to exit the PTT call. Press and release the TALK button and select a different channel from the list. Press and hold the TALK button to begin transmitting on the different channel. Receive a PTT call while on a telephone call Press the END key to end the telephone call. Now you can hear the PTT call. Transmit on the priority channel Press and release the TALK button.
ACCESSORIES Accessories for the SpectraLink 8020/8030 Wireless Telephone include three different charger models, three different Battery Pack models, headsets and several carrying options. Battery Packs The Battery Packs must be recharged periodically. Each type of Battery Pack requires a different amount of time to achieve a fully charged state from a fully depleted state. Three Battery Pack options are available.
The Battery Pack can be changed while the call is still in progress. Do not press END. Quickly remove the discharged Battery Pack and replace with a charged Battery Pack, press END to turn the handset back on and then press START to resume the call. Notes on Battery Packs • Battery Pack life will vary depending on handset model and features and system infrastructure. • Maximum Battery Pack performance is achieved after a few charge/discharge cycles.
Place the Single or Dual Charger on a flat, horizontal surface. Plug the power supply into the charger and into an appropriate wall outlet. The Quad Charger may be mounted on a horizontal or vertical surface. Charging Status The handset display and the LED on the Dual and Quad Chargers indicate whether or not charging is occurring or completed or if a Battery Pack failure has been detected.* Handset/LED Charging Status Charging LED Solid On The Battery Pack in the handset is charging.
Single Charger 1 4 GHI 7 PQRS <* FCN 2 ABC 5 JKL 8 TUV 0 3 DEF 6 MNO 9 WXYZ #> LINE Accessories The Single Charger is designed to allow the handset to remain operational through speakerphone or headset use while the handset's Battery Pack is being charged. The handset may also be charged while it is in standby mode or turned off. Place the handset in the Single Charger facing forward. While the handset is charging in standby mode, it will display its extension number and Charging….
Dual Charger 1 4 GHI 7 PQRS <* FCN 2 ABC 5 JKL 8 TUV 0 3 DEF 6 MNO 9 WXYZ #> LINE LED indicator The Dual Charger is designed to charge the Battery Pack in the handset while it remains operational and also charge an additional Battery Pack in the rear charging bay. The handset has charging priority when both slots are occupied. Place the handset in the front slot, facing forward. The Battery Pack alone snaps into the charging bay as shown in the illustration.
Quad Charger The Quad Charger is designed to simultaneously charge four Battery Packs. It may be mounted on a horizontal or vertical surface. The Battery Pack snaps into the charging slot. The LED above the occupied bay indicates the charging status of the Battery Pack in the bay. Accessories A flashing LED may indicate a Battery Pack failure. Verify the condition of the Battery Pack by the following procedure before replacing it.
Carrying Options The following options are available for handset protection and easy handset carrying and removal. Belt clip: Spring-loaded plastic belt clip that attaches to the back of the handset. Swivel belt clip: Swivel-style belt clip that attaches to the back of the handset with full 360 degree swivel or eight-position ratchet options. Swivel carrying case: Black leather case with keypad cover and swivel-style quick release belt clip. Holster: Black holster with belt clip.
HANDSET ADMINISTRATION FAQs How does the handset power off and power on? The END key is the power on/power off key. Press and hold it to turn the handset on. Turn the handset off from the standby mode by pressing and holding the END key. If you are in an active call, end the call by pressing the END key. This returns the handset to the standby mode, then press END again to turn the handset off. How do I place a call and terminate a call? To place a call, press the START key and then dial the number.
What is the range of the SpectraLink 8020/8030 Wireless Telephone? As barriers affect radio transmission, there is no single answer for this question. Normally, you can expect the same range as with any other wireless device. However, if your facility has metal walls or other materials that inhibit radio waves, the range will be reduced.
What features (transfer, mute, etc.) are available and how are they activated? Active call features such as Mute and Hold are available by pressing the softkey programmed to the feature. Additional features, such as Transfer and Conference, are locally programmed and usually activated by pressing the FCN key and then the softkey that corresponds to the programmed feature. Contact your phone system administrator for detailed information on how to access these features in your facility.
Specifications Radio mode (set by system administrtator) 802.11b, 802.11g 802.11a 2.4–2.4835 GHz 5.150–5.250 GHz 5.250–5.350 GHz 5.470–5.725 GHz 5.725–5.825 GHz Transmission type Direct-sequence spread spectrum (DSSS) Transmit data rate Up to 54 Mb/s Radio QoS Wireless security SpectraLink Voice Priority (SVP) Wired Equivalent Privacy (WEP), 40-bit and 128bit; Cisco FSR; WPA-PSK, WPA2-PSK FCC certification Part 15.
Administration Notes: 44
INDEX A Accessories Battery Packs 33 Carrying options 39 Chargers 34 Headset 39 Active mode 8 Administration Care of handset 47 FAQs 40 Handset Operation Summary 15–20 Specifications 43 Answer call First line 17 Second line 18 Via headset 18 B Backlight 19 Battery Packs Charging 35–38, 41–42 Charging status 35 Dual Charger 37 Options 33 Quad Charger 38 Remove/replace 15 Single Charger 36 C Care of handset 47 Carrying options 39 Chargers Charging status 35 Cleaning the handset 47 Dual Charger 37 Quad Charg
Volume with 40 While charging 34, 36 Hold Place a call on 18 Softkey label 13 I Internal call 16 K Keypad Cleaning 42, 47 Cover 39 Illustration 2, 3 Lock 9, 11, 16 Unlock 14, 16 M Menu navigation 8 Modes of operation 8 Mute On status bar 11 Softkey label 13 Use of 19, 42 N Navigation 8 P Phonebook Call 17 Edit 19 Edit entry options 29 Features 28 List options 28 Open 13 Save to 27 Predial Use of 17, 27 Push-to-talk (PTT) Defined 31 Mode 8 Operation summary 31 R Range 41 Redial Softkey label 14 Use of
CARE OF YOUR HANDSET • • • • • • • • Avoid dropping the handset or knocking it against hard surfaces. Carrying the handset in a holster or carrying case will help protect it. There are no serviceable parts in the handset or chargers. You should not open the handset case or disassemble the chargers. Doing so will void your warranty. Turn off the handset and unplug chargers before you clean them. Take care not to exert undue pressure on charger electrical contacts while wiping.
Please contact your Polycom Authorized Reseller for assistance. Polycom, Inc. 4750 Willow Road, Pleasanton, CA 94588 http://www.polycom.com Copyright Notice Copyright © 2007, 2008 Polycom, Inc. All rights reserved under the International and pan-American Copyright Conventions.