
Owner's Manual


ASSEMBLY INSTRUCTIONS
MADE IN CHINA
2
4. Plug the adapter into the wall outlet (See Fig. B) and use the remote control to turn on the lights. This section
of your tree should now be lit. If some bulbs do not light or flicker, search for any loose plugs and/or broken,
loose or missing bulbs. Connect the plugs or replace the bad bulbs promptly in order to maintain the
performance and life expectancy of your pre-lit tree.
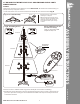
5. Allow branches to fall into place or gently pull up and out. When adjusting branches, be sure that all wires are
free of branch hinges. Begin to shape the branches and tips in the bottom section inserted into the tree
stand. Start with the tips closest to the middle of the tree; pull the individual tips alternately upward and
outward working your way to the tip of the branches (See Fig. C). Work row by row to the upper part of the
tree section leaving no tip untouched. Continue to shape each branch as described above as you set up each
tree section.
6. Find the next section, remove the protective cap, and insert the section into the bottom section. Turn the pole
of the section and make sure the pole is inserted into place. When properly inserted, you should see the
section light up (if you have already turned on the lights using your remote control). Continue this step and
step 5 until the entire tree is set up, lit, and ready to be decorated.
Top view
Side view
Fig. C
For Pre-lit Trees, If The Tree Does Not Illuminate
1. Check to make sure that all plugs and adapter are properly connected as indicated in Fig. B.
2. Turn the poles gently to make sure pole-to-pole connection is secured.
3. Check for loose, broken or missing bulbs, and replace as needed.
TROUBLESHOOTING TIPS
Each tree includes hinge pins/washers, and for pre-lit trees spare bulbs are also included.
If extra parts are needed, please contact our Customer Service Center at customerservice@balsamhill.com
SPARE PARTS
Fig. E
1. Unplug adapter from the wall outlet first and then remove all ornaments and decorations.
2. Disassemble the tree from the top to the bottom. Start with the tree top and gently lift straight up to remove
from section below and fold all branches toward the pole.
3. Continue by gently lifting each section straight up from the section below.
Fold all branches toward the pole until the bottom section is removed from
the tree stand. Cover the protective cap on the poles to avoid damaging the
internal parts. (See Fig. D)
4. Carefully place all tree sections into the storage bags within the shipping
box(es) and tape the box(es) shut.
5. When not in use, please store your tree in a cool, dry place away from sunlight. Exposing your tree to excessive
heat or humidity may damage your tree.
6. Keep out of reach of pets and children.
Fig. D
STORAGE INSTRUCTIONS
LOOSE BRANCHES
1. Extra hinge pins are included for repairing the hinges of
the branches. Place the branch into the slot of the bracket.
2. Insert a new hinge pin through the hole and secure using
the retainer washer. (See Fig. E)
CAUTION:
1. To reduce the risk of fire and electric shock:
a) Use only the power supply that was provided with this product;
b) Do not install on trees having needles, leaves or branch covering of metal or materials which look like metal, and
c) Do not mount or support strings in a manner that can cut or damage wire insulation.
2. Use only the adapter supplied with this product. Using a different adapter will damage the lights and may cause
fire, or electrical shock hazards.