
Installation Guide


10
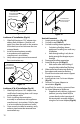
Lochinvar 2" installation (Fig.14)
1. Slide PolyPro pipe w/ PVC adapter into
oblong hole and down. Brackets will
point away from the wall, on the exterior
of the house, and rest between the two
outward beads.
2. Install the termination assembly
in accordance with appliance
manufacturer’s instructions.
3. Verify exhaust pipe cannot be removed
from termination cap.
Vertical Concentric
1. Locate penetration (Fig.16)
2. Cut hole in roof (Table 3)
3. Cut hole in ceiling above appliance
• Cut hole in all ceilings above
appliance if installing in a multi story
installation
• Hole through ceiling/s only has to
be big enough for the pipe to pass
through
4. Firestop each ceiling penetration
5. Attach ashing to roof (Fig.17)
• Slide storm collar onto ashing if
using the Adjustable Roof Flashing
6. Slide vertical termination into ashing
from above until seated on ashing
7. Plumb Termination and mount support
bracket to structure
8. Install gaskets into Co-Linear Adapter
(Fig.13)
9. Connect Co-Linear Adapter to
termination (Fig.18)
10. Install Poly Pro venting system to/from
Co-Linear Adapter to appliance
• If appliance only requires single vent
(exhaust) you may attach PolyPro
system directly to the inner pipe of
the termination assembly without
using the Co-Linear Adapter (Fig.18)
Figure 16
CENTERLINE OF
EXHAUST OUTLET
OF APPLIANCE
Lochinvar 3" & 4" installation (Fig.15)
1. Slide PolyPro Pipe w/ PVC adapter into
small hole of retaining plate until it stops
on the adapter collar
2. Finish installing the termination
assembly in accordance with appliance
manufacturer’s instructions. PolyPro pipe
is to be installed on the exhaust outlet.
3. Once securely installed to exterior, verify
exhaust pipe cannot be removed from
termination cap.
Figure 15
POLYPRO PIPE
W/PVC ADAPTER
SUPPLIED WITH
TERMINATION KIT
Figure 14
BRACKET
POLYPRO PIPE
W/PVC ADAPTER
SUPPLIED WITH
TERMINATION KIT