
- DOVETAIL JIG SUPPLEMENTARY INSTRUCTION MANUAL


6
THROUGH-DOVETAILS WITH CLAMPING BOARDS
You can use both the normal through-dovetail template (included with the 4212 Jig and the 4213 Accessory Kit),
and the miniature through-dovetail template (included with the 4215 Accessory Kit) with a clamping board.
NOTE: You can modify these clamping board methods to make box joints.
SETUP
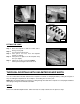
Step 1 -
Step 2 -
Make a clamping board 2" x 3" x 19". Make sure
that all four sides are square (You may need to
glue thinner sections of wood together and
plane them to make the 2" board).
Drill the pilot holes for #10 screws on the face of
the board as indicated in the drawing (Fig. 6A).
Remove the brackets from the template (Fig.
6B).
Align the lines of the template with the edges of
the clamping board. You should be able to see
the pilot holes in the elongated slot of the
template Fig. 6C).
Drive two #10 wood screws through the
elongated slots of the template into the
clamping board (Fig. 6D).
TEMPLATES MOUNTED TO CLAMPING BOARDS
You can mount the jig templates to clamping boards and take the templates to the workpiece to make the joint. The
benefits of this operation are:
1. You can maneuver a mounted template onto a large workpiece easier than clamping a large workpiece to the
jig. This process allows you to join boards wider than 12" by routing a part of the joint, sliding the mounted
template just past the original cut, and routing the remainder of the joint.
2. By using the clamping boards, you can rout boards that
are too short to clamp in the jig base, allowing you to
dovetail small decorative boxes.
3. You can make half-blind joints in thicker wood than the jig can handle.
4. You can make steeply-angled joints with the clamping boards.
5. You can make joints using a router table by inverting the mounted templates.
Fig. 4B
Fig. 4A
Fig. 4C
Step 3 -
Step 4 -
Step 5 -
WOOD GRAIN
DRILL PILOT HOLES
FOR #10 WOOD SCREWS
"13 "3
"1
"19
"2
"3
Fig. 6A