
Use and Care Guide


14
OPERATION
The belt/disc sander is designed to perform sanding
operations on surface, and edge grain. The sander
will also perform freehand forming and contouring
operations. The following suggestions are recommended
for best results and safest use.
1. Always apply light pressure allowing the abrasive to
remove the material slowly.
2. The workpiece should be moved, continuously, to
avoid burning.
3. Avoid sanding small pieces of wood which will posi-
tion the fingers close to the abrasive belt or disc.
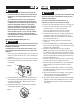
ON/OFF SWITCH (FIG. L)
To avoid injury, always keep the plug disconnected
from the power source and the switch turned OFF
until the sander is completely assembled and
adjusted properly.
The ON/OFF power switch is located on the front of the
sander, and incorporates a removable safety switch (1).
1. To turn the machine “ON”, move the switch up to the
“ON” position.
2. To turn the machine “OFF”, move the switch down to
the “OFF” position.
In situations where the sander may be left unattended,
the operator has the option of removing the “black”
safety portion of the ON/OFF switch to render the
sander inoperable. When the operator is ready to use
the machine again, the “black” safety portion of the
switch may be reinstalled simply by inserting it into the
opening in the switch and pushing it in until it “seats.”
Fig. L
CAUTION
!
WARNING
!
ON
OFF
REMOVE
TO LOCK
1
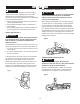
BELT HORIZONTAL SANDING (FIG. M)
To avoid trapping the workpiece or fingers between
the worktable and sanding belt, the worktable
edge should be positioned a maximum of 1/16 in.
(1.6 mm) from sanding belt.
When using the sanding belt in the horizontal position,
to perform surface or edge sanding, the belt worktable
(1) must always be used. Always hold the workpiece
(2) firmly keeping your fingers away from the sanding
belt . Always keep the end of the workpiece against the
belt worktable (1) and move the work evenly across the
sanding belt. Apply only enough pressure to allow the
sanding belt to remove material. Use extra caution when
sanding very thin pieces.
Fig. M
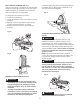
SANDING INSIDE CURVES (FIG. N)
To avoid injury, do not apply the end of the
workpiece to the idler drum (1). This could cause the
workpiece to fly up or cause kickback.
With care, freehand sanding of inside curves can be
accomplished on the idler drum (1). Never attempt to
sand the ends of a workpiece on the idler drum (1).
Fig. N
CAUTION
!
1
2
3
CAUTION
!
1