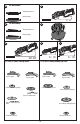
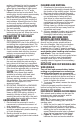
M 1/4 inch wheels P Threaded clamp nut Backing flange 5˚- 10˚ N 1/8 inch wheels Q 8 Threaded clamp nut 14 Backing flange 13 5˚- 15˚ 20˚-30˚ 4-1/2 inch (115mm) Grinding Wheels Type 27 guard S R O 5˚- 10˚ 4-1/2 inch (115mm) Sanding Flap Discs Type 27 guard Type 27 guard Unthreaded backing flange Type 27 guard Hubbed sanding flap disc Unthreaded backing flange Type 27 hubbed wheel Type 27 depressed center wheel non-hubbed sanding flap disc Threaded clamp nut Threaded clamp nut 10
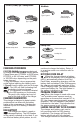
4-1/2 inch (115mm) Type 1 Cutting Wheels Wire Wheels Type 27 guard Type 1 guard Backing flange Type 27 guard Protector tipo 27 Type 1 guard Backing flange 3 inch wire cup brush 4 inch wire cup brush Sanding Discs abrasive cutting wheel diamond cutting whee Rubber backing pad Sanding disc Clamp nut Clamp nut Charging Procedure Threaded clamp nut PORTER-CABLE chargers are designed to charge PORTER-CABLE battery packs. Charge times are: PCC690L in 35-80 mins., PCC691L in 65-140 mins.
Always make sure the handle is tight. up mode which equals or balances the individual cells in the battery pack to allow it to function at peak capacity. Battery packs should be tuned up weekly or whenever the battery no longer delivers the same amount of work. To use the automatic tune-up mode, place the battery pack in the charger and leave it for at least 8 hours.
position. 5. REMOVING - To remove the guard, open the guard latch, rotate the guard so that the lugs on the guard (9) are aligned with the slots on the gear case cover, and pull up on the guard. Figure G Note: The guard is pre-adjusted to the diameter of the gear case hub at the factory. If, after a period of time, the guard becomes loose, tighten the adjusting screw (12) with latch in the closed position and guard installed on the tool.
button (3), tighten the threaded clamp nut with included wrench. 5. To remove the wheel, depress the spindle lock button and loosen the threaded clamp nut with included wrench. NOTE: If the wheel spins after the threaded clamp nut is tightened, check the orientation of the threaded clamp nut. If a thin wheel is installed with the pilot on the clamp nut against the wheel, it will spin because the height of the pilot prevents the clamp nut from holding the wheel. breakage and injury may result.
surface, allowing the tool to operate at CLEANING AND DISPOSAL high speed. Sanding rate is greatest 1. All surfaces in the work area should be when the tool operates at high speed. vacuumed and thoroughly cleaned daily for 3. Figure R - Maintain a 5˚ to 15˚ angle the duration of the sanding project. Vacuum between the tool and work surface. The filter bags should be changed frequently. sanding disc should contact approximately 2. Plastic drop cloths should be gathered one inch (25mm) of work surface.
wire cup brushes. 4. Maintain contact between the edge of the wheel and the work surface with wire wheels. 5. Continuously move the tool in a forward and back motion to avoid creating gouges in the work surface. Allowing the tool to rest on the work surface without moving, or moving the tool in a circular motion causes burning and swirling marks on the work surface. 6. Remove the tool from the work surface before turning the tool off. Allow the tool to stop rotating before setting it down.