
Use and Care Guide


13
6. Replace the table aligning nut (2) back
intot the place and tighten with the table
aligning bolt (1).
Fig. C
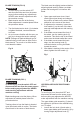
INSTALLING AND REMOVING BLADE
(FIG. D, E)
To avoid injury from accidental starting,
always turn the switch OFF and remove the
plug from the power source before moving,
replacing, or adjusting the blade.
Removing
1. Loosen the blade tension by turning the
blade tension knob (1) counterclockwise.
2. Open the upper and lower wheel cover
doors (2) by rotating the two wheel cover
lock knobs (3).
3. Remove the table aligning pad from the
table.
Fig. D
ASSEMBLY AND ADJUSTMENTS
Estimated Assembly Time: 50 - 60 minutes.
For your safety, never connect plug to power
source receptacle until all assembly and
adjustment steps are complete, and you have
read and understood the safety instructions.
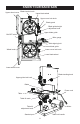
INSTALLING THE BAND SAW TABLE
(FIG. A, B, C)
1. Bag “D” - Loosen the table aligning
bolt (1) and remove the table aligning
nut (2) from the table.
2. Guide the table slot (3) over the saw
blade (4).
Fig. A
Fig. B
3. Place the table by aligning the slot (5) of
table tilt scale (6) with two pins (7) and
the teeth of the scale (6) engage with the
teeth of the table tilt adjustment knob (8)
as shown on Fig. C.
4. Bag “C” - Insert the table lock knob (9)
through the washer (10) and into the
hole (11).
5. Adjust the table by aligning the zero scale
mark to the scale pointer (12) and tighten
the table lock knob (9).
2
1
3
4
5
6
8
10
11
12
9
7
1
3
3
2
WARNING
!
WARNING
!