ESPAÑOL: PÁGINA 13 FRANÇAISE : PAGE 25 Instruction manual PALM NAILER MODEL PN650 MODEL PN650 with GLOVE To learn more about Porter-Cable visit our website at: http://www.porter-cable.com IMPORTANT Please make certain that the person who is to use this equipment carefully reads and understands these instructions before starting operations. The Model and Serial No. plate is located on the main housing of the tool. Record these numbers in the spaces below and retain for future reference. Model No.
Date of Manufacture:___________________________ Fecha de fabricación:, Date de fabrication: Serial No:______________________________________ Número de serie:, Nombre d'ordre 2
GENERAL SAFETY RULES DANGER: When using pneumatic tools, basic safety precautions should always be followed to reduce the risk of personal injury, including the following: READ AND FOLLOW ALL INSTRUCTIONS. There are certain applications for which this tool was designed. Porter-Cable strongly recommends that this tool NOT be modified and/or used for any application other than for which it was designed.
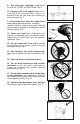
9. Use clean, dry, regulated, compressed air at 50 to 120 PSI, (3.4 to 8.3 BAR). Fig. 6. Fig. 6 10. Connect tool to air supply hose with a coupling that automatically removes all pressure from the tool when the coupling is disconnected. Fig. 7. 11. Disconnect tool from air supply hose before doing tool maintenance, clearing a jammed fastener, leaving work area, moving tool to another location, or handing the tool to another person. Fig. 7. Fig. 7 12.
EMPLOYER’S RESPONSIBILITIES DANGER: Employer must enforce compliance with the safety warnings and all other instructions contained in this manual. Keep this manual available for use by all people assigned to use this tool. For personal safety and proper operation of this tool, read and understand tool labels and manual. Failure to follow warnings could result in DEATH or SERIOUS INJURY. Read and follow all of these instructions carefully.
• • • DANGER: All air line components (hoses, connectors, filters, regulators, etc.) must have a minimum working pressure rating of at least 150 PSI (10.3 BAR) or 150% of maximum system potential, whichever is greater. Do not connect tool to pressure which potentially exceeds 200 PSI (13.7 BAR). Only connect tool to air supply hose with a coupling that automatically removes all pressure from the tool when the coupling is disconnected.
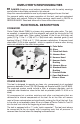
FINISH NAIL GUIDE ASSEMBLY 1. WARNING: Disconnect tool from air supply. 2. The finish nail guide (A) Fig. 17, for driving 1-1/4"(3d) to 2-1/2"(8d) finish nails, is provided with a rubber nose cushion (B) Fig. 17 that will reduce marring of the work surface. Assembly of the finish nail guide requires the use of the magnetic nail guide bushing supplied on the tool (Fig. 15). Fig. 17 C A A B B Fig. 18 3 To install finish nail guide, lay tool on its cap with nail guide pointing upward.
Fig. 19 A B A B Fig. 20 HAMMER ASSEMBLY 1. WARNING: Disconnect tool from air supply. 2. To install hammer attachments (A through D) Fig. 21 lay tool on its cap with nail guide pointing upward. Loosen and remove the magnetic nail guide and bushing (Fig. 15) using the 24mm open end wrench supplied. Remove the spring (C) Fig. 22, driver guide (F), three wave washers (D), magnetic driver guide and bushing from the driver blade (E) and place them in the carrying case for safe storage. C Fig.
Fig. 25 Fig. 26 E B C D 8. Align flats on hammer base with the slots in the hammer head guide bushing until the 30mm open end wrench will engage the flats (A) Fig. 27. Fig. 27 A 9. Engage the other 30mm open end wrench with the flats on hammer head as shown (B) Fig. 27 and tighten as securely as possible. B PREPARING THE TOOL 1. After reading and understanding this entire manual, connect tool to air supply. Fig. 28. DANGER: Never point tool at yourself or others in work area.
1. Attach appropriate nail guide or hammer attachment. 2. Orient nail (A) Fig. 29 with point down and and insert into the nail guide (B). B A 3. Position point of nail (A) Fig. 30 in the desired location and push down on the tool. The tool will began cycling and driving the fastener. Fig. 29 NOTE: Be sure to maintain constant hand pressure in line with the nail until the nail is fully seated.
CABLE/DELTA FACTORY SERVICE CENTER. All repairs made by these agencies are fully guaranteed against defective material and workmanship. We cannot guarantee repairs made or attempted by anyone other than these agencies. Should you have any questions about your tool, feel free to write us at any time. In any communications, please give your tool model and serial number. TROUBLESHOOTING WARNING: Disconnect tool from air supply before performing any Service Procedure. SYMPTOM 1. Air leak near top of tool. 2.
PORTER-CABLE LIMITED ONE YEAR WARRANTY Porter-Cable warrants its nailing and stapling tools for a period of one year from the date of original purchase. We will repair or replace at our option, any part or parts of the product and accessories covered under this warranty which, after examination, proves to be defective in workmanship or material during the warranty period.
PORTER-CABLE • DELTA SERVICE CENTERS (CENTROS DE SERVICIO DE PORTER-CABLE • DELTA) (CENTRE DE SERVICE PORTER-CABLE • DELTA) Parts and Repair Service for Porter-Cable • Delta Power Tools are Available at These Locations (Obtenga Refaccion de Partes o Servicio para su Herramienta en los Siguientes Centros de Porter-Cable • Delta) (Locations où vous trouverez les pièces de rechange nécessaires ainsi qu’un service d’entretien) ARIZONA Tempe 85282 (Phoenix) 2400 West Southern Avenue Suite 105 Phone: (602) 437-12