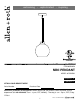
welcoming • sophisticated • inspiring E257480 ITEM #0760258 MINI PENDANT MODEL #CP52BNK Français p. 9 Español p. 17 ATTACH YOUR RECEIPT HERE Serial Number Purchase Date Questions, problems, missing parts? Before returning to your retailer, call out customer service department at 1-866-439-9800, 8 a.m. - 6 p.m., EST, Monday - Thursday, 8 a.m. - 5 p.m., EST, Friday. EB164 Lowes.
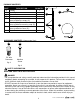
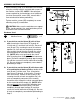
PACKAGE CONTENTS PART A B C D E F G H DESCRIPTION Canopy 6-inch Rod 12-inch Rod Fixture Mounting Strap (preassembled to canopy (A)) Mounting Strap Screw (preassembled to mounting strap (E)) Socket Ring (preassembled to fixture (D)) Glass Shade QUANTITY 1 1 3 1 1 A E F B E 2 C H 1 1 D G HARDWARE CONTENTS (shown actual size) AA E3 Wire Connector Qty. 3 BB Machine Screw Qty. 2 SAFETY INFORMATION READ AND SAVE THESE INSTRUCTIONS.
SAFETY INFORMATION DANGER • DO NOT connect the bare or green insulation fixture ground wire to the black (HOT) current-carrying wire or the white (NEUTRAL) house wire. Connection of the bare or green fixture ground wire to the black or white house wires may cause metal parts of the fixture to carry electrical currents. Under this condition anyone coming in contact with the fixture will receive electrical shock,G which could cause serious injury or death.
PREPARATION Before beginning assembly of product, make sure all parts are present. Compare parts with package contents list and hardware contents list. If any part is missing or damaged, do not attempt to install, operate or assemble the product.
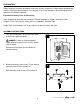
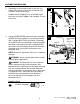
ASSEMBLY INSTRUCTIONS 3. Attach mounting strap (E) to outlet box (not included) using the existing washers and outlet box screws or the machine screws (BB). NOTE: If the outlet box screws required for your outlet box are of a different size than the machine screws (BB), consult with a licensed electrician before proceeding. 3 Outlet Box E Tighten machine screws (BB) completely to secure mounting strap (E) to outlet box. Washer CAUTION: Make sure the outlet box can support 35 lbs. hanging weight.
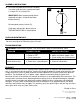
ASSEMBLY INSTRUCTIONS 5. Depending on the number of rods used, you may need to cut the excess wire. You will need at least 10 inches of wire to work with. 5 10 inches Prepare wire by stripping 3/4 in. of insulation from wire ends using wire strippers (not included). Tie wire into a knot. A A 6. Connect BARE/GREEN ground wire from outlet box to BARE wire from canopy (A) using wire connector (AA).
ASSEMBLY INSTRUCTIONS 7. Wrap electrical tape (not included) around each individual wire connector (AA) down to the wire. 7 Outlet Box WARNING: Make sure no bare wire or wire strands are visible after making connections. AA F AA AA 8. Carefully arrange excess wiring and wire connectors (AA) within canopy (A). 8 Outlet Box Align holes in edge of canopy (A) with screw holes at ends of mounting strap (E), then secure with mounting strap screws (F) previously removed (Step 2, page 4). E D A F 9.
ASSEMBLY INSTRUCTIONS 10. Install one standard-base bulb (not included). Use either a 60-watt max. incandescent bulb, a 13-watt CFL or a 6-watt LED. 10 D IMPORTANT: When replacing bulb, please allow bulb and glass shade to cool down before touching. Restore power and test fixture (D). If light does not function, please refer to TROUBLESHOOTING in section below. Bulb CARE AND MAINTENANCE • Shut off main power supply. Wipe fixture with soft, damp cloth. Use window cleaner to clean glass.