
Installation Guide
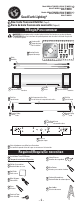
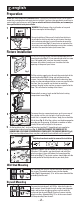
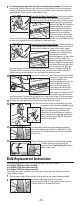
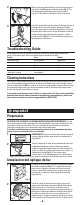
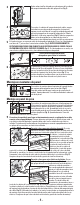
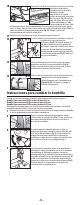

Fig. 1
Only these knock-outs need to be removed for installation
Preparation
Fixture Installation
Wall Stud Mounting
Drywall Mounting
english
Screw the machine screws into the threaded holes on the
mounting bracket (Fig. 1). If your mounting bracket has more
than 2 threaded holes, measure the center-to-center
distance of the holes to make sure it matches the hole
openings in the pan of your fixture.
Pull the existing supply wires through the center hole of the
mounting bracket (Fig. 2). Using your old electrical box
screws, secure the mounting bracket to the electrical box,
make sure the protruding machine screws are parallel to the
the floor. You may need to use the slots to mount the
universal bracket so the machine screws are parallel to the
floor. This will allow for leveling of the fixture.
To remove the wire compartment cover, push in near one of
the catches until the circular hole is free from the round
catch that is stamped into the fixtures’ body; there should be
4-6 of these (Fig. 4). All of the catches must be disengaged on
one side prior to removing. A flathead screwdriver or other
sturdy flat item will be helpful in this process.
Remove both screws at each end of the fixture’s wiring
compartment cover (Fig. 3).
On the backplate, the 1-inch round knock-out and the 2 T-shaped knock-outs need to be
removed for standard installation (Fig. 5). CAREFULLY REMOVE THE KNOCK-OUT BY
HAMMERING A FLATHEAD SCREWDRIVER OR PUNCH UNTIL THE SURFACE BREAKS (Fig. 6).
If the knock-out did not break free, use pliers and bend it back and forth until it snaps off.
Additional support may be needed for fixtures longer than
30 inches. If this applies, you should mark and install the
plastic anchors in your wall before final mounting of the
back-plate (Fig. 7). The plastic anchors should align with the
narrow portion of the keyhole slots in your back plate.
For mounting over the wall stud, drill two small pilot holes for
the screws. Screw both wood screws into the wooden
studs (Fig. 8). Approximately
1
/2 in. of the screw should still be
protruding from the wall.
For mounting into drywall, drill
3
/16 in. holes for the plastic
wall anchors. Insert the plastic wall anchors into the proper
holes and tap them into place so they are flush with the
surface of your drywall (Fig. 9). Screw all screws into the
plastic anchors. Approximately
1
/2 in. of the screw should
still be protruding from the wall.
ON
OFF
ON
OFF
ON
OFF
ON
OFF
ON
OFF
ON
OFF
ON
OFF
ON
OFF
ON
OFF
ON
OFF
ON
OFF
ON
OFF
ON
OFF
ON
OFF
2
DO NOT USE THIS FIXTURE WITH A DIMMING CIRCUIT. If you presently have dimmer controls, you will need to
remove them, and replace them with regular electrical switches. If you have a three way dimmer, you will have to
replace it with a regular three way switch. If you are unfamiliar with electrical installations, we recommend you
have a qualified electrician do your installation.
Remove the old fixture. Make yourself a sketch of how the fixture is
wired (index the sketch by wire color) or mark the wires themselves
with masking tape and a pencil so you will know how to connect the
wires to your new fixture (Fig. 2). If several wires are involved or if the
wiring seems more complicated and perhaps even includes a red wire,
take note of the connections before you disconnect them.
1
1
7
8
2
3
4
5
6
OFF
WARNING: Shut off power at the circuit breaker or fuse panel
before removing the old fixture (Fig. 1).
Fig. 1
Fig. 2
Fig. 2
Fig. 3
Fig. 4
Fig. 5
Fig. 6
Fig. 7
Fig. 8
Fig. 9
- 2 -