
Installation Guide

Bulb Replacement Instructions
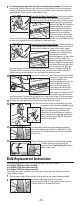
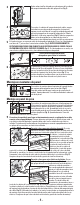
Grounding For Plastic Electrical Boxes: A copper ground wire
is pre-attached to your fixture housing. If your electrical box is
made of plastic and/or has a green, or has a bare copper
grounding wire inside, the fixture
grounding wire and the electrical
box ground wire should be
connected together using one of the
wire nuts. Pull the supply and
ground wires through the electrical
box cover (Fig. 12). Align the 2 outer
small holes of the cover and slide it
over the electrical box. Next, pull
the wires through central hole in the back of the fixture into the wire compartment (Fig. 13).
Using the washers and nuts, secure the bath bar back onto the electrical box cover plate.
Check to make sure your bath bar is level and tighten the mounting screws.
Connect the supply leads from the electrical box to the fixture
wire leads using the medium sized
wire nuts supplied in your
installation hardware kit as per the
illustration (Fig. 14). The black
leads from the fixture go to the
black supply lead and the white
leads from the fixture go to the
white supply lead. Tighten the wire
nuts properly to prevent the wires
from coming loose. Tape the wire nuts to the wires using electrical tape. Tuck the connected
wires into the wire compartment (Fig. 15). Place the compartment cover back on the fixture.
Re-attach the cover plate with the two (2) screws you removed in step 3.
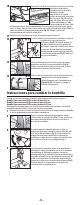
Slide the diffuser into the decorative end cap then position
the other end cap and secure with the
decorative finial (Fig. 19 and Fig. 20). Restore
power to the fixture.
Install the bulbs into the sockets by aligning the pins of the
bulb with the slot in the sockets (Fig. 16). Using
your thumbs and forefinger, press the metal
ends of the bulb socket, and roll the bulb
forward until it rotates 90 degrees inside the
socket, making contact between the bulb pins
and the socket contacts (Fig. 17). Repeat this
step for the other bulb.
You now need to attach one of the decorative end caps
which will hold one end of the diffuser (Fig. 18). Place the
end cap over the threaded tubing and secure in place with
the finial cap.
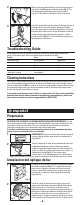
When bulb replacement is necessary, you must replace the bulb as follows:
24 in Bathbar F14T5 linear fluorescent bulb
36 in. Bathbar F21T5 linear fluorescent bulb
48 in. Bathbar F28T5 linear fluorescent bulb
These bulbs are readily available at your local home center, electrical distibutor, and most
larger hardware stores.
Shut off power supply. Allow sufficient time for bulbs to cool properly before handling.
Remove the decorative finial by unscrewing
counterclockwise (Fig. 1). Then remove the end cap and
slide out the diffuser to expose the bulbs.
9
10
1
2
11
12
13
14
Fig. 10
Fig. 11
Fig. 12
Fig. 13
Fig. 14
Fig. 15
Fig. 16
Fig. 17
Fig. 18
Fig. 1
Fig. 19
Fig. 20
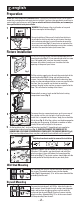
For safety and proper operation, your fixture must be properly grounded. First, determine
what kind of electrical box you have. The electrical box inside the wall must be covered
with the included electrical box cover. If you are unfamiliar with the methods of properly
grounding your fixture, consult a qualified electrician.
Grounding For Metal Electrical Boxes: If your electrical box is
metal, you will need to run the green wire attached to the
inside of the fixture through the cover plate and attach it to the
mounting bracket secured to the
electrical box (Fig. 10). Position the
electrical box cover and fixture
housing over the electrical box
screws and pull the supply wires
through the center hole of the
electrical box cover and the bath
bar wire compartment. Using the
washers and nuts, secure the bath bar back onto the electrical box cover plate (Fig. 11). Check
to make sure your bath bar is level and tighten the mounting screws.
- 3 -