
Installation Guide
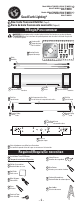
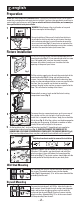
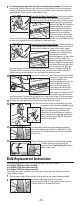
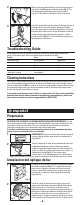
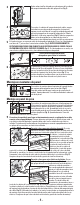
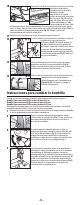
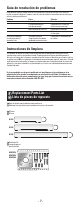
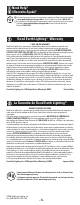

Fig. 1
español
Preparación
ON
OFF
ON
OFF
ON
OFF
ON
OFF
ON
OFF
ON
OFF
ON
OFF
ON
OFF
ON
OFF
ON
OFF
ON
OFF
ON
OFF
ON
OFF
ON
OFF
2
NO UTILICE ESTE APLIQUE DE LUZ SIN UN CIRCUITO REGULADOR DE INTENSIDAD. Si usted
tiene actualmente controles reguladores de intensidad, deberá retirarlos y reemplazarlos con
interruptores eléctricos normales. Si tiene un regulador de intensidad de tres posiciones,
tendrá que reemplazarlo con un interruptor normal de tres posiciones.
Si usted no está familiarizado con las instalaciones eléctricas, le recomendamos que haga
que un electricista calificado realice su instalación.
Quite el aplique de luz viejo. Haga un boceto de cómo está
cableado dicho aplique (indexe el dibujo por color de
cable) o marque los propios cables con cinta adhesiva de
pintor y un lápiz, para saber cómo conectar los cables a su
aplique de luz nuevo (Fig. 2). Si hay varios cables
involucrados o si el cableado parece más complicados y
quizás hasta incluye un cable rojo, anote las conexiones antes de desconectar los cables.
1
APAGADO
ADVERTENCIA: Corte el suministro eléctrico en el panel de
cortacircuitos o fusibles antes de quitar el aplique de luz
viejo (Fig. 1).
Fig. 1
Fig. 2
Instalación del aplique de luz
Enrosque los tornillos para metal en los agujeros roscados
del soporte de montaje (Fig. 1). Si su soporte de montaje
tiene más de 2 agujeros roscados, mida la distancia de
centro a centro de los agujeros para asegurarse de que
coincida con las aberturas de los agujeros del plato del
aplique de luz.
Tire de los cables de alimentación existentes a través del
agujero central del soporte de montaje (Fig. 2). Utilizando los
tornillos viejos de su caja eléctrica, sujete firmemente el
soporte de montaje a la caja eléctrica y asegúrese de que los
tornillos para metales que sobresalen estén paralelos al piso.
Es posible que tenga que usar las ranuras para montar el
soporte universal, siempre y cuando los tornillos para metales
estén paralelos al piso. Este permitirá nivelar el aplique de luz.
1
2
Fig. 2
Troubleshooting Guide
Minor problems often can be fixed without the help of an electrician. Before doing any work on the
fixture, shut off power supply at the circuit breaker panel to avoid electrical shock.
Problem Cause Solution
Fixture doesn’t light Bulb is defective Replace bulb
Power is off Check if power supply is on
Bad wire connection Check wire connectors
Bad switch Test or replace switch
Fuse blows or circuit breaker trips Crossed wires or power wire Check wiring connections
when light is turned on is grounded out
Cleaning Instructions
Your fixture is made from quality materials that will last for many, many years with minimum care. You
may want to periodically clean the diffuser, or interior of the fixture using a mild, non-abrasive glass
cleaner and soft cloth. Do NOT use solvents, or cleaners containing abrasive agents. When cleaning
the inside of the fixture, make sure you have the power turned off, and do not spray liquid cleaner
directly onto the bulb, socket, ballast, or wiring.
In the unlikely event that your fixture’s ballast, or lamp socket(s) fail, they can be replaced by a
qualified electrician. For further information regarding these replaceable parts, please have
your electrician contact our technical support number at 800-291-8838.
When replacing a defective bulb, use your thumbs to press
and roll the bulb 90 degrees inside the socket (Fig. 2). This
will disengage the bulb contact pins from the socket
contacts. Then slide the bulb pins out of the socket slot.
Install the new bulb(s) into the sockets by aligning the pins of
the bulb with the slot in the sockets. Using your thumbs,
press the metal ends of the bulb into the socket, and roll the
bulb toward the socket until it rotates 90 degrees inside the
socket, making contact between the lamp pins, and the
socket contacts (Fig. 3). Re-install the diffuser and end cap.
Restore power to the fixture.
3
4
Fig. 2
Fig. 3
- 4 -