
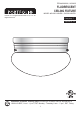
Installation Guide


1-1/4 in.
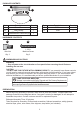
1
2
3
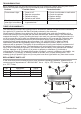
1. Screw 1-1/2 in. machine screws (BB) into the electrical
box until there is about 1-1/4 in. between the ceiling and
the underside of the screw head (Fig. 1).
With power disconnected to your electrical box, remove the old fixture. If your old fixture is attached to
an electrical box having more than two (2) wire leads, we suggest you use tape and markings to keep
track of which wires were attached to each other.
ASSEMBLY INSTRUCTIONS
BB
BB
BB
B
B
1-1/2 in.
Machine
Screw
BB
A
A
Hardware Used
x 2
1-1/2 in.
Machine
Screw
BB
Hardware Used
x 2
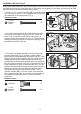
2.
To install the bulb socket (B), snap the metal socket
clip into the rectangular hole until you feel it lock into
place. Tug on the bulb socket (B) to make sure it is
properly locked onto the pan (A) (Fig. 2). Feed the bulb
socket (B) wires through the circular wire opening to the
backside of the fixture pan (A).
BB
AA
AA
AA
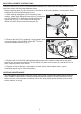
Wire Nut
x 1
3. For safety and proper operation, the fixture must be
properly grounded (Fig. 3). A green, or bare copper
ground wire is preassembled to the fixture pan (A). If the
electrical box is made of plastic, and has a green or bare
copper grounding wire inside, the fixture ground wire
must be spliced to the green ground wire in the electrical
box using one of the wire nuts (AA). If the electrical box is
metal, and does not have a visible ground wire, you can
assume that the metal electrical box and metal conduit is
already grounded at or near the circuit breaker panel.
The fixture pan (A) will be grounded via the 1-1/2 in.
machine screws (BB). If you are unsure if the electrical
box is properly grounded, or unfamiliar with the methods
of properly grounding the fixture, consult a qualified
electrician.
3