
Installation Guide


4
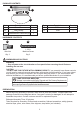
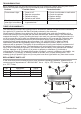
4. Connect the supply leads from the electrical box to the
fixture wire leads using the wire nuts (AA) (Fig. 4). The
black lead from the fixture pan (A) is spliced to the black
supply lead, and the white lead from the fixture pan (A) is
spliced to the white supply lead. Make sure the wire
nuts (AA) are tight. You can wrap electrical tape around
the wire nuts (AA) to prevent them from coming loose.
Carefully push the spliced wires back into the electrical
box.
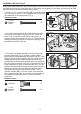
5. Position the fixture pan (A) over the electrical box so
that the 1-1/2 in. machine screws (BB) you installed in
Step 1 pass through the round openings of the keyhole
slots in the back of the fixture pan (A). When both 1-1/2
in. machine screws (BB) are through the keyholes, twist
the fixture pan (A) until the 1-1/2 in. machine screw (BB)
bodies are engaged in the narrower end of the keyhole
slot (Fig. 5). Hold the fixture pan (A) in place, and
tighten the 1-1/2 in. machine screws (BB).
6. Grasp the bulb (E) by the plastic base, and align the
pins on the bulb (E) with the bulb socket (B) (Fig. 6).
Rotate it clockwise approximately
1
/4
turn until the bulb
(E) base is secure in the bulb socket (B).
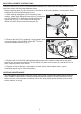
7. Back out all the preassembled diffuser thumb screws (C)
out about 3/8 in. to allow room to insert the diffuser (D) in
the fixture pan (A) (Fig. 7). Push the diffuser (D) up,
hold and tighten each of the diffuser thumb
screws (C) until the diffuser (D) is securely attached
to the fixture pan (A) (Fig. 9). Be careful not to drop
the diffuser (D) while tightening the diffuser thumb
screws (D). NOTE: Tighten all 3 diffuser thumb
screws (C) as equally as possible or the diffuser (D)
may be mounted off center.
Restore power to the electrical box to make sure your
fixture is working properly.
ASSEMBLY INSTRUCTIONS
AA
AA
AA
B
E
A
A
Hardware Used
AA
Wire Nut
x 2
A
D
A
C
BB
BB
5
6
7
4