
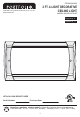
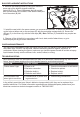
Installation Guide
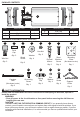


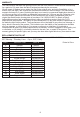

PACKAGE CONTENTS
HARDWARE CONTENTS (shown actual size)
Wire Nut
Qty. 3
AA
Qty. 2
Drywall
Anchor
FF
Qty. 4
Washer
DD
Qty. 4
Short
Machine
Screw
GG
Qty. 2
Wood
Screw
CC
Qty. 2
EE
Hex Nut
Qty. 1
Mounting
Plate
HH
(Not shown to size)
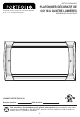
A
B
Fixture
Socket
1
8
D End Cap 2
E Light Shield 2
PART DESCRIPTION QUANTITY
PART DESCRIPTION QUANTITY
Grounding
Screw
JJ
Qty. 1
Qty. 2
Carriage
Bolt
II
(Not shown to size)
Finial
Cap
BB
Qty. 2
C Diffuser
1
GND
Qty. 4
KK
Spring
Clip
Qty. 4
LL
Star
Washer
Qty. 4
MM
Small
Screw
Qty. 1
NN
Support
Chain
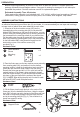
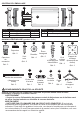
SAFETY INFORMATION
Please read and understand this entire manual before attempting to assemble, operate or
install the product.
WARNING
• Shut off power at the circuit breaker or fuse panel before removing the old fixture or
installing the new one.
CAUTION
• DO NOT USE THIS FIXTURE WITH A DIMMING CIRCUIT. If you presently have dimmer
controls, you will need to remove them and replace them with regular electrical switches. If you
have a three-way dimmer, you will have to replace it with a regular three-way switch. If you are
unfamiliar with electrical installations, it is recommended you have a qualified electrician do your
installation.
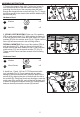
2
D
D
C
E
A
B
B
E