
Installation Guide


B
A
9
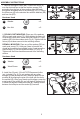
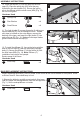
9. Install four 32-watt, 120-volt F32T8 fluorescent bulbs
(not included) (Fig. 9). Do not replace with any other
wattage of linear fluorescent bulb. Install the bulb into the
sockets (B) by aligning the pins of the bulb with the slot in
the sockets (B). Using your thumb and forefinger, press the
metal ends of the socket (B), and roll the bulb forward until
it rotates 90 degrees inside the socket (B), making contact
between the bulb pins and the socket (B) contacts.
ASSEMBLY INSTRUCTIONS
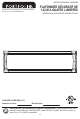
8. CEILING JOIST MOUNTING:
Place one of the washers
(DD) on each wood screw (CC). While holding the fixture (A)
in line with the pilot holes, screw the wood screws (CC) and
washers (DD) into the wooden studs (Fig. 8). Tighten until the
fixture (A) has been secured to the mounting surface.
DRYWALL MOUNTING:
Place one of the washers (DD) on
each wood screw (CC).
Hold your fixture in line with the
drywall anchors that were installed in step 2, and screw the
wood screws (CC) into the drywall anchors (FF) (Fig. 8).
Tighten until the fixture has been secured to the mounting
surface.
8
CC
DD
Washer
DD
x 2
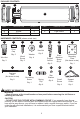
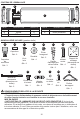
Hardware Used
Wood Screw x 2
CC
Hardware Used
Washer x 2
DD
Hex Nut x 2
EE
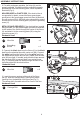
7. Remove the support chain (NN). Position the fixture (A)
over the electrical box so that the machine screws (GG)
protruding from the face of the mounting plate (HH) pass
through the elongated holes in the fixture (A) (Fig. 7). Secure
the fixture pan (A) to the electrical box with the washers (DD)
and hex nuts (EE).
DD
CC
FF
GG
DD
EEEE
GG
7
DD
B
A
9
GG
DD
EEEE
GG
7
DD
A
5