
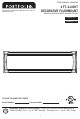
Installation Guide

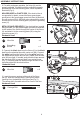


11
F
E
E
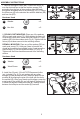
12
BB
C
D
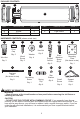
1
BB
C
1.
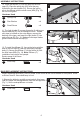
Expose the bulbs by carefully removing both finial caps
(BB) to release the endcaps/diffuser from the carriage bolts
(Fig. 1). Set the endcap/diffuser unit aside.
ASSEMBLY INSTRUCTIONS
BULB REPLACEMENT INSTRUCTIONS
KK
Spring Clip
Hardware Used
x 4
LL
Star Washer
x 4
MM
Small Screw
x 4
Before replacing the bulb(s), shut off power to the fixture at the circuit breaker or fuse panel. Allow
sufficient time for fixture and lamp to cool.
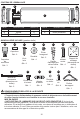
10. Place the diffuser (C) over the pegs on the end
caps (E). Place the spring clip (KK) over the peg
followed by the star washer (LL). Secure the spring
clip to the diffuser with the small screw (MM) (Fig. 12).
Do not over tighten.
11. The light shields (F) are pre-formed to fit within your
fixtures end cap (E). Do not change the form. Double
stick tape is located on the outer edges, remove the
backing of the tape, and insert the light sheild (F) into
each end cap (E) (Fig. 11). Make sure the tape makes
good contact with the end cap (E).
12. To install the diffuser (C), line up the holes at either
end on the end caps (E) with the protruding carriage
bolts (II). Secure the diffuser (C) to the fixture (A) with
the finial caps (BB) (Fig. 14). Note: Diffuser (C)
installation may require two people.
Restore power to the fixture.
BB Finial Cap
Hardware Used
x 2
BB Finial Cap
Hardware Used
x 2
10
KK
MM
LL
C
KK
6