
Installation Guide


WARNINGS AND CAUTIONS
SAVE THESE INSTRUCTIONS
DO NOT ATTEMPT TO ASSEMBLE THIS LAMP WHILE IT IS PLUGGED IN. THIS LAMP IS
FOR INDOOR USE ONLY.
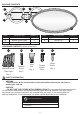
Wire Nut x 1
CC
Hardware Used
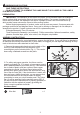
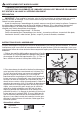
1.
Remove the appropriate knockouts on the back of the
fixture (A) that correspond to the positions of the
mounting ears on the electrical box (Fig. 1). This can be
done using a flathead screwdriver and pliers.
With power disconnected to your electrical box, remove the old fixture. If your old fixture is attached to
an electrical box having more than two (2) wire leads, we suggest you use tape and markings to keep
track of which wires were attached to each other.
PREPARATION
ASSEMBLY INSTRUCTIONS
IMPORTANT: The installation of this fixture will require you to provide a means of holding the
fixture in place while securing the fixture to the mounting surface. If no means of support for the
fixture can be provided, the installation will require 2 people to install–one to hold the fixture up,
while another person secures the fixture to the mounting surface.
Before beginning assembly of product, make sure all parts are present. Compare parts with
package contents list and diagram above. If any part is missing or damaged, do not attempt to
assemble the product. Contact customer service for replacement parts.
Estimated Assembly Time: 30 minutes
Tools Required for Assembly (not included) : Phillips screwdriver, flathead screwdriver, safety
glasses, electrical tape, pliers, wire cutters, wire strippers, step ladder.
A
1
2
AA
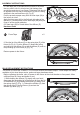
2. For safety and proper operation, the fixture must be
properly grounded (Fig. 2). A green, or bare copper ground
wire is preassembled to your fixture pan (A). If the electrical
box is made of plastic, and has a green or bare copper
grounding wire inside, the fixture ground wire must be
spliced to the green ground wire in the electrical box using
one of the wire nuts (AA). If the electrical box is metal, and
does not have a visible ground wire, you can assume that
the metal electrical box and metal conduit is already
grounded at or near your circuit breaker panel. The fixture
pan (A) will be grounded via the machine screws (DD). If
you are unsure if the electrical box is properly grounded, or
unfamiliar with the methods of properly grounding the
fixture, consult a qualified electrician.
AA
3