
Installation Guide


ASSEMBLY INSTRUCTIONS
BULB REPLACEMENT INSTRUCTIONS
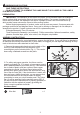
8.
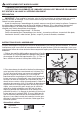
Foam tape (AA) is included with this fixture in the event
that you wish to use it to block minor light leakage from
around the perimeter of your fixture. Foam tape (AA) should
be applied to the top side of the diffuser (D) prior to it being
attached to the mounted fixture (A) (Fig. 8).
Peel the protective paper away from the foam tape (AA) a
few inches at a time.
Apply the foam tape (AA) to the flat back-side edge of the
diffuser (D), pressing down on the foam tape (AA) with your
finger to ensure proper adhesion.
Cut foam tape (AA) to fit each side of the diffuser (D).
This fixture (A) uses two 32 watt FC12T9 32 watt circline fluorescent lamps. These lamps are readily
available at your local home center, and most larger hardware stores.
Before replacing the bulbs, shut off power to the fixture at the circuit breaker or fuse panel. Allow
sufficient time for fixture and bulbs to cool.
AA
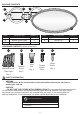
Hardware Used
8
9
D
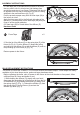
9. Rest the lip of the diffuser (D) on the spring clips (E) of the
fixture (A) (Fig. 9). Pivot the diffuser (D) toward the ceiling
and maneuver the diffuser (D) so that the diffuser (D) rests on
the protruding lip of the fixture (A) (Fig. 10).
Restore power to the fixture.
1.
While holding the diffuser (D) steady with one hand,
disengage the protruding lip of the fixture (A) from the lip
of the diffuser (D) by pushing the diffuser (D) away from
the spring clips (E) (Fig. 1). Unhook the diffuser (D) from
the spring clips (E) on the fixture (A) and set the
diffuser (D) aside (Fig. 2).
Foam Tape x 2
AA
A
D
E
E
10
D
2
A
D
E
E
1
D
5