
Installation Guide


2
Installation Instructions – LD4B/LD6B Commercial Recessed LED Rough-In
INSTALLATION
Rough-In Section
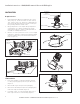
1. Fixture Attachment Method: Install fixture into ceiling
cavity using 1/2˝ electrical conduit. Use 3/4˝ channel,
1-1/2˝ channel, 1/8˝ x 1/2˝ bar stock, or T-bar fasteners
as mounting rails (furnished by others) by inserting the
through hanger brackets at both sides.
2. Hanger Adjustment Screw: Adjust hanger adjustment
screws (Figure 1.) so bottom of plaster ring is flush
with finished ceiling line. (Figure 2.) Hanger bracket is
reversible for total adjustment of 5˝.
3. Remove one of the junction box covers. Connect supply
lead wires to lead wires of driver as per Wiring Diagram
and in accordance with your local electrical code(s) or
N.E.C. (Figure 14.).
Trim Installation
1. Place end of flexible conduit through frame opening
in ceiling exposing upper portion of quick disconnect
(Figure 2.).
2. Remove LED engine from protective packaging.
3. Remove trim assembly from protective packaging and
rotate side clips (3) outwards. (Figure 4.).
4. Insert LED engine on to trim assembly. Align post on
LED engine with slot on trim assembly (Figure 5.).
Luminaire
Quick
Disconnect
Hanger
Adjustment
Screw
Junction Box Covers
Luminaire
Quick
Disconnect
LED Engine
Trim Assembly
Torsion
Springs
Installation Instructions – LD4B/LD6B Commercial Recessed LED Rough-In www.eaton.com
Side Clips
Figure 1
Figure 3
Figure 2
Figure 4
Figure 5
Figure 6