
Installation Guide


4
PREPARATION
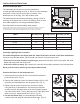
Before beginning assembly of the product, make sure that all parts are present. Compare parts
with package contents list and diagram on previous page. If any part is missing or damaged, do
not attempt to assemble the product. Contact customer service for replacement parts.
Estimated Assembly Time: 2 minutes
Tools Required for Assembly: none
ASSEMBLY INSTRUCTIONS
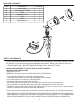
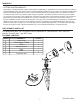
1. Carefully remove the fixture from its protective
packaging. (Fig. 1)
2. Attach the spike (F) and post (E) together by turning
the spike counter-clockwise. While attaching the
spike, make sure to secure the wire inside the post
so it does not get caught between the post and
spike’s threads.
3. Remove the lens cover (A) by turning
counter clockwise. (Fig. 1)
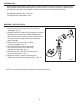
4. Insert the bulb (B) into the bulb socket.
Use a soft cloth, as oil from skin may
damage the lamp bulb. (Fig. 1)
5. Replace the lens cover (A) on the body (C)
by turning clockwise. (Fig. 1)
6. Adjust the fixture’s angle by loosening the
adjustment screw (D) and retightening it. (Fig. 1)
NOTE: The lens should point up and never towards the ground.
Fig. 1
D
C
G
F
E
B
A