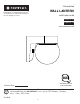
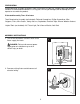
ITEM #1085700 WALL LANTERN PORTFOLIO® and PORTFOLIO & DesignTM are trademarks or registered trademarks of LF, LLC. All rights reserved. MODEL #WLL101BK Français p. 10 Español p. 19 ATTACH YOUR RECEIPT HERE APPROVED FOR USE IN WET LOCATIONS Purchase Date Questions, problems, missing parts? Before returning to your retailer, call our customer service department at 1-800-643-0067, 8 a.m. - 6 p.m., EST, Monday - Thursday, 8 a.m. - 5 p.m., EST, Friday.
TABLE OF CONTENTS Package Contents ............................................................................................................... 2 Hardware Contents .......................................................................................................................... 3 Safety Information ............................................................................................................... 3 Preparation ...........................................................................
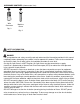
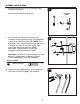
HARDWARE CONTENTS (shown actual size) AA Wire Connector BB Machine Screw Qty. 3 Qty. 2 SAFETY INFORMATION READ AND SAVE THESE INSTRUCTIONS. DANGER • For your protection and safety, carefully read and understand the information provided in this manual completely before attempting to assemble, install or operate this product. Failure to do so could lead to electrical shock, fire or other injuries that could be hazardous or even fatal.
SAFETY INFORMATION WARNING • All electrical connections must be in agreement with local codes and ordinances, the National Electric Code (NEC) and ANSI/NFPA 70-1999. Contact your municipal building department to learn about your local codes, permits and/or inspections. Risk of fire - most dwellings built before 1985 have supply wire rated for 140°F. Consult a qualified electrician before installation.
PREPARATION Before beginning assembly of product, make sure all parts are present. Compare parts with package contents list and hardware contents list. If any part is missing or damaged, do not attempt to install, operate or assemble the product.
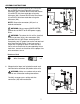
ASSEMBLY INSTRUCTIONS 3. Remove decorative nut (C) from threaded nipple on mounting strap (B). 3 Threaded Nipple Save decorative nut (C) for later use. C B 4. Attach mounting strap (B) to outlet box (not included) using the existing washers and outlet box screws or the machine screws (BB). NOTE: If the outlet box screws required for your outlet box are of a different size than the machine screws (BB), consult with a licensed electrician before proceeding.
ASSEMBLY INSTRUCTIONS 5b. Connect BARE/GREEN ground wire from outlet box to BARE wire from fixture (A) using wire connector (AA). Connect WHITE wire from fixture (A) to WHITE wire from outlet box using wire connector (AA). Connect BLACK wire from fixture (A) to BLACK wire from outlet box using wire connector (AA). 5b BLACK WHITE AA AA A NOTE: Screw wire connectors (AA) on in a clockwise direction. BARE WARNING: Never connect BARE/GREEN ground wire to WHITE or BLACK power supply wires.
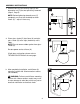
ASSEMBLY INSTRUCTIONS 7. Secure fixture (A) to mounting strap (B) with decorative nut (C) that was previously removed (Step 3, Page 5). 7 A NOTE: Before tightening decorative nut (C) completely, use level (not included) to check fixture (A) -- adjust if necessary. C B 8. Place glass shade (D) into fixture (A) and twist glass shade (D) to the right (clockwise) until it stops. NOTE: Do not remove rubber gasket from glass shade (D). 8 A Restore power and test fixture (A).
CARE AND MAINTENANCE • Shut off main power supply. Wipe fixture with soft, damp cloth. Use window cleaner to clean glass. Do not use an abrasive cleaner on glass or fixture. • Total wattage for this fixture is 10 watts; do not attempt to replace the LED. TROUBLESHOOTING WARNING: Before beginning work, shut off the power supply to avoid electrical shock. PROBLEM Light does not come on initially or no longer comes on. Fuse blows out or circuit breaker trips. POSSIBLE CAUSE 1. Power is OFF. 2.