
Installation Guide

3
PREPARATION
ASSEMBLY INSTRUCTIONS
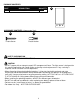
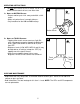
Determine the approximate location for the fixture
(A). Place fixture (A) against the wall and mark the
location of the hole using a pencil or a marker (not
included).
Set fixture (A) aside. Then, using a 1/8 in. drill bit
(not included), drill a pilot hole at the marked
location. Position plastic anchor (BB) in the pilot
hole. Gently tap plastic anchor (BB) with a
hammer (not included) until flush with wall
surface.
1
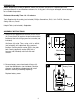
Remove battery cover from back of fixture (A).
Install four AA batteries (not included). Observe
diagram inside battery compartment to install
batteries correctly according to polarity.
Replace battery cover.
1.
2.
Before beginning assembly of product, make sure all parts are present. Compare parts with
package contents list and hardware contents list. If any part is missing or damaged, do not attempt
to assemble the product.
Estimated Assembly Time: 10 - 15 minutes
Tools Required for Assembly (not included): Phillips Screwdriver, Drill, 1/8 in. Drill Bit, Hammer,
Safety Glasses, Pencil
Helpful Tools (not included): Stepladder
A
Pilot Hole
BB
2
A
Battery
Battery Cover
AA
(backside)