
Use and Care Manual


18
BLADE CARE
For best results mower blades must be sharp.
Re place worn, bent or damaged blades.
CAUTION: Use only a replacement blade
approved by the manufacturer of your riding
mower. Using a blade not approved by the
manufacturer of your riding mower is hazard-
ous, could damage your riding mower and
void your warranty.
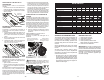
BLADE REMOVAL
1. Raise mower to highest position to allow
access to blade.
NOTE: Protect your hands with gloves and/
or wrap blade with heavy cloth.
2. Remove blade bolt by turning coun ter-
clock wise.
3. Install new or resharpened blade with
stamped "GRASS SIDE" facing the
ground.
IMPORTANT: To ensure proper as sem bly,
center hole in blade must align with star on
mandrel assembly.
4. Install and tighten blade bolt securely
(45-55 Ft. Lbs./ 62-75 Nm).
IMPORTANT: Special blade bolt is heat
treated.
0
2
5
4
5
Blade
Center Hole
Star
Mandrel
Assembly
Blade Bolt
(Special)
OPERATOR PRESENCE SYS TEM AND
REVERSE OPERATION SYSTEM (ROS)
Be sure operator presence and reverse
operation sys tems are work ing properly.
If your riding mower does not function as
described, repair the problem immediately.
• The engine should not start unless the
brake pedal is fully de pressed, and the deck
clutch lever is in the dis en gaged position.
CHECK OPERATOR PRESENCE SYSTEM
• When the engine is running, any attempt
by the op er a tor to leave the seat without
first setting the parking brake should shut
off the engine.
• When the engine is running and the deck
clutch lever is engaged, any attempt by
the operator to leave the seat should shut
off the engine.
• Never operate the deck clutch lever unless
you are seated in the seat.
ROS "ON"
Position
Engine "ON" Position
(Normal Operating)
RIDING MOWER
Always observe safety rules when per form ing
any main te nance.
BRAKE OPERATION
If riding mower requires more than four
(4) feet (1,21 m) to stop at highest speed
in high est gear on a level, dry concrete or
paved surface, then brake must be serviced
at your nearest authorized service center.
TIRES
• Maintain tire pressure at 12 psi (0,82 bar).
• Keep tires free of gasoline, oil, or insect
control chemi cals which can harm rubber.
• Avoid stumps, stones, deep ruts, sharp
objects and other hazards that may cause
tire damage.
NOTE: To seal tire punctures and pre vent
flat tires due to slow leaks, tire sealant may
be purchased from your local parts dealer.
Tire sealant also pre vents tire dry rot and
corrosion.
AXLE, SPINDLES, AND RACK AND
PINION
• Front wheel axles, front spindles, and rack
and pinion should be properly lubricated
with grease.
Wheel
Axle
Rack and Pinion
Spindle
CHECK REVERSE OPERATION (ROS)
SYSTEM
• When the engine is running with the ignition
switch in the engine "ON" position and the
deck clutch lever engaged, any attempt by
the operator to shift into reverse should
shut off the engine.
• When the engine is running with the ignition
switch in the ROS "ON" position and the
deck clutch lever engaged, any attempt by
the operator to shift into reverse should
NOT shut off the engine.
39
CÓMO USAR LA CORTADORA DE
CÉSPED
ACTIVACIÓN DEL FRENO DE ESTA-
CIONAMIENTO
La cortadora de césped está equipada con un
interruptor de detec ción de presencia del ope-
rador. Cuando el motor esté en funcionamiento,
cualquier intento del op er a dor de dejar el asiento
sin primero activar el freno de estacionamiento
apagará el motor.
1. Presione el pedal del freno completamente
hasta abajo y manténgalo presionado.
2. Jale y sostenga la palanca del freno de es-
tacionamiento hacia arriba, libere la presión
del pedal de freno y luego suelte la palanca
del freno de estacionamiento. El pedal debe
permanecer en posición de frenado. Ase-
gúrese de que el freno de estacionamiento
mantendrá detenida la cortadora de césped.
La op er a ción de cualquier cortadora de césped puede causar que entren objetos ex-
traños en los ojos, lo que puede provocar un dañ o severo en los mismos. Use siem pre
len tes de seguridad o protecciones oculares mientras esté op er an do la cortadora de
césped o rea lizan do cualquier a just e o reparación. Se rec om ienda usar una careta
de segu ridad de vis ión amplia sobre los an te ojos o lent es de seguridad están dar.
PARADA
CUCHILLA DE LA CORTADORA DE CÉSPED -
• Para detener la cuchilla de la cortadora de
césped, mueva la palanca del embrague de la
plataforma a la po si ción de “desenganchado.
IMPULSIÓN DE RECORRIDO -
• Para parar el mecanismo impulsor, presione el
pedal del freno completamente.
• Mueva la palanca de control de movimiento a
la posición de neutro.
MOTOR -
• Mover la palanca de mando entre la posición
de velocidad media y máxima (rápida).
AVISO:Si no se mueve la palanca de mando
entre la posición de velocidad media y máxima
(rápida), antes de pararse, se puede causar un
“retorno de llama” del motor.
• Gire la llave de ignición a la posición de apaga-
do “STOP” y remueva la llave al abandonar
el cortadora de césped para evitar el uso no
autorizado.
IMPORTANTE: Dejando el interruptor de la
ignición en cualquier posición otra que “STOP”
causar i que la batería se descargue (muerta).
AVISO: Bajo ciertas condiciones, cuando el
cortadora de césped está parado con el motor
andando en vacío, los gases de escape del motor
caliente pueden hacer que el césped se ponga
“café.” Para eliminar esta posibilidad, siempre
pare el motor cuando pare el cortadora de césped
en áreas con césped.
PRECAUCIÓN: Siempre pare el cortadora
de césped completamente, según se ha descrito
anteriormente, antes de abandonar la posición
del operador.
( ) “Desenganchado”
(Disengaged)
( ) “Enganchado”
(Engaged)
Palanca de control de movimiento
Control De
Aceleración