TROUBLESHOOTING - See appropriate section in manual unless directed to an authorized Service Center. PROBLEM CAUSE CORRECTION Grass catcher 1. not filling 2. (If so equipped) 3. Cutting height too low. Lift on blade worn off. Catcher not venting air. 1. Raise cutting height. 2. Replace blade. 3. Clean grass catcher. Hard to push Grass is too high or wheel height is too low. Rear of lawn mower housing or cutting blade dragging in grass. Grass catcher too full. Handle height position not right for you.
TROUBLESHOOTING TABLE OF CONTENTS Safety Rules ..................2-4 Assembly.....................6-10 Operation ..................11-16 Maintenance..............17-19 Service and Adjustments ...................20 Storage ......................21-22 Troubleshooting ........23-24 SAFETY RULES IMPORTANT: This cutting machine is capable of amputating hands and feet and throwing objects. Failure to observe the following safety instructions could result in serious injury or death.
STORAGE NOTE: Fuel stabilizer is an acceptable alternative in minimizing the formation of fuel gum deposits during storage. Add stabilizer to gasoline in fuel tank or storage container. Always follow the mix ratio found on stabilizer container. Run engine at least 10 minutes after adding stabilizer to allow the stabilizer to reach the carburetor. Do not drain the gas tank and carburetor if using fuel stabilizer.
STORAGE SAFETY RULES • Remove gas-powered equipment from the truck or trailer and refuel it on the ground. If this is not possible, then refuel such equipment with a portable container, rather than from a gasoline dispenser nozzle. • Keep the nozzle in contact with the rim of the fuel tank or container opening at all times until fueling is complete. Do not use a nozzle lock-open device. • If fuel is spilled on clothing, change clothing immediately. • Never overfill fuel tank.
THINGS TO KNOW BEFORE YOU ASSEMBLE OR OPERATE YOUR LAWN MOWER SERVICE AND ADJUSTMENTS CAUTION: Before performing any service or adjustments: • Release operator presence control bar. • Make sure the blade and all moving parts have completely stopped. • Disconnect spark plug wire from spark plug and place wire where it cannot come in contact with plug.
NOTE: Depending upon the features on the lawn mower model you purchased, all the parts shown may not be included with your mower. For ease of assembly, aside of your work area, lay out all hardware in the groups shown. ASSEMBLY LOCATION PARTS BAG CONTENTS (SHOWN ACTUAL SIZE) For models with bolt-on wheels only: WHEELS TO MOWER HOUSING (4) Shoulder Bolts 3/8-16 x 2-1/2 (4) Locknuts 3/8-16 (2) Washers 1-1/4" Dia. (4) Spacers GUARD TO MOWER HOUSING (2) Washers 3/4" Dia.
ASSEMBLY MAINTENANCE LAWN MOWER Always observe safety rules when performing any maintenance. TIRES • Keep tires free of gasoline, oil, or insect control chemicals which can harm rubber. • Avoid stumps, stones, deep ruts, sharp objects and other hazards that may cause tire damage. 5. Use block of wood between blade and lawn mower housing and tighten the blade bolt, turning clockwise. • The recommended tightening torque is 35–40 ft. lbs. (47–54 Nm). IMPORTANT: Blade bolt is heat treated.
ASSEMBLY MAINTENANCE INSTALL REAR WHEELS (HIGH WHEEL MOWERS ONLY) Some high wheel models require washers which will be provided in a parts bag. If provided, install washers on the axle first as shown. • Install one (1) rear wheel on the axle of rear wheel adjuster. • Install 3/8-16 locknut and tighten securely. • Repeat procedure for other rear wheel. ALL HANDLES • Raise upper handle section into place on lower handle, remove protective padding and tighten both handle knobs.
OPERATION MOWING TIPS CAUTION: Do not use de-thatcher blade attachments on your mower. Such attachments are hazardous, will damage your mower and could void your warranty. • Under certain conditions, such as when mowing very tall grass, raise the mower height on the first cut to reduce pushing effort, to avoid overheating the engine, and to avoid leaving clumps of grass clippings. Make the second cut to the desired height. • For extremely heavy cutting, reduce the width of cut.
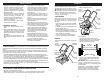
OPERATION ASSEMBLY SPARK PLUG BOOT On some models a spark plug boot is packed loose in the parts bag. If your model has the boot, install on spark plug wire and reconnect spark plug wire to spark plug. Spark plug Boot UNITS WITH DECK-MOUNTED BATTERY: • After charging, connect engine connector (male) to battery connector (female). Your engine has an integral alternator for partial charging. Connect your battery charger to charge battery as required.
OPERATION CAUTION: Do not run your lawn mower without rear mulcher plate or plug in place or approved grass catcher in place. Never attempt to operate the lawn mower with the rear door removed or propped open. OPERATION Use ear The operation of any lawn mower can result in foreign objects protecthrown into the eyes, which can result in severe eye damage. tors to Always wear safety glasses or eye shields while operating your avoid lawn mower or performing any adjustments or repairs.
OPERATION FOR MULCHING MOWERS ONLY OPERATION MULCHER PLUG BUILT INTO REAR DOOR Most mulching mowers are shipped ready to be used as a mulcher. “REAR DISCHARGE ONLY” MOWERS Some models have a seperate mulcher plug, other models have the mulcher plug built into the rear door. To convert to bagging or discharging, the plate or plug (if so equipped) must be removed from the discharge opening of the lawn mower. • Open rear door and remove mulcher plate or plug (if so equipped).
OPERATION FOR MULCHING MOWERS ONLY OPERATION MULCHER PLUG BUILT INTO REAR DOOR Most mulching mowers are shipped ready to be used as a mulcher. “REAR DISCHARGE ONLY” MOWERS Some models have a seperate mulcher plug, other models have the mulcher plug built into the rear door. To convert to bagging or discharging, the plate or plug (if so equipped) must be removed from the discharge opening of the lawn mower. • Open rear door and remove mulcher plate or plug (if so equipped).
OPERATION CAUTION: Do not run your lawn mower without rear mulcher plate or plug in place or approved grass catcher in place. Never attempt to operate the lawn mower with the rear door removed or propped open. OPERATION Use ear The operation of any lawn mower can result in foreign objects protecthrown into the eyes, which can result in severe eye damage. tors to Always wear safety glasses or eye shields while operating your avoid lawn mower or performing any adjustments or repairs.
OPERATION ASSEMBLY SPARK PLUG BOOT On some models a spark plug boot is packed loose in the parts bag. If your model has the boot, install on spark plug wire and reconnect spark plug wire to spark plug. Spark plug Boot UNITS WITH DECK-MOUNTED BATTERY: • After charging, connect engine connector (male) to battery connector (female). Your engine has an integral alternator for partial charging. Connect your battery charger to charge battery as required.
OPERATION MOWING TIPS CAUTION: Do not use de-thatcher blade attachments on your mower. Such attachments are hazardous, will damage your mower and could void your warranty. • Under certain conditions, such as when mowing very tall grass, raise the mower height on the first cut to reduce pushing effort, to avoid overheating the engine, and to avoid leaving clumps of grass clippings. Make the second cut to the desired height. • For extremely heavy cutting, reduce the width of cut.
ASSEMBLY MAINTENANCE INSTALL REAR WHEELS (HIGH WHEEL MOWERS ONLY) Some high wheel models require washers which will be provided in a parts bag. If provided, install washers on the axle first as shown. • Install one (1) rear wheel on the axle of rear wheel adjuster. • Install 3/8-16 locknut and tighten securely. • Repeat procedure for other rear wheel. ALL HANDLES • Raise upper handle section into place on lower handle, remove protective padding and tighten both handle knobs.
ASSEMBLY MAINTENANCE LAWN MOWER Always observe safety rules when performing any maintenance. TIRES • Keep tires free of gasoline, oil, or insect control chemicals which can harm rubber. • Avoid stumps, stones, deep ruts, sharp objects and other hazards that may cause tire damage. 5. Use block of wood between blade and lawn mower housing and tighten the blade bolt, turning clockwise. • The recommended tightening torque is 35–40 ft. lbs. (47–54 Nm). IMPORTANT: Blade bolt is heat treated.
NOTE: Depending upon the features on the lawn mower model you purchased, all the parts shown may not be included with your mower. For ease of assembly, aside of your work area, lay out all hardware in the groups shown. ASSEMBLY LOCATION PARTS BAG CONTENTS (SHOWN ACTUAL SIZE) For models with bolt-on wheels only: WHEELS TO MOWER HOUSING (4) Shoulder Bolts 3/8-16 x 2-1/2 (4) Locknuts 3/8-16 (2) Washers 1-1/4" Dia. (4) Spacers GUARD TO MOWER HOUSING (2) Washers 3/4" Dia.
THINGS TO KNOW BEFORE YOU ASSEMBLE OR OPERATE YOUR LAWN MOWER SERVICE AND ADJUSTMENTS CAUTION: Before performing any service or adjustments: • Release operator presence control bar. • Make sure the blade and all moving parts have completely stopped. • Disconnect spark plug wire from spark plug and place wire where it cannot come in contact with plug.
STORAGE SAFETY RULES • Remove gas-powered equipment from the truck or trailer and refuel it on the ground. If this is not possible, then refuel such equipment with a portable container, rather than from a gasoline dispenser nozzle. • Keep the nozzle in contact with the rim of the fuel tank or container opening at all times until fueling is complete. Do not use a nozzle lock-open device. • If fuel is spilled on clothing, change clothing immediately. • Never overfill fuel tank.
STORAGE NOTE: Fuel stabilizer is an acceptable alternative in minimizing the formation of fuel gum deposits during storage. Add stabilizer to gasoline in fuel tank or storage container. Always follow the mix ratio found on stabilizer container. Run engine at least 10 minutes after adding stabilizer to allow the stabilizer to reach the carburetor. Do not drain the gas tank and carburetor if using fuel stabilizer.
TROUBLESHOOTING TABLE OF CONTENTS Safety Rules ..................2-4 Assembly.....................6-10 Operation ..................11-16 Maintenance..............17-19 Service and Adjustments ...................20 Storage ......................21-22 Troubleshooting ........23-24 SAFETY RULES IMPORTANT: This cutting machine is capable of amputating hands and feet and throwing objects. Failure to observe the following safety instructions could result in serious injury or death.
TROUBLESHOOTING - See appropriate section in manual unless directed to an authorized Service Center. PROBLEM CAUSE CORRECTION Grass catcher 1. not filling 2. (If so equipped) 3. Cutting height too low. Lift on blade worn off. Catcher not venting air. 1. Raise cutting height. 2. Replace blade. 3. Clean grass catcher. Hard to push Grass is too high or wheel height is too low. Rear of lawn mower housing or cutting blade dragging in grass. Grass catcher too full. Handle height position not right for you.