
Operating Guide
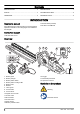

2. Press the power button until the light is on.
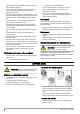
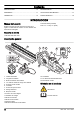
3. Hold the front handle with your left hand and the rear
handle with your right hand. Squeeze the front
lockout button.
4.
Squeeze the trigger to operate.
• Squeeze the trigger lightly for lower speed.
• Squeeze the trigger more for higher speed.
5. Use the product.
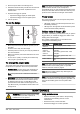
To cut the hedge
• Move the product from the bottom up when you cut
the sides.
•
Point the motor away from the hedge.
•
Hold the product as near to your body as possible for
the correct balance.
• Make sure that the point of the blade does not touch
the ground.
• Do not cut too quickly. Cut slowly and continuously
until you get a good quality cut.
To change the power mode
The power mode of the product can be changed while
the product is in operation. There are 2 power modes:
1. Standard mode - Saves energy and maximizes run
time. Standard mode is applicable for most tasks.
Note: The product is set to Standard mode when
started.
2. Boost mode - The product operates at high speed in
Boost mode. Boost mode runs at maximum power
for tasks that are not easy. To start Boost mode,
push the Boost mode button until the light is on. To
stop Boost mode, push the Boost mode button until
the light is off.
Note: If the trigger is released during operation, the
product starts in the last mode. If the product
automatically stops, or if the operator pushes the power
button, the last used mode is erased from memory. The
product is set to Standard mode again when started.
Power meter
The power meter shows how much power the product
uses during operation.
• LED lights 4 and 5 show the best performance and
best battery efficiency.
•
LED light 6 on the right side shows maximum power
and the minimum battery efficiency.
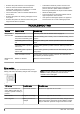
Battery state of charge LED
The status of the battery pack is shown until you pull the
trigger. When you release the trigger, the status of the
battery pack is shown again.
The number of LEDs that are on show the current
charge level of the battery pack.
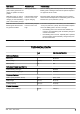
LED lights Battery status
All Green LEDs
come on
Fully Charged (100% - 76%)
LED 1, 2 and 3
come on
The battery pack is 75% - 51%
charged.
LED 1 and 2
come on
The battery pack is 50% - 26%
charged.
LED 1 comes on The battery pack is 25% - 6%
charged.
LED 1 flashes The battery pack is 5% - 0% charg-
ed.
Note: If the motor stops and the power LED stays on,
push the button on the battery pack. For possible
solutions, see
Error codes on page 8
.
Note: When the battery pack is fully discharged, the
motor stops immediately.
Note: The motor automatically stops if the battery pack
or motor controller is too hot during heavy operation. Let
the motor and battery pack cool. The product then
resets.
MAINTENANCE
WARNING: Read and understand the safety
chapter before you clean, repair or do
maintenance on the product.
Daily maintenance
• Remove the battery pack. Refer to the operating
instructions of the battery pack for correct
maintenance.
•
Examine the nuts, screws and bolts.
• Examine the trigger for correct operation.
398 - 002 - 20.11.2017 7