
Full Product Manual


14
HOW TO OPERATE THE LAWN MOWER
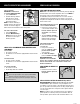
DRIVE CONTROL (IF EQUIPPED)
DRIVE CONTROL LEVER(S)
1. Self-propelling is controlled by
holding the Operator Presence
Control Bar down to the handle
and pulling the Drive Control
Lever(s) rearward to the
handle. The further toward the
handle the lever is pulled, the
faster the machine will travel.
2. To stop forward motion without stopping the engine, release the
Drive Control Lever(s) or handle only. Hold the Operator Presence
Control Bar down against the handle to continue mowing without
self-propelling.
DRIVE CONTROL HANDLE
1. Self-propelling is controlled by
holding the Operator Presence
Control Bar down to the handle
and pulling the Drive Control
Handle to the handle.
2. To stop forward motion without
stopping the engine, release the
Drive Control Handle. Hold the
Operator Presence Control
Bar down against the handle to continue mowing without self-
propelling.
NOTE: After releasing the drive control if the mower will not roll
backwards, push the mower forward slightly to disengage the drive
wheels.
TO CONVERT MOWER
Your lawn mower may have been shipped ready to be used as a
mulcher. To convert to bagging or discharge modes:
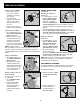
EZ STORE (IF EQUIPPED)
1. Push the Operator Presence
Control Bar forward.
2. Lift handle. This will allow easy
removal and replacement of the
Grass Catcher.
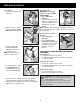
REAR BAGGING
1. Lift rear door of the lawn mower.
2. Ensure that the rear door
locks into the EZ Bag Access
(IF EQUIPPED).
3. Place the Grass Catcher frame
hooks onto the grass bag
brackets.
NOTE: For clarity, rear door is
not shown.
4. Rear door will release from the
EZ Bag Access (IF EQUIPPED)
and rest on Grass Catcher.
6. Ensure that rear door covers any gap between mower deck and
bagging unit.
7. To convert to mulching or discharging operation, remove Grass
Catcher and close the rear door.
1
1
3
3
4
1
1
2
16
´
• Accione la Palanca de seguridad.
• Empuñe con fi rmeza el Retráctil de arranque y tire
del cable sin esfuerzo.
• Deslice la cuerda de arranque por el bucle
de la manija superior.
• Ajuste la tuerca mariposa.
IMPORTANTE: Antes de encender
la cortadora de pasto asegúrese de leer
los manuales de propietario y las advertencias de seguridad
incluidos en la caja del producto.
3. AGREGADO DE GASOLINA
Llene el tanque de combustible por debajo del cuello
de llenado
del tanque. NO llene en exceso. Use gasolina nueva,
limpia
y regular sin plomo con un mínimo de 87 octanos.
NO mezcle
el aceite con la gasolina. Compre el combustible en
cantidades
que puedan usarse en un período de 30 días para
garantizar
que el combustible sea nuevo.
PREPARACIÓN DEL MOTOR ANTES DEL ARRANQUE
2. COMPRUEBE EL NIVEL DE ACEITE DEL MOTOR
• Asegúrese que la podadora esté nivelada.
• Retire la varilla indicadora del nivel de aceite del pico de llenado.
• Vierta lentamente el aceite. NO llene en exceso.
• Inserte y ajuste la varilla indicadora del nivel de aceite.
IMPORTANTE: Compruebe el nivel de aceite antes de cada uso.
Agregue aceite si es necesario. Rellene hasta la línea “Full” (Lleno) de la
varilla indicadora del nivel de aceite.
´
ENSAMBLE RÁPIDO
13
4. ENCENDIDO DE MOTOR
• Mantenga presionada la palanca de seguridad
contra el manubrio.
• Empuñe con fi rmeza el retráctil de arranque
y tire del cable rápidamente.
• La podadora deberá de estar lista para cortar
el pasto.
• Para detener el motor suelte la palanca
de seguridad.
manual 22.indd Pliego 13 de 14 - Páginas (16, 13)manual 22.indd Pliego 13 de 14 - Páginas (16, 13) 01/12/21 14:5801/12/21 14:58
5.
6.