ENGLISH R Instruction Manual Manual de Instrucciones Manuel d’Instructions PP446T ESPAÑOL For Occasional Use Only Electrolux Home Products, Inc. 104 Warren Road Augusta, GA 30907 Copyright E2004 Electrolux Home Products, Inc. 530165221 7/16/04 FRANÇAIS WARNING: Read and follow all Safety Rules and Operating Instructions before using this product. Failure to do so can result in serious injury. ADVERTENCIA: Lea el manual de instrucciones y siga todas las advertencias e instrucciones de seguridad.
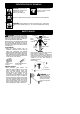
IDENTIFICATION OF SYMBOLS DANGER! This pruner can be dangerous! Careless or improper use can cause serious or even fatal injury. Read and understand the instruction manual before using the pruner. Always wear appropriate ear protection, eye protection and head protection. DANGER! Falling objects can cause severe head injury. Wear head protection when operating this unit. Do not stand beneath branch being cut.
S Do not handle or operate a pruner when you are fatigued, ill, or upset, or if you have taken alcohol, drugs, or medication. You must be in good physical condition and mentally alert. If you have any condition that might be aggravated by strenuous work, check with doctor before operating a pruner. S Do not operate the pruner with one hand. Serious injury to the operator, helpers, bystanders or any combination of these persons may result from one-handed operation. A pruner is intended for two-handed use.
MAINTAIN YOUR UNIT IN GOOD WORKING ORDER S Always store gasoline in a container approved for flammable liquids. S Disconnect the spark plug before performing maintenance except carburetor adjustments. S Look for and replace damaged or loose parts before each use. Look for and repair fuel leaks before use. Keep in good working condition. S Make certain the chain stops moving when the throttle trigger is released. For correction, refer to CARBURETOR ADJUSTMENTS.
S Watch for shifting of wood or other forces that could close a cut and pinch or fall into chain. S Use the Reduced--Kickback Guide Bar and Low--Kickback Chain specified for your unit. S Low--Kickback Chain, designed with a contoured depth gauge and guard link which deflect kickback force and allow wood to gradually ride into the cutter.
S Check air intake opening, blower tubes or vacuum tubes frequently, always with engine stopped and spark plug disconnected. Keep vents and discharge tubes free of debris which can accumulate and restrict proper air flow. S Never place any object in air intake opening as this could restrict proper air flow and cause damage to the unit. S Never use for spreading chemicals, fertilizers, or other substances which may contain toxic materials.
terial when the blade is in motion. Make sure the switch is in the OFF position, the spark plug wire is disconnected, and the blade has stopped moving before removing jammed material from the cutting blade. Do not grab or hold the unit by the cutting blade. Allow blades to stop Blades move momentarily before removing after the them from the cut. trigger is released. S Install required shield properly before using the unit. Use the metal shield for all metal blade use.
S If the rotor will not rotate freely due to frozen ice, thaw the unit before thoroughly before attempting to operate under power. S Keep the rotor clear of debris. S Do not throw snow near other people. The snow thrower could propel small objects at high speed causing injury. S After striking a foreign object, stop the engine, disconnect spark plug and inspect the snowthrower for damage and repair if necessary before restarting unit.
1. 2. 3. Position the lower shoulder strap clamp under the upper shaft and align the upper and lower clamp screw holes. ATTACHING SHIELD (FOR LINE TRIMMER ATTACHMENT) Upper Shoulder Strap Clamp WARNING: The shield must be properly installed. The shield provides partial protection from the risk of thrown objects to the operator and others and is equipped with a line limiter blade which cuts excess line to the proper length. The line limiter blade (on underside of shield) is sharp and can cut you.
CHOKE The CHOKE helps to supply fuel to the engine to aid in cold starting. Activate the choke by moving the choke lever to the FULL CHOKE position. After the engine attempts to start, move the choke lever to the HALF CHOKE position. Once engine has started, move the choke lever to the OFF CHOKE position. BEFORE STARTING ENGINE WARNING: Be sure to read the fuel information in the safety rules before you begin. If you do not understand the safety rules, do not attempt to fuel your unit.
NOTE: If engine dies with the choke lever in the OFF CHOKE position, move the choke lever to the HALF CHOKE position and pull the rope until engine runs, but no more than 6 pulls. Starter Handle Choke Lever Primer Bulb Choke position decal Muffler 1. 2. 3. 4. Set unit on a flat surface. Move ON/OFF switch to the ON position. Slowly press the primer bulb 6 times. Move choke lever to FULL CHOKE by aligning lever with position shown on decal (see illustration below). Choke position decal 5.
Upper Shaft Coupler LOOSEN Lower Attachment OPERATING INSTRUCTIONS FOR PRUNER ATTACHMENT OPERATING POSITION ALWAYS WEAR: Head Protection TIGHTEN Eye Protection Knob 2. Press and hold the locking/release button. Locking/Release Button Long Pants Heavy Shoes Coupler Lower Attachment Upper Shaft 3. While securely holding the engine and upper shaft, pull the attachment straight out of the coupler. INSTALLING OPTIONAL ATTACHMENTS 1. Remove the shaft cap from the attachment (if present). 2.
S Watch out for branches immediately behind the branch being pruned. If the chain hits the rear branch, damage to the unit may occur. S Be alert for springback. Watch out for branches that are bent or under pressure. Avoid being struck by the branch or the pruner when the tension in the wood fibers is released. S Keep a clear work area. Frequently clear branches out of the way to avoid tripping over them. S Long branches should be removed in several pieces.
CUTTING METHODS WARNING: Use minimum speed and do not crowd the line when cutting around hard objects (rock, gravel, fence posts, etc.), which can damage the trimmer head, become entangled in the line, or be thrown causing a serious hazard. S The tip of the line does the cutting. You will achieve the best performance and minimum line wear by not crowding the line into the cutting area. The right and wrong ways are shown below.
CHECK FOR LOOSE FASTENERS AND PARTS S S S S S 4. 5. Spark Plug Boot Air Filter Housing Screws Assist Handle Screw Debris Shield 6. CHECK FOR DAMAGED OR WORN PARTS Contact an authorized service dealer for replacement of damaged or worn parts. S ON/OFF switch -- Ensure ON/OFF switch functions properly by moving the switch to the OFF position. Make sure engine stops; then restart engine and continue. S Fuel tank -- Discontinue use of unit if fuel tank shows signs of damage or leaks.
After each use, ensure ON/OFF switch is in the OFF position, then clean all sawdust from the guide bar and sprocket hole. To maintain guide bar: S Move ON/OFF switch to the OFF position and disconnect spark plug. S Loosen and remove bar clamp nut and chain brake. Remove bar and chain from pruner. S Clean the oil holes and bar groove after each 5 hours of operation. Remove Sawdust From Guide Bar Groove Oil Holes S Burring of guide bar rails is a normal process of rail wear.
Line exit holes Line in Notch Hub Line in Notch Wind the line evenly and tightly onto the spool. Wind in the direction of the arrows found on the spool. 6. Push the lines into the notches, leaving 3 to 5 inches (7 -- 12 cm) unwound. 7. Insert the lines into the the exit holes in the hub as shown in the illustration. 8. Align the notches with the line exit holes. 9. Push spool into hub until it snaps into place. 10. Pull the lines extending outside of the hub to release the lines from the notches. 5. 8.
STORAGE WARNING: Perform the following steps after each use: S Allow engine to cool before storing or transporting. S Store unit and fuel in a well ventilated area where fuel vapors cannot reach sparks or open flames from water heaters, electric motors or switches, furnaces, etc. S Store unit with all guards in place. Position unit so that any sharp object cannot accidentally cause injury. S Store unit and fuel well out of the reach of children.
TROUBLESHOOTING TABLE WARNING: Always stop unit and disconnect spark plug before performing all of the recommended remedies below except remedies that require operation of the unit. TROUBLE CAUSE REMEDY Engine will not start. 1. ON/OFF switch in OFF position. 2. Engine flooded. 1. Move ON/OFF switch to ON. 2. See “Starting a Flooded Engine” in Operation Section. 3. Fill tank with correct fuel mixture. 4. Install new spark plug. 5. Check for dirty fuel filter; replace.
LIMITED WARRANTY ELECTROLUX HOME PRODUCTS, INC., warrants to the original purchaser that each new Poulan PROr brand gasoline tool or attachment is free from defects in material and workmanship and agrees to repair or replace under this warranty any defective gasoline product or attachment as follows from the original date of purchase. 2 YEARS -- Parts and Labor, when used for household purposes. 90 DAYS -- Parts and Labor, when used for commercial, professional, or income producing purposes.
PRODUCTS, INC., servicing center. If you have any questions regarding your warranty rights and responsibilities, you should contact your nearest authorized service center or call ELECTROLUX HOME PRODUCTS, INC., at 1--800--554--6723. WARRANTY PERIOD: Any warranted part which is not scheduled for replacement as required maintenance, or which is scheduled only for regular inspection to the effect of “repair or replace as necessary” shall be warranted for 2 years.