Poulan Por favor, el aparato al lugar de compra. Please do no not devuelva return unit to retailer. Veuillez ne pas retourner I'outil au d_taillant. • 1-800-554-6723 www.poulan.com Instruction Manual Manual de Instrucciones Manuel d'lnstructions 1950 / 1975 / 2055 / 2050 / 2075 / 2150 2155/2175/2350/2375/2150PRLE Series For Occasional Use Only WARNING: Read and follow all Safety Rules and Operating Instructions before using this product. Failure to do so can result in serious injury.
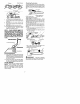
WARNING! This chain saw can be dangerous! Careless or improper use can cause serious or even fatal injury. Always wear appropriate Always Read and understand the instruction manual before Iraqi using the chain saw. ear protection, eye protection use two hands when operating and head protection. the chain saw. WARNING! Contacting the guide bar tip with any object should be avoided; tip contact may cause the guide bar to move suddenly upward and backward, which may cause serious injury.
• Carefully plan your sawthg operation inadvance. Donotstart cutting until youhave a clear work area, secure footing, and, ifyou arefelling trees, aplanned retreat path. OPERATE YOUR SAW SAFELY • Do not operate a chain saw with one hand. Serious injury to the operator, helpers, bystanders or any combination of these persons may result from one-handed operation. A chain saw is intended for two-handed use. • Operate the chain saw only in a wetbventilated outdoor area.
Elbow locked Clear The Working Area REDUCE THE CHANCE OF KICKBACK • Recognize that kickback can happen. With a basic understanding of kickback, you can reduce the element of surpbse which contributes to accidents. • Never let the moving chain contact any ob_ ject at the tip of the guide bar. • Keep the working area free from obstructions such as othertrees, branches, rocks, fences, stumps, etc. Eliminate or avoid any obstruction that your saw chain could hit while you are cutting.
Reduced Kickback Symmetrical Guide Bar caused by allowing contact of the bar tip in the danger zone with any hard object. Kickback can also be caused by pinching the saw chain along the top of the guide bar. This action may push the guide bar rapidly back toward the operator. Either of these events may cause you to lose control of the saw which could result in serious injury or even death. DO NOT RELY UPON ANY OF THE DEVICES BUILT INTO YOUR SAW.
NOTE: If this saw is to be used for commercial Iogging, a chain brake is required and shall not be removed or otherwise disabled to comply with Federal OSHA Regulations for Commercial Logging. SAFETY NOTICE: Exposure to vibrations through prolonged use of gasoline powered hand tools could cause blood vessel or nerve damage in the fingers, hands, and joints of people prone to circulation disorders or abnormal swellings.
Cutters Depth Gauge Drive Checking the tension: Use the screwdriver end of the chain adjustment tool (bar tool) to move the chain around the bar. If the chain does not rotate, it is too tight. If too loose, thechain will sag below the bar. Links Chain Place chain onto the sprocket Place chain over and behind clutch, fitting the drive links in the clutch drum sprocket. & Fit bottom of drive links between the teeth in the sprocket in the nose of the guide bar. 9. Fit chain drive links into bar groove.
KNOW YOUR CHAIN SAW READ THIS iNSTRUCTION MANUAL AND SAFETY RULES BEFORE OPERATING YOUR CHAIN SAW. Compare the illustrations with your unit to familiarize yourseft with the location of the various controls and adjustments. Save this manual for future reference. Chain Front Hand Guard -'_f'_J Front Handle Adjustment Tool BorToo, Chain I_"_ I¢" [ _.
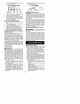
_lk WARNING: Remove fuel cap slow- ly when refueling. FUELING ENGINE This engine is certified to operate on unleaded gasoline. Before operation, gasoline must be mixed with a good quality synthetic 2-cycle aff-cooled engine oil designed to be mixed ata ratioof40:f. Poulan/Weed Eater brand synthetic oil is recommended. A40:1 ratio is obtained by mixthg 3.2 ounces (95 ml) of oil with 1 gallon (4 liters) of unleaded gasoline. Included with this saw ls a 3.
5. Push thechoke/fast idlelever intothe HALF CHOKE position. CHOKE/FAST • When cutting with the saw, the chain brake must be disengaged. IDLE LEVER Disengaged _ o_,IEW) I Ch fast idle lever 6. 7. OFF _iili I k HALF Braking function control CAUTION: The chain brake must be checked several times daily. The engine must be ru nning when performing this procedure. This is the only instance when the saw should be placed on the ground with the engine running. Place the saw on firm ground.
FELLING • Release the throttle trigger as soon as the cut is completed, allowing the engine to idle. If you run the saw at full throtfie without a cuttthg load, unnecessary wear can occur to the chain, bar, and engine. It is recommended that the engine not be operated for longer than 30 seconds at full throttle. • To avoid losing controlwhen cut is complete, do not put pressure on saw at end of cut. • Stop the engine before setting the saw down after cutting.
• DO NOT cut down a partially fallen tree with your saw. Be extremely cautious with partially fallen trees that may be poorly supported. When a tree doesn't fall completely, set the saw aside and pull down the tree with a cable winch, block and tackle, or tractor. CUTTING A FALLEN TREE (BUCKING) Bucking is the term used for cutting a fallen tree to the desired log size. Undercutting involves cutting on the underside of the log with top of saw against the log. When undercutting use light upward pressure.
_1 Using a support • Keep the tree between you and the chain. Cut from the side of the tree opposite the branch you are cutting. • Remove larger, supppriJng branches with the cutting techniques described in BUCKING WITHOUT A SUPPORT • Always use an overcut to cut small and freely hanging limbs. Undercutting could cause hmba to fail and pinch the saw. PRUNING st Cut stand ,_kWARNING: Limit pruning to limbs shoulder height or below. Do not cut if branches are higher than your shoulder.
AIR FILTER CAUTION: Do not clean filter in gasoline or other flammable solvent to avoid creating a fire hazard or producing harmful evaporative emissions. 2. 3. 4. Cleaning the air filter: A dirty air filter decreases engine performance and increases fuel consumption and harmful emissions. Always clean after every 5 hours of operation. 1. Loosen 3 screws on cylinder cover. 2. Remove cylinder cover. 3. Remove air filter. 4. Clean the fflr filter using hot soapywater. Rinse with clean cool water.
• Turn idle speed screw (T) clockwise to increase engine speed. • Turn idle speed screw (T) counterclockwise to decrease engine speed. If you require further assistance or are unsure about performing this procedure, contact your authorized service dealer or call 1-800-554-6723. 1. 2. 3. 4. 5. BAR MAINTENANCE 6. 7. If your saw cuts to one side, has to be forced through the cut, or been run with an improper amount of bar lubrication it may be necessary to service your bar.
TROUBLESHOOTING _k TABLE WARNI NG: Always stop unit and disconnect spark plug before performing all of the recom mended remedies below except remedies that require operation of the unit. TROUBLE CAUSE Engine will not start or will run only a few seconds after starting. 1. Ignifion switch off. 2. Engine flooded. REMEDY 1. Move ignition switch to ON. 2. See "Difficult Starting" in Operation Section. 3. Fill tank with correct fuel mixture. 4. Install new spark plug. 5.
YOUR WARRANTY RIGHTS AN D OBLIGATIONS: The U.S. Environmental Protection Agency, California Air Resources Board, Environment Canada and ELECTROLUX HOME PRODUCTS, INC., are pleased to explain the emissions control system warranty on your year 2002-2004 small off-road engine. In California, all small off-road engines must be designed, built, and equipped to meet the State's stdogent anti-smog standards. ELECTROLUX HOME PRODUCTS, INC.
The information on the product label indicates which standard your engine is certified. Example: (Year) EPA Phase 1 or Phase 2 and/or CALIFORNIA.
ADVERTENCIA: iEsta sierra de cadena puede ser peligrosa! El uso descuidado o indebido de esta herramienta puede causar graves hendas. manual de instrucciones antes de usar la ---1 Lea y comprenda el sierra. Use siempre la protecci6n de oidos apropiada, ojos y la protecci6n de la cabeza. "_' @ la proteccion de cadena.
ruido de Jas sierras de cadena puede da5ar los oidos. • Mantenga todas tas buttes del cuerpo alejabus de la cadena siempre que eJ motor est6 en funcionamien_o. • Mantenga a los ni_os, esbuctadores y animales a una dJstancia minima de 10 metros (30 pies) del area de trabajo o cuando esta haoienco arrancar e] motor. • No levante ni opere ia sierras de cadena cuando esta faigado, enfermo, ansioso o si ha tornado alcohol, drogas o remedios. Es imprescindJbie que ed.
superior de la barra guia y la cadena se detiene repentinamente. Esta detenci6n repen_Jna de la cadena tiene como resultado una Jnversi6n de la fuerza de la cadena usada para cortar madera y causa que la sierra se mueva en sen_Jdo opuesto al de la rotaci6n de la cadena. La sierra directamente hacia arras en direcci6n al usuano.
• Parese levemente hacia laizquierda dela sierra de cadena para evitar que el c uerpo este enlinea directa con lacadena. • Noseextienda excesivamente. Lasierra puede impulsario oempujado yud.puede perder elequilibrio yelcontrol delasierra. • Nocorte arriba delnival deloshombros. Es diflcil mantener elcontrol delasierra sJest_ porencima delnJvel deloshombros.
CSA (Asociaci6n Canadiense de Normas) y ANSI. AI comprar barra y cadena de repuesto, deben tomarse en consideraci6n los valores mas bajos de ACR. Los valores mas bajos de ACR representan _nguJos mas seguros para el usuape, mientras que los valores mas altos indican mayor angulo y energias mas altas en las reculadas. Los angulos compulados representados en la columna no-activada indF can la energia total y el _ngulo asociado sin activaci6n del freno de cadena durante la reculada.
3. 8. Coloque los eslabones de propulsi6n entre los dientes de la engranaje en la punta de la barra. 9. Coloque los eslabones de propulsi6n en la ranura de la barra. 10. Tire la barra hacia adelante basra que la cadena quede tirante en la ranura de la barra. Asegure todas las eslabones de propu]si6n estan en el ranuradela barra. AVISO: EL FRENO DE CADENA DEBE SER DESACTIVADO ANTES DE LA INSTALACION DE LA SIERRA.
Para ajustar la tensibn: La tensi6n de la cadena es muy impartante. La cadena se va estirando col/ el uso, especialmente durante las primeras veces que usa la sierra. Verifique sin falta la tensi6n de la cadena caga vez que use la sierra y cada vez que la abastezca de combustible. Se ajusta la tensi6n de ta cadena aflojando las tuercas del freno de cadena y ajust_ndolas de vueda a mano paicamente. Luego se gira el tornillo de ajuste 1/4 de vuelta mientras se manteine la barra levantada.
FRENO INTERRUPTOR ON/STOP El tNTERRUPTOR ON/STOP esta acostumbrado a detener la maquina. GATILLO DE ACELERADOR El GATILLO DE ACELERADOR controla veIocidad de m_quina. TRABA DEL ACELERADOR Es necesario apretar primero la TRABA DEL ACELERADOR para poder accionar el aceleF ador. Este dispositivo previene el acionamiento acbldental del acelerador.
INTERRUPTOR ON/STOP (VISTA LATERAL) /IJAUVI:::N|I::NI;IA: La cadena no debe moverse cuando el motor se encuentre en marcha inactiva. Si la cadena se mueve en marcha inactiva, yea la secci6n de AJUSTES AL CARBURADOR en este manual. Evite contacto con el silenciador. Un silenciador caliente podria causar quemaduras muy graves. STOP 1. Mueva el interruptor ON/STOP a la posici6n ON. Tire de la palanca del cebador/marcha lenta rapida su maxima extensi6n. 3. Lentamente, oprima et bombeador 6 veces. 4.
Que el motor se ponga en marcha puede requedr que se tire de la cuerda de arranque muchas veces, dependiendo cu_n ahogado se encuentre el motor Si el motor no arranca, refi6rase a ta TABLA DIAGNOSTICA o Ilame al 1-800-554-6723. FRENO madera. Libere la empu6adura dei mango delan_ero y que la punla de la barra guia caiga hacia adelanta y pueda entrar en contacto con el tocon. Cuando la punta de la barra golpee et tocon, el freno debe actJvarse.
atravJese un tercio de] ancho del tronco. • Despeje alarea detrabajo. Ud.precisa un area despejada entodo elcontorno dearbol Luego complete el corte de muesca cortandonde pueda pisar con firmeza entodo modo en angulo como se muestra en la ilustramento. ci6n "Metodo muesca", abajo. Una vez com• El usuario dela sierra decadena debera perpleto el code de muesca, retire la cuba de manecer del lado cuesta arriba delterreno madera del arbol.
CORTANDO UN ARBOL TUMBADO A ADVERTENCIA: Nunca Jnvierta la sierra para hacer cortes ascendientes. No se puede controlar la sierra de esa forma. (SECCIONAMIENTO) El termino seccionamiento significa cortar un arbol tumbado en secciones del largo deseado. Haga sJempre el primer corte del lado dei tronco que esta bajo compresi6n. El ladode compresi6n del tronco es donde la presi6n det peso del tronco se concentra. ,_ADVERTENCIA: No se pare sobre el tronco que est_ sJendo codado.
Con caballete tercios descirta en la secci6n SECCIONAMIENTO SIN APOYO. • Use siempre un corte descendiente para cortar rarnas pequel_as y ramas que cuelgan libreme_e. Los cortes ascendientes podrfan hacer que las ramas caigan y apreten la sierra. PARA PODAR como apoyo / 1 er corte _k ADVERTENCIA: Pode _lnicamente last la altura det hombro. No corte las ramas que queden m_s altas que los hornbros. Consiga a un profesional para efectuar ese trabajo.
FILTRO DE AIRE PRECAUCION: No use gasolina ni ningpe otro ]iquido inflamabie para timpiar el filtro, para evitar incendios y emisiones nocivas. • de Desahogo Limpieza del filtro de aire: Un fi]tro de aire sucio disminuye el rendimiento del motor e incrementa el consumo de combustible y la producci6n de emisiones nocivas. Limpie siempre el fi]tro de aire despu6s de cada 5 horas de uso. 1. Afloje tos 3 tornil]os en la tapa de] cilindro. 2. Retire la tapa dei cilindro. 3. Retire el filtro de aire. 4.
1I. Reinsta]e ]a placa trasera, la guia de ]a sa]ida de desahogo, ]a junta del si]enciador, y el si]enciador utilizando los torni]los de{ sHenciador. Apriete firmemente basra quedar seguros. 12. Reinstale la cubierta del tornillo y la tuerca. Apriete firmemente. AJUSTE AL CARBURADOR _I_ADVERTENCIA: _=_;;_;;;_ La cadena es- • A6ada ]ubricante a] orificio de] engranaje despu6s de cada uso. • Los rieles de ]a barra desarrollan protuberancias al gastarse. S_que]as con una lima plana.
ALMACENAJE combustible puedan aicanzar chispsas o llamas abier[as de los termotanq ues, calefactores centrales, motores o Jnterruptotes el6ctricos, etc. • Guarde el aparato en un lugar seco fuera del alcance de los niSos. _kADVERTENCIA: Pare el motor y deje que se enfrie y fije bien el aparato antes de guardarlo o de transportado en un vehiculo.
ELECTROLUX HOME PRODUCTS, INC,, Esta garartia no cubre la preparaci6n de pregarantiza alcomprador odginai quacada entrega, la instalaci6n de la barra guia y la casierra decadena agasolina mama Poulan dena y los ajustes normales explicados en el manual de instrucciones tales como los nueva sera libre dedefectos demateriales y demano deobra yque seoompromete are- ajustes al carburador y a la tensi6n de la cadeparar oreemplazar, bajo lascondiciones de ha. Esta garantia no cubre el costo de flete.
sempe6ado mantenimiento ensumaquina de] mantenimiento requerido debera estar demotor peque6o para uso fuera decarret- garantizada por el periodo de tiempo que era,pero ELECTROLUX HOME PROD- comienza en la fecha de compra inicial basra UCTS, tNC., nopodra negar elservicio bajo la fecha del primer reemp]azo programado garantia QnJcamente acausa delafalta de para dicha pieza.
La lnformaci6m en la etiqueta del producto indica las normas de certlficaci6n Ejemplo: (ASo) EPA Fase 1 o Fase 2 y/o CALIFORNIA. de su motor. InformacJon Importante en relacion al motor. Este motor satisface las regulaciones de emision para motores pequeSos operados fuera de la oarretera. FamJlia # De Serie Horas de la durabllidad Vea el manual de instrucoiones para especificaciones imJento y ajustes.