ENGLISH R Instruction Manual Manual de Instrucciones Manuel d’Instructions 031 ESPAÑOL For Occasional Use Only Electrolux Home Products, Inc. 250 Bobby Jones Expressway Augusta, GA 30907 Copyright E2002 Electrolux Home Products, Inc. 530163414 12/9/02 FRANÇAIS WARNING: Read and follow all Safety Rules and Operating Instructions before using this product. Failure to do so can result in serious injury.
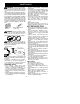
SAFETY RULES S Always wear foot protection. Do not go barefoot or wear sandals. Stay clear of spinning line. S Secure hair above shoulder length. Secure or remove loose clothing or clothing with loosely hanging ties, straps, tassels, etc. They can be caught in moving parts. S Being fully covered also helps protect you from debris and pieces of toxic plants thrown by spinning line. S Stay Alert. Do not operate this unit when you are tired, ill, upset or under the influence of alcohol, drugs, or medication.
SAFETY NOTICE: Exposure to vibrations through prolonged use of gasoline powered hand tools could cause blood vessel or nerve damage in the fingers, hands, and joints of people prone to circulation disorders or abnormal swellings. Prolonged use in cold weather has been linked to blood vessel damage in otherwise healthy people.
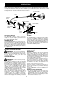
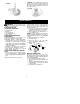
OPERATION KNOW YOUR TRIMMER READ THIS INSTRUCTION MANUAL AND SAFETY RULES BEFORE OPERATING YOUR UNIT. Compare the illustrations with your unit to familiarize yourself with the location of the various controls and adjustments. Save this manual for future reference. Assist Handle Tube Trimmer Head ON/STOP Switch Shield Starter Handle Primer Bulb Line Limiter Blade Throttle Trigger Choke Lever Muffler ON/STOP SWITCH CHOKE The ON/STOP switch is used to stop the engine.
S If engine does not stop, move choke lever to FULL CHOKE position. ON/STOP Switch Choke position decal Throttle Trigger 7. Pull starter rope sharply until engine runs, but no more than 6 pulls. If the engine doesn’t start after 6 pulls (at the HALF CHOKE position), move the choke lever to the FULL CHOKE position and press the primer bulb 6 times. Squeeze and hold the throttle trigger and pull the starter rope 2 more times.
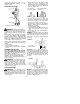
S The tip of the line does the cutting. You will achieve the best performance and minimum line wear by not crowding the line into the cutting area. The right and wrong ways are shown below. If the unit still doesn’t start, refer to TROUBLESHOOTING TABLE or call 1-800-554--6723.
SWEEPING -- The fanning action of the rotating line can be used for a quick and easy clean up. Keep the line parallel to and above the surfaces being swept and move the tool from side to side. Sweeping Mowing MAINTENANCE CLEAN AIR FILTER WARNING: Disconnect the spark plug before performing maintenance except for carburetor adjustments. A dirty air filter decreases engine performance and increases fuel consumption and harmful emissions. Always clean after every 5 hours of operation. 1.
SERVICE AND ADJUSTMENTS REPLACING THE LINE INSTALLING SPOOL WITH LINE Pre--wound spools offer the most convenient method for replacing line and ensuring optimum performance. S Replacement spools are color--coded to ensure use of the correct spool with your unit. Be sure to use the same color spool as the existing spool. NOTE: Always clear dirt and debris from cutting head components when performing any type of maintenance. S Hold spool and unscrew cap by turning in the direction shown on top of the cap.
STORAGE WARNING: Fuel stabilizer is an acceptable alternative in minimizing the formation of fuel gum deposits during storage. Add stabilizer to the gasoline in the fuel tank or fuel storage container. Follow the mix instructions found on stabilizer container. Run engine at least 5 minutes after adding stabilizer. Perform the following steps after each use: S Allow engine to cool before storing or transporting.
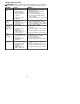
TROUBLESHOOTING TABLE WARNING: Always stop unit and disconnect spark plug before performing all of the recommended remedies below except remedies that require operation of the unit. TROUBLE Engine will not start. CAUSE REMEDY 1. Engine flooded. 1. See “Starting a Flooded Engine” in Operation Section. 2. Fill tank with correct fuel mixture. 3. Install new spark plug. 4. Check for dirty fuel filter; replace. Check for kinked or split fuel line; repair or replace. 5. Contact an authorized service dealer.
LIMITED WARRANTY ELECTROLUX HOME PRODUCTS, INC., warrants to the original purchaser that each new Poulan PRO" " brand gasoline tool or attachment is free from defects in material and workmanship and agrees to repair or replace under this warranty any defective gasoline product or attachment as follows from the original date of purchase. 2 YEARS-- Parts and Labor, when used for household purposes. 90 DAYS -- Parts and Labor, when used for commercial, professional, or income producing purposes.
warranted part which is not scheduled for replacement as required maintenance, or which is scheduled only for regular inspection to the effect of “repair or replace as necessary” shall be warranted for 2 years. Any warranted part which is scheduled for replacement as required maintenance shall be warranted for the period of time up to the first scheduled replacement point for that part.