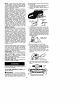
Poulan i_ ® Por favor, el aparato al lugar de compra. Please do no notdevuelva return unit to retailer. Veuillez ne pas retourner I'outil au d_taillant. • 1-800-554-6723 www.poulan.com Instruction Manual Manual de Instrucciones Manuel d'lnstructions 1950 / 1975 / 2050 / 2055 / 2075 / 2150 2155 / 2175 / 2350 / 2375 / 2150PR For Occasional Use Only A c(UL)us v WARNING: Read and follow all Safety Rules and Operating Instructions before using this product. Failure to do so can result in serious injury.
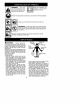
WARNINGt This chain Read and understand the instruction manual before using the chain saw. saw can be dangerous! Careless or improperuse can cause sedous or even fatal injury. Always wear appropriate ear protection, eye protection and head protection. Always use two hands when operating the chain saw. WARNINGt Contacting the guide bar tip with any object should be avoided; tip contact may cause the guide bar to move suddenly upward and backward, which may cause serious injury.
• Carefully planyoursawingoperation inadvance. Donotstart cutting until youhave a clear work area, secure footing, and, ifyou • arefelling trees, aplanned retreat path. OPERATE YOUR SAW SAFELY • Do not operate a chain saw with one hand. Serious injury to the operator, helpers, bystanders or any combination of these persons may result from one-handed operation. A chain saw is intended for two-handed use. • Operate the chain saw only in a well-ventilated outdoor area.
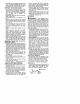
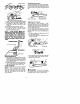
_ Avoid Obstructions Elbow locked Clear TheWorking Area REDUCE THE CHANCE OF KICKBACK • Recognize that kickback can happen. With a basic understanding of kickback, you can reduce the element of surprise which contributes to accidents. • Never let the moving chain contact any object at the tip of the guide bar. • Keep the working area free from obstructions such as other trees, branches, rocks, fences, stumps, etc. Eliminate or avoid any obstruction that your saw chain could hit while you are cutting.
Reduced Kickback Symmetrical Guide Bar aJl Radius Tip Symmetdce3 Guide Bar _. [ Large Radius Tip • Low-Kickback Chain, designed with a contoured depth gauge and guard link which deflect kickback force and allow wood to gradually ride into the cutter. LowKickback Chain has met kickback performance requirements when tested on a representative sample of chain saws below 3.8 cubic inch displacement specified in ANSI B175.1.
NOTE:Ifthissawistobeused forcom- The chain is sharp and can cut you even when not moving! mercial logging, a chainbrake is required it1.is Loosen and remove the chain brake nuts andshallnotberemoved orotherwise disand the chain brake from the saw. abled tocomply withFederal OSHA Regula2. Remove the plastic shipping spacer (if tions forCommercial Logging. SAFETY NOTICE: Exposure tovibrations present).
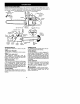
Cutters Depth Gauge Checking the tension: Use the screwdriver end of the chain adjustment tool (bar tool) to move the chain around the bar. If the chain does not rotate, it is too tight. If too loose, the chain will sag below the bar. Drive Links Chain Brake Nuts 7. 8. 9. 10. Place chain onto the sprocket Place chain over and behind dutch, fitting the drive links in the dutch drum sprocket. Fit bottom of drive links between the teeth in the sprocket in the nose of the guide bar.
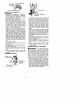
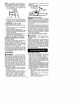
KNOW YOUR CHAIN SAW READ THIS INSTRUCTION MANUAL AND SAFETY RULES BEFORE OPERATING YOUR CHAIN SAW, Compare the illustrations with your unit to familiarize yourself with the location of the various controls and adjustments. Save this manual for future reference. Chain Front Hand Guarcl''_" Front Handle Adjustment Tool (Bar Tool) Starter Rope Switch ON/STOP i1_=====_ Chain Muffler Bar Oil Fill Cap Fast Idle e F_cS_Idle/_f_/Cylinder Cover Throttle Lock Lockout o LT°h_°kt°tlle u_ / f--z"-_ .._.,/._.._ .
A dll WARNING: Remove fuel cap slowly when refueling. FUELING ENGINE This engine is certified to operate on untended gasoline. Before operation, gasoline must be mixed with a good quality synthetic 2-cycte air-cooled engine oil designed to be mixed at a ratio of 40:1. Poulan/Weed Eater brand synthetic oil is recommended. Mix gasoline and oil at a ratio of 40:1. A40:1 ratio is obtained by mixing 3.2 ounces (95 ml) ofoit with 1 gallon (4 liters) of untended gasoline. Included with this saw is a 3.
NOTE:Iftheengine sounds as if it is trying to start before the 5th pull, stop pulling and immediately proceed to the next step. 6. Push the choke knob in completely (to the OFF position); pull the starter rope until the engine starts. CHOKE back toward the front handle as far as possible. • When cutting with the saw, the chain brake must be disengaged. Disengaged _ii_Engag :IEW) k Choke knob OFF FULL 7. Allow the engine to run for approximately 5 seconds.
Allowthechaintocutforyou.Exert onlylightdownward pressure. Ifyou forcethecut,damage to thebar, chain, orengine canresult. Release thethrottle trigger assoon as thecutiscompleted, allowing theenginetoidle.Ifyourunthesawatfull throttle without acutting load, unnecessary wearcanoccurtothechain, bar,andengine. Toavoidlosingcontrol whencutis complete, donotputpressure onsaw atendofcut. • Stoptheengine before setting thesaw down after cutting.
• As tree starts to fall, stop saw, put it down, and get away quickly on your planned retreat path. • DO NOT cut down a partially fallen tree with your saw. Be extremely cautious with partially fallen trees that may be poorly supported. When a tree doesn't fall completely, set the saw aside and pull down the tree with a cable winch, block and tackle, or tractor. CUTTING A FALLEN TREE (BUCKING) Bucking is the term used for cutting a fallen tree to the desired log size.
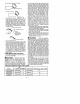
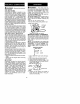
PRUNING Using a support stand 2 nd Cut i_WARNING: 1 st Cut I st Cut Limit pruning to limbs shoulder height or below. Do not cut if branches are higher than your shoulder. Get a professional to do the job. Make your first cut 1/3 of the way through the bottom of the limb. Next make a 2nd cut all the way through the limb. Then cut a third overeut leaving a 1 to 2 inch collar from the truck of the tree.
dusty conditions. A used aire filter can never be completely cleaned. It is advisable to replace your air filter with a new one after every 50 hours of operation, or annually, whichever comes first. 1. Loosen 3 screws on cylinder cover. 2. Remove cylinder cover. 3. Remove air filter. 4. Cleantheairfilterusinghotsoapywater. Rinse with clean cool water. Air dry completely before reinstalling. 5. Lightly oil air filter before installing to improve the efficiency of air filter.
'_'_'--File Rail Edge_ and Sides Square Worn Groove N N IU I I I Correct Groove Replace guide bar when the groove is worn, the guide bar is bent or cracked, or when excess heating or burring of the rails occurs. If replacement is necessary, use only the guide bar specified for your saw in the repair parts list or on the decal located on the chain saw, CHAIN SHARPENING Chain sharpening is a complicated task that requires special tools.
TROUBLESHOOTING _, TABLE WARNING: Always stop unit and disconnect spark plug before performing all of the recommended remedies below except remedies that require operation of the unit. TROUBLE CAUSE Engine will not start or will run only a few seconds after starting. 1. Ignition switch off. 2. Engine flooded. Engine will not idle properly. 1. Idle speed requires adjustment. 2. Carburetor requires adjustment. 1. See "Carburetor Adjustment" in the Service and Adjustments Section. 2.
ELECTROLUX HOME PRODUCTS, INC, warrants to the odgioel purchaser that each new Poulan® brand gasoline chain saw is free from defects in material and workmanship and agrees to repair or replace under this warranty any defective gasoline chain saw as follows from the original date of purchase. 1 YEAR - Parts and Labor, when used for Household purposes. 66 DAYS - Parts and Labor, when used for Commercial, Professional, or Income Producing purposes. 36 DAYS - Parts and Labor, if usod for rental purposes.
period begins onthedatethesmalloff-road _art still under warranty. WHAT IS NOT engine ispurchased. LENGTH OFCOVER- OVERED: All failures caused by abuse, AGE: Thiswarranty shallbeforaperiod of neglect, or improper maintenance are not twoyears fromtheinitial dateofpurchase.covered. ADD-ON OR MODIFIED PARTS: WHAT IS COVERED: REPAIR OR REPLACEMENT OF PARTS. Repair or replacement of any warranted part will be performed at no charge to the owner at an approved ELECTROLUX HOME PRODUCTS, INC., servicing center.
ADVERTENCIA: iEsta sierra de cadena puede ser peligrosa! El uso descuidado o indebido de esta herramienta puede causar graves heridas. Lea y comprenda el manual de instrucclones antes de user la sierra. Use siempre la protecci6n de oidos apropiada, ojos y la protecci6n de la cabeza. la protecci6n de Use siempre las dos manos cuando trabaje con la sierra de cadena.
ruido de las sierras de cadena puede daf_ar los oidos. • Mantenga todas las partes del cuerpo alejadas de la cadena siempre que el motor est6 en funcionamiento. • Mantenga a los nifLos, espectadores y animales a una distancia minima de 10 metros (30 pies) del &rea de trabajo o cuando esta hacienco arrancar el motor. • No levante ni opera la sierras de cadena cuando esta faigado, enfermo, ansioso o si ha tornado alcohol, drogas o remedios. Es imprescindible que ed.
superior de la barra gula y la cadena se detiene repentinamente. Esta detenci6n repentina de la cadena tiene como resultado una inversi6n de la fuerza de la cadena usada para cortar madera y caosa que la sierra se mueva en sentido opuesto al de la rotacion de la cadena. La sierra directamente hacia atras en direcci6n al esuario.
• Parese levemente hacia la izquierda de la sierra de cadena para evitar que ei cuerpo est6 en llnea directe con la cedena. • No se extienda excesivamente. La sierra puede impulsario o empujado y ud. puede perder ei equilibrio y el control de la sierra. • No corte erdbe del nival de los hombros. Es dificil mantener el control de la sierra si est_ per encima del nivei de los hombros.
diense de Normas) y ANSI. AI comprar barra y cadena de repuesto, deben tomarse en consideraci6n los valores mas bajos de ACR. Los valores mas bajos de ACR representan _ngulos m_s seguros para el usuario, mientras que los valores mas altos indican mayor angulo y energlas m_s altas en Ins reculadas. Los &ngulos computados representados en la columna no-activada indican la energia total y el &ngulo asociado sin activacion del freno de cadena durante la reculada.
3. 7. Coloque la cadena por encima y detr_s del embrague, poner ]as eslabones de funcionamiento en el cilindro del embrague. 8. Coloque los eslabones de propulsion entre los dientes de la engranaje en la punta de la barra. 9. Coloque los eslabones de propulsi6n en la ranura de la barra. 10 Tire la barra hacia adelante hasta que la cadena quede tirante en la ranura de la barra. Asegure todas las eslabones de propulsion est_n en el ranura de la barra.
*"_o_ T°ariliHs_e de / / 0 _e Tuerca del freno de cadena de la Cadena (Herramienta de la Barra) freno de cadena Tomillo de Ajuste - 1/4 de Vuelta Para ajustar la tensibn: La tension de la cadena es muy importente. La cadena se va estirendo con el uso, especialmente duraate les primeras veces que usa la sierra. Vedfique sin falta la teasi6n de le cadena caga vez que use le sierra y cada vez que le abastezca de combustible.
Tapa del Cilindro Traba de Mareha Lenta Cuchillas Marcador (_)'_ Traba del Direcci6n de _Esla'bJnes Manija Trasera de profundidad Tomi[[o de de / Funcionamiento Rotaci6n de la Cadena i Barra Guia de la freno de cadena del Engranaje Acelerador Captador de Cadena INTERRUPTOR ON/STOP BOMBEADOR E[ INTERRUPTOR ON/STOP est_ acostamEl BOMBEADOR circula combustible al carburador. brado a detener la m_quina.
Iibremente para que el sistema de ]ubricaci6n pueda bombear suficiente acoite para lubricar adecuadamente. Se recomienda el aceite Poulan® genuino para barra y cadena para proteger el aparato contra el desgaste excesivo provocado por el calory la fricci6n. El aceite Poulan® resiste la perdida de espesura a altas temperaturas. Si no nay disponibilidad de aceite para barra y cadena Poulan® use un acoite de buena calidad tipo SAE 30. • Nunca utilice aceite usado para la lubricacion de la barra y de la cadena.
PARA ARRANCAR CON EL MOTOR CALIENTE 1. Mueva el interruptor ON/STOP a la posicion ON. 2. Presione hacia adentro y por completo la palanca del cebador (a la posici6n OFF). 3. Lentamente, optima el bombeador 6 veces. 4. Apriete y sujete el gatillo acelerador. Con el dedo pulgar, oprima hacia abajo el traba de marcha lenta acelerada; luego, suelte el gatil]o acelerador. 5. Tire de la cuerda de arranque r&pidamente con su mano derecha hasta que el motor se ponga en marcha. 6.
Mantenga elmotor conacelerador a Retire la tierra, las piedras, la corteza suelta, fondo constantemente mientras corta. los clavos, las grampas y el alambre qee Dejequelasierra haga todoeltrabajo pueda haber en el _rbol en el lugar del carte. decortar; nousem_s queunamuyligPlanifique una ruta predeterminada erapresi0n hacia abajo.
La bisagra sostiene el arbol en el tocon y ayuda a controlar la caida Abertura del corte de tumbada / Cierre de la muesca AV|SO: Antes de complefar el tumbado, use cuSas para abrir el corte, cuando sea necesario, para contrelar la direccion de la caida. Use cuSas de madera o de pl_stico, pero nunca de acero o de hierre, para evitar que la sierra recule y para evitar daSos a la cadena.
• Hags rodar el tronco y termine con otto corte descendiente. • Tenga cuidado con los troncos presionados de un lado, Vea [a ilustraciones anterior pars seccionar un tronco presionado. SECClONAMIENTO USANDO TRONCO O CABALLETE DE APOYO • Recuerde que el pdmer corte siempre es de lado del tronco bajo compresion. (Vea en la ilastraciones que sigue el primer corte y el segundo corte.) • El primer corte deber_ extenderse por 1/3 del di_metro del tronco. • Termine por el segundo corte.
Tornillos de la Tapa del _-- ADVERTENCIA: Desconecte la bujla antes de hacer cualquier mantenimiento, con la excepci6n de los ajustes al carburador. Recomendamos que todo el servicio y todos los ajustes no listados en este manual sean efectuados pot un distribuidor autodzado del servicio. PLANILLA DE MANTENIMIENTO Verifique: El nivel de combustible . Lubricaci6n de la barra . Tensi6n de la cadena... Afilaci6n de la cadena .. Piezas daBadas ....... Tapas sueltas ......... Fijadores sueltas ......
• La cadena se mueve con el motor en marcha lenta. Vea procedimiento de MARCHA LENTA "T". • La sierra no anda a marcha lenta. Vea procedimiento de MARCHA LENTA "T". Marcha Lenta "T" Deje que el motor trabaje en marcha lent& Si la cadena se mueve, la marcha lenta es demasiado. Si el motor se par& la marcha lentaes demasiado lenta.
combustible puedan alcanzar chispsas o llamas abiertas delostermotanques, calefactores centreles, motores o interruptores el_ctricos, etc. nolo methanol) pueden atraer humedad, que Ileva a la separaci6n y a la formaci6n de &cidos durante el almacenado. La gasolina _cida puede daSar el motor. • Guarde el aparato en un lugar seco fuera del alcance de los niSos.
ejo indebido, mantenimiento incorrecto ni uso de accesorios y/o juegos de piezas adicionales no recomendados especificamentepor ELECTROLUX HOME PRODUCTS, INC., para esta sierra de cadena. Asimismo, esta garantia no cubre daSos causados pot manejo indebido, mantenimiento incorrecto ni tampoco si la sierra ha sido alterada de cualquier modo que segSn nuestro criterio afecte su condid6n o su operaci6n.
PARACION O REEMPLAZO DE PIEZAS. La reparaci6n o el reemplazo de cualquier pieza garantizada ser_n desempefiados y ofrecidos al dueSo sin costo alguno en on distdbuidot autorizado del servicio ELECTROLUX HOME PRODUCTS, INC. Si cuenta usted con alguna pregunta en relaci6n a sus derechos y responsabilidades de garantia, usted debera comunicarse con su distnbuidor autorizado del servicio mas cercano o Ilamar a ELECTROLUX HOME PRODUCTS, INC., al 1-800-554-6723. PERIODO DE GARAN.