ENGLISH R Instruction Manual Manual de Instrucciones Manuel d’Instructions 221 ESPAÑOL For Occasional Use Only WARNING: Read and follow all Safety Rules and Operating Instructions before using this product. Failure to do so can result in serious injury. ADVERTENCIA : Lea el manual de instrucciones y siga todas las advertencias e enstrucciones de seguridad. El no hacerlo puede resultar en lesiones graves. AVERTISSEMENT: Electrolux Home Products North America Div. of WCI Outdoor Products, Inc.
IDENTIFICATION OF SYMBOLS WARNING! Read and understand the instruction manual before using the chain saw. This chain saw can be dangerous! Careless or improper use can cause serious or even fatal injury. Always wear appropriate ear protection, eye protection and head protection. Always use two hands when operating the chain saw.
S Carefully plan your sawing operation in advance. Do not start cutting until you have a clear work area, secure footing, and, if you are felling trees, a planned retreat path. marked container for all fuel purposes. Wipe up all fuel spills before starting saw. S Move at least 10 feet (3 meters) from fueling site before starting engine. S Turn the engine off and let saw cool in a non-combustible area, not on dry leaves, straw, paper, etc. Slowly remove fuel cap and refuel unit.
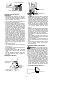
Avoid Obstructions Elbow locked Clear The Working Area Thumb on underside of handlebar REDUCE THE CHANCE OF KICKBACK S Keep a good, firm grip on the saw with both hands when the engine is running and don’t let go. A firm grip will help you reduce kickback and maintain control of the saw. Keep the fingers of your left hand encircling and your left thumb under the front handlebar. Keep your right hand completely around the rear handle whether your are right handed or left handed.
action may push the guide bar rapidly back toward the operator. Either of these events may cause you to lose control of the saw which could result in serious injury or even death. DO NOT RELY UPON ANY OF THE DEVICES BUILT INTO YOUR SAW. YOU SHOULD USE THE SAW PROPERLY AND CAREFULLY TO AVOID KICKBACK. Reduced--kickback guide bars and low--kickback saw chains reduce the chance and magnitude of kickback and are recommended. Your saw has a low kickback chain and bar as original equipment.
weather has been linked to blood vessel damage in otherwise healthy people. If symptoms occur such as numbness, pain, loss of strength, change in skin color or texture, or loss of feeling in the fingers, hands, or joints, discontinue the use of this tool and seek medical attention. An anti-vibration system does not guarantee the avoidance of these problems. Users who operate power tools on a continual and regular basis must monitor closely their physical condition and the condition of this tool.
Adjusting the tension: S Place the chain over and behind the clutch, fitting the drive links in the clutch drum sprocket. Chain tension is very important. Chain stretches during use. This is especially true during the first few times you use your saw. Always check chain tension each time you use and refuel your saw. An adjusting screw (located on the guide bar ) is used to adjust the tension of the chain (see illustration).
OPERATION KNOW YOUR SAW READ THIS INSTRUCTION MANUAL AND SAFETY RULES BEFORE OPERATING YOUR CHAIN SAW. Compare the illustrations with your unit to familiarize yourself with the location of the various controls and adjustments. Save this manual for future reference.
STARTING FUELING & LUBRICATION WARNING: Remove fuel cap slow- WARNING: The chain must not move when the engine runs at idle speed. If the chain moves at idle speed refer to CARBURETOR ADJUSTMENT within this manual. Avoid contact with the muffler. A hot muffler can cause serious burns. To stop the engine move the ON/STOP switch to the STOP position. To start the engine hold the saw firmly on the ground as illustrated. Make sure the chain is free to turn without contacting any object.
ON/STOP SWITCH ON STOP CHOKE/FAST IDLE LEVER (SIDE VIEW) Choke/Fast Idle Lever OFF FULL STARTING A WARM ENGINE: S Move ON/STOP switch to the ON position. S Pull the choke/fast idle lever out to the full extent, then push the lever back in completely (to the OFF position). S Slowly press the primer bulb 6 times. S Pull the starter rope quickly with your right hand until the engine starts. S Squeeze and release throttle trigger, allowing engine to idle.
S Keep the chain out of dirt and sand. Even a small amount of dirt will quickly dull a chain and thus increase the possibility of kickback. S Practice cutting a few small logs using the following techniques to get the “feel” of using your saw before you begin a major sawing operation. S Squeeze the throttle trigger and allow the engine to reach full speed before cutting. S Begin cutting with the saw frame against the log. S Keep the engine at full speed the entire time you are cutting.
NOTE: Before felling cut is complete, use wedges to open the cut when necessary to control the direction of fall. To avoid kickback and chain damage, use wood or plastic wedges, but never steel or iron wedges. S Be alert to signs that the tree is ready to fall: cracking sounds, widening of the felling cut, or movement in the upper branches. S As tree starts to fall, stop saw, put it down, and get away quickly on your planned retreat path. S DO NOT cut down a partially fallen tree with your saw.
1st Cut S Keep a clear work area. Frequently clear branches out of the way to avoid tripping over them. LIMBING 2nd Cut Using a support stand 2nd Cut 1st Cut 1st Cut 2nd Cut LIMBING AND PRUNING WARNING: Be alert for and guard against kickback. Do not allow the moving chain to contact any other branches or objects at the nose of the guide bar when limbing or pruning. Allowing such contact can result in serious injury. S Always limb a tree after it is cut down.
Muffler Diffuser Spark Arresting Screen Muffler Cover Screws MAINTENANCE SCHEDULE Lubricate bar sprocket hole . . . . . . . After each use Check: Fuel mixture level . . . . Bar lubrication . . . . . . . Chain tension . . . . . . . Chain sharpness . . . . For damaged parts . . For loose caps . . . . . . For loose fasteners. . . For loose parts . . . . . . Inspect and Clean: Bar . . . . . . . . . . . . . . . . Complete saw . . . . . . . Air filter . . . . . . . . . . . . . Chain brake . . . . . . . .
File Rail Edges and Sides Square Worn Groove Correct Groove Replace guide bar when the groove is worn, the guide bar is bent or cracked, or when excess heating or burring of the rails occurs. If replacement is necessary, use only the guide bar specified for your saw in the repair parts list or on the decal located on the chain saw. CHAIN SHARPENING Chain sharpening is a complicated task that requires special tools. We recommended you refer chain sharpening to a professional chain sharpener.
LIMITED WARRANTY ELECTROLUX HOME PRODUCTS NORTH AMERICA, Division of WCI Outdoor Products, Inc., warrants to the original purchaser that each new Poulan PRO brand gasoline chain saw is free from defects in material and workmanship and agrees to repair or replace under this warranty any defective gasoline chain saw as follows from the original date of purchase. 2 YEARS -- Parts and Labor, when used for Household purposes.
begins on the date the lawn and garden equipment engine is purchased. LENGTH OF COVERAGE: This warranty shall be for a period of two years from the initial date of purchase. WHAT IS COVERED: REPAIR OR REPLACEMENT OF PARTS. Repair or replacement of any warranted part will be performed at no charge to the owner at an approved POULAN/WEED EATER servicing center.