ENGLISH R Instruction Manual Manual de Instrucciones Manuel d’Instructions PPB1634 PPB1838 ESPAÑOL For Occasional Use Only Electrolux Home Products, Inc. 250 Bobby Jones Expressway Augusta, GA 30907 Copyright E2003 Electrolux Home Products, Inc. 530164284 11/14/03 FRANÇAIS WARNING: Read and follow all Safety Rules and Operating Instructions before using this product. Failure to do so can result in serious injury.
IDENTIFICATION OF SYMBOLS WARNING! Read and understand the instruction manual before using the chain saw. This chain saw can be dangerous! Careless or improper use can cause serious or even fatal injury. Always wear appropriateear protection, eye protection and head protection. Always use two hands when operating the chain saw. WARNING! Contacting the guide bar tip with any object should be avoided; tip contact may cause the guide bar to move suddenly upwardand backward, which may cause serious injury.
S Carefully plan your sawing operation in advance. Do not start cutting until you have a clear work area, secure footing, and, if you are felling trees, a planned retreat path. marked container for all fuel purposes. Wipe up all fuel spills before starting saw. S Move at least 10 feet (3 meters) from fueling site before starting engine. S Turn the engine off and let saw cool in a non-combustible area, not on dry leaves, straw, paper, etc. Slowly remove fuel cap and refuel unit.
Avoid Obstructions Elbow locked Clear The Working Area REDUCE THE CHANCE OF KICKBACK S Recognize that kickback can happen. With a basic understanding of kickback, you can reduce the element of surprise which contributes to accidents. S Never let the moving chain contact any object at the tip of the guide bar. S Keep the working area free from obstructions such as other trees, branches, rocks, fences, stumps, etc. Eliminate or avoid any obstruction that your saw chain could hit while you are cutting.
Reduced Kickback Symmetrical Guide Bar caused by allowing contact of the bar tip in the danger zone with any hard object. Kickback can also be caused by pinching the saw chain along the top of the guide bar. This action may push the guide bar rapidly back toward the operator. Either of these events may cause you to lose control of the saw which could result in serious injury or even death. DO NOT RELY UPON ANY OF THE DEVICES BUILT INTO YOUR SAW.
The chain is sharp and can cut you even when it is not moving! 1. Loosen and remove the chain brake nuts and the chain brake from the saw. 2. Remove the plastic shipping spacer (if present). Location of shipping spacer NOTE: If this saw is to be used for commercial logging, a chain brake is required and shall not be removed or otherwise disabled to comply with Federal OSHA Regulations for Commercial Logging.
Depth Gauge Cutters Checking the tension: Use the screwdriver end of the chain adjustment tool (bar tool) to move the chain around the bar. If the chain does not rotate, it is too tight. If too loose, the chain will sag below the bar. Drive Links Chain Adjustment Tool (Bar Tool) Chain Brake Nuts 7. 8. 9. 10. Adjusting the tension: Place chain onto the sprocket Place chain over and behind clutch, fitting the drive links in the clutch drum sprocket.
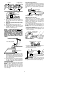
OPERATION KNOW YOUR CHAIN SAW READ THIS INSTRUCTION MANUAL AND SAFETY RULES BEFORE OPERATING YOUR CHAIN SAW. Compare the illustrations with your unit to familiarize yourself with the location of the various controls and adjustments. Save this manual for future reference.
STARTING FUELING & LUBRICATION WARNING: WARNING: The chain must not move when the engine runs at idle speed. If the chain moves at idle speed refer to CARBURETOR ADJUSTMENT within this manual. Avoid contact with the muffler. A hot muffler can cause serious burns. To stop the engine move the ON/STOP switch to the STOP position. To start the engine hold the saw firmly on the ground as illustrated. Make sure the chain is free to turn without contacting any object.
5. Push the choke/fast idle lever in to the HALF CHOKE position. CHOKE/FAST IDLE LEVER (SIDE VIEW) Choke/ fast idle lever OFF HALF FULL 6. Pull the starter rope sharply with your right hand until the engine starts. 7. Allow the engine to run for approximately 5 seconds. Then, squeeze and release the throttle trigger to allow engine to return to idle speed. STARTING A WARM ENGINE 1. Move ON/STOP switch to the ON position. 2. Pull the choke/fast idle lever out to the HALF CHOKE position. 3.
S Release the throttle trigger as soon as the cut is completed, allowing the engine to idle. If you run the saw at full throttle without a cutting load, unnecessary wear can occur to the chain, bar, and engine. It is recommended that the engine not be operated for longer than 30 seconds at full throttle. S To avoid losing control when cut is complete, do not put pressure on saw at end of cut. S Stop the engine before setting the saw down after cutting.
S DO NOT cut down a partially fallen tree with your saw. Be extremely cautious with partially fallen trees that may be poorly supported. When a tree doesn’t fall completely, set the saw aside and pull down the tree with a cable winch, block and tackle, or tractor. CUTTING A FALLEN TREE (BUCKING) Bucking is the term used for cutting a fallen tree to the desired log size. sure. Hold saw firmly and maintain control. The saw will tend to push back toward you. WARNING: Never turn saw upside down to undercut.
Using a support stand 2nd Cut S Remove larger, supporting branches with the cutting techniques described in BUCKING WITHOUT A SUPPORT. S Always use an overcut to cut small and freely hanging limbs. Undercutting could cause limbs to fall and pinch the saw. PRUNING 1st Cut 1st Cut 2nd Cut WARNING: Limit pruning to limbs shoulder height or below. Do not cut if branches are higher than your shoulder. Get a professional to do the job. S Make your first cut 1/3 of the way through the bottom of the limb.
AIR FILTER CAUTION: Do not clean filter in gasoline or other flammable solvent to avoid creating a fire hazard or producing harmful evaporative emissions. Cleaning the air filter: A dirty air filter decreases engine performance and increases fuel consumption and harmful emissions. Always clean after every 5 hours of operation. 1. Loosen 3 screws on cylinder cover. 2. Remove cylinder cover. 3. Remove air filter. 4. Clean the air filter using hot soapy water. Rinse with clean cool water.
S Turn idle speed screw (T) clockwise to increase engine speed. S Turn idle speed screw (T) counterclockwise to decrease engine speed. If you require further assistance or are unsure about performing this procedure, contact your authorized service dealer or call 1--800--554--6723. BAR MAINTENANCE If your saw cuts to one side, has to be forced through the cut, or been run with an improper amount of bar lubrication it may be necessary to service your bar.
TROUBLESHOOTING TABLE WARNING: Always stop unit and disconnect spark plug before performing all of the recommended remedies below except remedies that require operation of the unit. TROUBLE CAUSE Engine will not start or will run only a few seconds after starting. 1. Ignition switch off. 2. Engine flooded. Engine will not idle properly. 1. Idle speed requires adjustment. 2. Carburetor requires adjustment. 1. Air filter dirty. 2. Spark plug fouled. 3. Chain brake engaged. 4.
U.S. EPA/CALIFORNIA/ENVIRONMENT CANADA EMISSION CONTROL WARRANTY STATEMENT YOUR WARRANTY RIGHTS AND OBLIGATIONS: The U.S. Environmental Protection Agency, California Air Resources Board, Environment Canada and ELECTROLUX HOME PRODUCTS, INC., are pleased to explain the emissions control system warranty on your year 2002--2004 small off--road engine. In California, all small off--road engines must be designed, built, and equipped to meet the State’s stringent anti--smog standards.
The information on the product label indicates which standard your engine is certified. Example: (Year) EPA Phase 1 or Phase 2 and/or CALIFORNIA.