
Owner's Manual


15
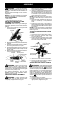
Mowing
SWEEPING -- The fanning action of the rotat-
ing line can be used for a quick and easy
clean up. Keep the line parallel to and above
the surfaces being swept and move the tool
from side to side.
Sweeping
MAINTENANCE
WARNING: Disconnect unit from
power source before performing maintenance.
CHECK FOR LOOSE
FA STENERS AND PART S
S Bar clamp nut
S Chain
S Bar adjusting screw
S Housing screws
S Assist handle screw
S Debris shield
CHECK FOR DAMAGED O R
WORN PARTS
Contact an authorized service dealer for re-
placement of damaged or worn parts.
S Trigger switch -- Ensure trigger switch func-
tions properly by pressing and releasing the
trigger switch. Make sure motor starts and
stops.
S Oil tank -- Discontinue use of unit if oil tank
shows signs of damage or leaks.
INSPECT AND CLEAN UNIT AND
LABELS
S After each use, inspect complete unit for
loose or damaged parts. Clean the unit
and labels using a damp cloth.
S Wipe off unit with a clean dry cloth.
CHECK CHAIN TENSION
WARNING: Wear protective gloves
when handling chain. The chain is sharp and
can cut you even when it is not moving. M ake
chain adjustments with lower end supported.
Chain tension is very important. Chains
stretch during use. This is especially true dur-
ing the first few times you use your pruner. Al-
ways check chain tension each time you use
your unit.
1. Use the screwdriver end of the chain ad-
justment tool (bar tool) to move chain
around guide bar to ensure kinks do not
exist. The chain should rotate freely .
Chain Adjustment Tool
Guide
Bar
2. Loosen bar clamp nut until it is finger tight
against the bar clamp.
Bar clamp nut
Adjusting Screw
3. Turn adjusting screw clockwise until
chain solidly contacts bottom of guide bar
rail. Then, turn adjusting screw an addi-
tional 1/4 turn.
Adjusting Screw -- 1/4 Turn
4. Using bar tool, roll chain around guide bar to
ensure all links are in bar groove.
5. Lift up tip of guide bar to check for sag.
Release tip of guide bar, then turn adjust-
ing screw 1/4 turn clockwise. Repeat until
sag does not exist.
6. While lifting tip of guide bar, tighten bar
clamp nut securely with the bar tool.
7. Use the screwdriver end of the bar tool to
move chain around guide bar .
8. If chain does not rotate, it is too tight.
Slightly loosen bar clamp nut and loosen
chain by turning the adjusting screw 1/4
turn counterclockwise. Retighten bar
clamp nut.
9. If chain is too loose, it will sag below the
guide bar and needs to be tightened fol-
lowing above procedure.
WARNING: DO NOT op er a te th e
pruner if the chain is loose. If the pruner is oper-
ated with a loose chain, the chain could jump off
the guide bar and result in serious injury.
CHECK CHAIN SHARPNESS
A sharp chain makes wood chips. A dull chain
makes a sawdust powder and cuts slowly.
See CHAIN SHARPENING in the SERVICE
AND ADJUSTM E NT S secti o n .