un er INGmow RNerate WAnot op les ntain s co er is pr op ssub erlyi jec t to we ar an d de n. Ch ratio tierio ba eck g fre qu pla Re tly. en ce wh ked crac en or da mag . Us ed e on ly a reco en mm de d re en cem pla t co ntain er. Do ING RN WA 84 020 OWNER’S MANUAL Model Number G422SL Product No. 960 73 00-23 42 Inch Mower Grass Catcher • • • • 532425565 11.19.08 BAD Assembly Operation Customer Responsibilities Repair Parts Printed in the U.S.A.
SAFETY RULES Safe Operation Practices for Ride-On Mowers IMPORTANT: THIS CUTTING MACHINE IS CAPABLE OF AMPUTATING HANDS AND FEET AND THROWING OBJECTS. FAILURE TO OBSERVE THE FOLLOWING SAFETY INSTRUCTIONS COULD RESULT IN SERIOUS INJURY OR DEATH. • WARNING: In order to prevent accidental starting when setting up, transporting, adjusting or making repairs, always disconnect spark plug wire and place wire where it cannot contact spark plug.
SAFETY RULES Safe Operation Practices for Ride-On Mowers IV. TOWING • • • • • • Tow only with a machine that has a hitch designed for towing. Do not attach towed equipment except at the hitch point. Follow the manufacturer's recommendation for weight limits for towed equipment and towing on slopes. Never allow children or others in or on towed equipment. On slopes, the weight of the towed equipment may cause loss of traction and loss of control. Travel slowly and allow extra distance to stop. • • • • V.
KNOW YOUR GRASS CATCHER READ THIS OWNER'S MANUAL AND SAFETY RULES BEFORE ASSEMBLING OR OPERATING YOUR GRASS CATCHER. Compare the illustrations with the carton contents to familiarize yourself with the parts before starting the assembly. Study the operating instructions and safety precautions thoroughly to insure proper functioning of your Grass Catcher and to prevent injury to yourself and others. Save this manual for future reference.
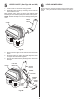
1 ASSEMBLY 2 REAR MOUNTING BRACKET (See Figs. 1A, 1B & 1C) NOTE: For ease of assembly, you may wish to obtain the assistance of another person for mounting cover assembly to tractor. 1. Lift and rotate cover to align cover bracket with support assembly. 2. Slide cover assembly down onto the support assembly. NOTE: If your tractor already has four (4) shoulder bolts installed on the rear drawbar, simply hang the mounting bracket, on the bolts. Discard included shoulder bolts and disregard Fig 1B.
3 4 CONTAINER MOUNTING (See Fig. 3) n wher. lace aine s Rep erlyi tly. ent cont propfrequen acem r is aine baged repl contCheck end ss unle tion.recomm er a INGmow riora only RN rater and detie ope d. Use WA not wea age Do ect to dam subjked or crac LOWER CHUTE (See Fig. 4A) 1. Raise and hold deflector shield in upright position. 2. Place slot in lower chute over mounting tab on mower and position lower chute over mower opening as shown. 3. Hook rear latch into flange hole on back of mower. 4.
4 LOWER CHUTE REINFORCEMENT PLATE INSTALLATION (See Fig. 4B) (For Models without the L Shaped Bracket Only) 1. Align reinforcement plate with slot in lower chute as shown. 2. Install reinforcement plate as shown; secure with carriage bolts and flanged locknuts provided in this kit. 3. Install lower chute to mower deck with reinforcement plate between hinge bracket and spring as shown. CARRIAGE BOLTS INSTALLED SLOT REINFORCEMENT PLATE LOWER CHUTE FLANGED LOCKNUTS Fig.
5 6 UPPER CHUTE (See Figs. 5A and 5B) 1. Lower mower to its lowest cutting position. 2. Assemble upper chute by inserting curved end into hole in back of cover. TIP: Holding upper chute as shown and twisting while installing in cover will help keep the rubber seal in place. NOTE: Handle carefully so as not to damage full bag indicator. Be sure deck is properly leveled for best mower performance. See your tractors owner's manual for instructions. UPPER CHUTE COVER Fig. 5A 3.
OPERATION TIPS FOR IMPROVED BAGGING OPERATION: • Your bagger is equipped with a full bagger indicator. Movement of the wheel increases as the bags fill. The wheel will be spinning fastest just before the bags fill completely. When the wheel stops, it indicates that the bags are full and the chutes have become clogged. NOTE: To help prevent clogging of chutes, check/empty bags when the wheel is spinning fast. Experience will teach you the best time to empty the bags.
CUSTOMER RESPONSIBILITIES GENERAL RECOMMENDATIONS CAUTION: Grass catcher components are subject to wear, damage and deterioration, which could expose moving parts or allow objects to be thrown. Frequently check components and replace with manufacturer's recommended parts, when necessary. Always observe safety rules when performing any maintenance. • Before each use check for loose fasteners. • Clean unit thoroughly after each use. BLADE CARE For best results mower blades must be kept sharp.
REPAIR PARTS GRASS CATCHER - MODEL NUMBER G422SL (PRODUCT NO. 960 73 00-23) *41 *40 *42 KEY NO. 2 3 4 5 6 7 8 9 10 11 12 13 14 15 18 20 21 22 23 24 25 PART NO.
SERVICE NOTES
REMARQUES D’ENTRETIEN
PIÈCES DE RECHANGE RAMASSE-HERBE - NO. DE MODÈLE G422SL (NO. DE PRODUIT 960 73 00-23) *41 NO DE PIÈCE *40 NO. DE RÉF.
RESPONSABILITÉS DU CLIENT RECOMMANDATIONS GÉNÉRALES Observez toujours les règles de sécurité quand vous faites l’entretien. • Avant chaque utilisation, vérifiez pour les attaches lâches. • Nettoyez complètement le produit après chaque utilisation. • • • • • • ATTENTION: AVANT D’EFFEC TUER TOUS L’ENTRETIEN, L’INS PECTION, OU RÉGLAGE: Appuyez complètement sur la pédale de frein/embrayage et fixez le frein de stationnement.
UTILISATION CONSEILS POUR AMÉLIORER LE RAMASSAGE: Suivez les instructions de l’utilisation de la tondeuse dans votre manuel du propriétaire de tracteur. Quand vous utilisez votre ramasse-herbe sur une pelouse où l’équipement du ramassage d’herbe et de feuille n’a pas été utilisé, vous ramassez le chaume et les débris qui ont accumulé pendant les durée longues.
Faites attention que le carter de tondeuse est correctement nivelé pour le meilleur rendement de la tondeuse. Référez-vous au manuel du propriétaire de votre tracteur pour les instructions. 1. Baissez le carter de tondeuse à la position de coupe plus basse. 2. Montez la glissière supérieure en insérant l’extrémité courbée dans le trou en l’arrière du couvercle.
4 1. 2. 3. INSTALLATION DE LA PLAQUE DE RENFORT DE LA GOULOTTE INFÉRIEURE (Voir les Figs. 4B) (Pour les modèles sans “L” support seulement.) Alignez la plaque de renfort à fente dans la goulotte inférieure comme indiqué. Installez la plaque de renfort comme indiqué ; fixez solidement à l’aide des boulons de carrosserie et des écrous d’arrêt à collet fournis dans ce kit.
3 n whe lace er. Rep contain lyis per uently.ment is pro freq lace er tain ck baged rep con ss n. Che end unle ratio recomm er INGmow erioonly a RN rater and deti ope d. Use WA not wea age Do ject to dam sub ked or crac MONTER LE BAC À GAZON (Voir la Fig. 3) 1. Installez premièrement un bac à gazon au côté à gauche. Installez un autre bac au centre et le dernier au côté à droite. REMARQUE: Un bac à droite devrait toujours chevaucher le bac à gauche aux soutiens centraux. 2.
1 MONTAGE SUPPORT DE MONTAGE ARRIÈRE (Voir Figs. 1A, 1B et 1C) REMARQUE: Si votre tracteur a déjà quatre (4) boulons à épaulement installés sur la barre d’attelage arrière, accrochez simplement le support de montage sur les boulons. Débarrassez-vous des boulons à épaulement qui es inclus et ne suivez pas la Fig. 1B. 2 COMMENT ASSEMBLER L'ENSEMBLE DE COUVERCLE A' L'ENSEMBLE DU SUPPORT (Voir Fig.
CONNAISSEZ VOTRE RAMASSE-HERBE LISEZ CE MANUEL DU PROPRIÉTAIRE ET LES RÈGLES DE SÉCURITÉ AVANT DE MONTER OU UTILISER VOTRE RAMASSEHERBE. Comparez les illustrations avec le contenu du carton pour se mettre au courant avant de commencer le montage. Étudiez complètement les instructions d’utilisation et les précautions de sécurité d'assurer le bon fonctionnement de votre ramasse-herbe et d’éviter les blessures à vous-même et aux autres. Conservez ce manuel pour la référence d’avenir.
RÈGLES DE SÉCURITÉ Conseils pour l’utilisation en toute sécurité des tracteurs • IV. REMORQUAGE • • • • • Ne remorquez qu’avec un véhicule conçu pour l’attelage. N’accrochez l’appareil remorqué qu’au crochet d’attelage. Suivez les recommandations du fabricant quant aux limites de poids des appareils remorqués et au remorquage dans les pentes. Ne laissez jamais les enfants ou d’autres personnes à bord des appareils remorqués.
RÈGLES DE SÉCURITÉ Conseils pour l’utilisation en toute sécurité des tracteurs IMPORTANT: CET TRACTEUR PEUT AMPUTER LES MAINS, LES PIEDS ET PROJETER DES OBJETS. L’INOBSERVATION DES RÈGLES DE SÉCURITÉ SUIVANTES PEUT ÊTRE LA CAUSE DE BLESSURES SÉRIEUSES ET MÊMES MORTELLES.
020 un er INGmow RNerate WAnot op les ntain er is pr op ssub erlyi jec t to we ar an d de n. Ch ratio tierio ba eck g fre qu en Re tly. pla ce wh ked crac en or da mag . Us ed e on ly a reco en mm de d re en cem pla t co ntain er. s co Do ING RN WA 84 MANUEL DU PROPRIÉTAIRE Numéro de Modèle G422SL Numéro de Produit 960 73 00-23 Tondeuse de 107 cm (42 po.) Ramasse-Herbe • • • • Montage Utilisation Responsabilités du Client Pièces de Rechange 532425565 11.19.