ENGLISH R Trademark Please do not return unit to retailer. Por favor, no devuelva el aparato al lugar de compra. Veuillez ne pas retourner l’outil au détaillant. 1--800--554--6723 www.weedeater.
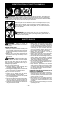
IDENTIFICATION OF SAFETY SYMBOLS WARNING: This unit can be dangerous! Careless or improper use can cause serious injury. Read your operator’s manual carefully until you completely understand and can follow all warnings and safety rules before operating the unit. Failure to do so can result in serious injury. Save operator’s manual. WARNING: The muffler is very hot during and after use.
IDENTIFICATION OF SAFETY SYMBOLS WARNING: Stop the engine before opening the vacuum inlet door. The engine must be stopped and the impeller blades no longer turning to avoid serious injury from the rotating blades. Gently tilt the handle of the screwdriver toward the back of the unit to release the latch while pulling up on the vacuum inlet cover with your other hand. When using the vacuum attachment, the unit is designed to pick up dry material such as leaves, grass, small twigs, and bits of paper.
D D D D D Make sure the unit is properly assembled and in good operating condition. Do not fill fuel tank while engine is hot or running. Avoid spilling fuel or oil. Wipe up fuel spills before starting engine. Move at least 10 feet (3 meters) away from fuel and fueling site before starting engine. Always store gasoline in a container approved for flammable liquids. OPERATE YOUR UNIT SAFELY WARNING: Stop the engine before opening the vacuum inlet door.
ASSEMBLY WARNING: Stop engine and be sure the impeller blades have stopped turning before opening the vacuum inlet door or attempting to insert or remove the vacuum or blower tubes. The rotating blades can cause serious injury. Always disconnect the spark plug before performing maintenance or accessing movable parts. Rib Groove WARNING: If you receive your unit assembled, check each step to insure your unit is properly assembled and all fasteners are secure.
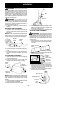
5. Place the hooks of the upper vacuum tube on the retaining posts of the unit. 6. Pivot the tube until it is secured to the blower unit by the vacuum inlet latch. PIVOT 3. Remove the vacuum bag. 4. Close the vacuum inlet cover and make sure it is latched closed. 5. Reinstall the blower tube (see BLOWER TUBE ASSEMBLY). SHOULDER STRAP ADJUSTMENT 1 Hold the unit as shown with the muffler side facing away from your body and clothes. 2. Pass the shoulder strap over your head and onto your right shoulder. 3.
OPERATION KNOW YOUR BLOWER READ THIS INSTRUCTION MANUAL AND SAFETY RULES BEFORE OPERATING YOUR UNIT. Compare the illustrations with your unit to familiarize yourself with the location of the various controls and adjustments. Save this manual for future reference.
S In dusty conditions, slightly dampen surfaces or use a mister attachment when water is available. S Conserve water by using power blowers instead of hoses for many lawn and garden applications, including areas such as gutters, screens, patios, grills, porches, and gardens. S Watch out for children, pets, open windows, or freshly washed cars. Blow debris away safely. S Use the full blower nozzle extension so the air stream can work close to the ground.
STARTING A COLD ENGINE 1. Move throttle lever to the position. 2. Move choke lever to the FULL CHOKE position. 3. Slowly press the primer button 8 times. Throttle Lever Primer Button 8. Allow the unit to run for 30 more seconds at the RUN position before moving the throttle lever to the position. If engine has not started after 5 pulls (at HALF CHOKE), repeat STARTING A COLD ENGINE procedure. If engine still does not start, proceed to STARTING A FLOODED ENGINE. 9.
CLEAN AIR FILTER REPLACE FUEL FILTER To replace fuel filter, drain unit by running it dry of fuel, then remove fuel cap/retainer assembly from tank. Pull filter from tank and remove it from the fuel line. Install new fuel filter on fuel line; reinstall parts. Air Filter Cover Fuel Line Fuel Filter Screws Air Filter CHECK MUFFLER MOUNTING SCREWS Cleaning the air filter: A dirty air filter decreases engine performance and increases fuel consumption and harmful emissions.
FUEL SYSTEM Under FUELING ENGINE in the OPERATION section of this manual, see message labeled IMPORTANT regarding the use of gasohol in your engine. Fuel stabilizer is an acceptable alternative in minimizing the formation of fuel gum deposits during storage. Add stabilizer to gasoline in fuel tank or fuel storage container. Follow the mix instructions found on stabilizer container. Run engine at least 5 minutes after adding stabilizer.
LIMITED WARRANTY WEED EATER warrants to the original purchaser that each new WEED EATER brand gasoline tool or attachment is free from defects in material and workmanship and agrees to repair or replace under this warranty any defective gasoline product or attachment as follows from the original date of purchase: 2 YEARS-- Parts and Labor, when used for household purposes. 90 DAYS - Parts and Labor, when used for commercial, professional, or income producing purposes.
for regular inspection to the effect of “repair or replace as necessary” shall be warranted for 2 years. Any warranted part which is scheduled for replacement as required maintenance shall be warranted for the period of time up to the first scheduled replacement point for that part. DIAGNOSIS: The owner shall not be charged for diagnostic labor which leads to the determination that a warranted part is defective if the diagnostic work is performed at an approved WEED EATER servicing center.