MODEL NO. CN1842STA 18.0 HP 42 INCH LAWN TRACTOR • Assembly • Operation • Maintenance • Service and Adjustments • Storage • Troubleshooting • Repair Parts For Parts and Service, contact our authorized distributor: call 1-800-849-1297 For Technical Assistance: call 1-800-829-5886 191603 02.27.04 TR PRINTED IN U.S.A.
TABLE OF CONTENTS Warranty ................................................ 2 Safety Rules .......................................... 3 Product Specifications ........................... 6 Assembly/Pre-Operation ....................... 8 Operation............................................. 11 Maintenance Schedule ........................ 16 Maintenance ........................................ 16 Service and Adjustments..................... 20 Storage ................................................
SAFETY RULES IMPORTANT: This cutting machine is capable of amputating hands and feet and throwing objects. Failure to observe the following safety instructions could result in serious injury or death. • Be aware of the mower discharge direction and do not point it at anyone. Do not operate the mower without either the entire grass catcher or the guard in place. • Slow down before turning. • Never leave a running machine unattended.
SAFETY RULES • Watch for holes, ruts, or bumps. Uneven terrain could overturn the machine. Tall grass can hide obstacles. • Use slow speed. Choose a low gear so that you will not have to stop or shift while on the slope. • Follow the manufacturer’s recommendations for wheel weights or counterweights to improve stability. • Use extra care with grass catchers or other attachments. These can change the stability of the machine. • Keep all movement on the slopes slow and gradual.
SAFETY RULES • Remove obstacles such as rocks, tree limbs, etc. • Watch for holes, ruts, or bumps. Uneven terrain could overturn the machine. Tall grass can hide obstacles. • Use slow speed. Choose a low gear so that you will not have to stop or shift while on the slope. • Avoid starting or stopping on a slope. If tires lose traction, disengage the blades and proceed slowly straight down the slope. • If machine stops while going uphill, disengage blades, shift into reverse and back down slowly.
PRODUCT SPECIFICATIONS CUSTOMER RESPONSIBILITIES Gasoline Capacity and Type: Oil Type (API-SF-SJ): Oil Capacity: • Read and observe the safety rules. • Follow a regular schedule in maintaining, caring for and using your tractor. • Follow the instructions under “Maintenance” and “Storage” sections of this owner’s manual.
UNASSEMBLED PARTS Steering Wheel Steering Wheel Insert (1) Hex nut 1/2-20 (1) Large Flat Washer Steering Extension Shaft (1) Hex Bolt 1/4-28 x 1-1/4 (1) Locknut 1/4-28 Steering Wheel Adapter Steering Boot Seat (1) Washer 17/32 x 1-3/16 x 12 Gauge (1) Lock Washer 1/2 (1) Bolt Slope Sheet (1) Oil Drain Tube For Future Use Keys (2) Keys 7
ASSEMBLY/PRE-OPERATION Your new tractor has been assembled at the factory with the exception of those parts left unassembled for shipping purposes. To ensure safe and proper operation of your tractor all parts and hardware you assemble must be tightened securely. Use the correct tools as necessary to insure proper tightness. Review the video cassette before you begin. TOOLS REQUIRED FOR ASSEMBLY Insert 1/2 Hex Nut Large Flat Washer A socket wrench set will make assembly easier.
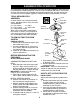
4. Push down on seat to engage shoulder bolt in slot and pull seat towards rear of tractor. 5. Pivot seat and pan forward and assemble adjustment bolt, lockwasher and flat washer loosely. Do not tighten. 6. Lower seat into operating position and sit in seat. 7. Slide seat until a comfortable position is reached which allows you to press clutch/brake pedal all the way down. 8. Get off seat without moving its adjusted position. 9. Raise seat and tighten adjustment bolt securely.
INSTALL MULCHER PLATE CHECK DECK LEVELNESS (If previously removed) For best cutting results, mower housing should be properly leveled. See “TO LEVEL MOWER HOUSING” in the Service and Adjustments section of this manual. 1. Raise and hold deflector shield in upright position. 2. Place front of mulcher plate over front of mower deck opening and slide into place, as shown. 3. Hook front latch into hole on front of mower deck. 4. Hook rear latch into hole on back of mower deck.
OPERATION These symbols may appear on your tractor or in literature supplied with the product. Learn and understand their meaning.
KNOW YOUR TRACTOR READ THIS OWNER'S MANUAL AND SAFETY RULES BEFORE OPERATING YOUR TRACTOR Compare the illustrations with your tractor to familiarize yourself with the locations of various controls and adjustments. Save this manual for future reference.
00155 The operation of any tractor can result in foreign objects thrown into the eyes, which can result in severe eye damage. Always wear safety glasses or eye shields while operating your tractor or performing any adjustments or repairs. We recommend a wide vision safety mask over spectacles or standard safety glasses. HOW TO USE YOUR TRACTOR IMPORTANT: Leaving the ignition switch in any position other than "STOP" will cause the battery to discharge and go dead.
TO TRANSPORT • Raise attachment lift to highest position with attachment lift control. • When pushing or towing your tractor, be sure gearshift lever is in neutral (N) position. • Do not push or tow tractor at more than five (5) MPH. NOTE: To protect hood from damage when transporting your tractor on a truck or a trailer, be sure hood is closed and secured to tractor. Use an appropriate means of tying hood to tractor (rope, cord, etc.).
• The attachments can also be used during the engine warm-up period. NOTE: If at a high altitude (above 3000 feet) or in cold temperatures (below 32 F) the carburetor fuel mixture may need to be adjusted for best engine performance (see “TO ADJUST CARBURETOR” in the Service and Adjustments section of this manual). CAUTION: Alcohol blended fuels (called gasohol or using ethanol or methanol) can attract moisture which leads to separation and formation of acids during storage.
MAINTENANCE MAINTENANCE SCHEDULE FILL IN DATES AS YOU COMPLETE REGULAR SERVICE S E GE S RS RS US UR N RA UR OU HOU HO ASO TO O H 0 S 8H SE RE 25 10 50 Y Y Y Y Y RE ER VER VER VER VER EFO FO V E B SERVICE E E E E E B H C EA DATES Check Brake Operation Check Tire Pressure T R A C T 0 R Check Operator Presence and Interlock Systems Check for Loose Fasteners 5 Sharpen/Replace Mower Blades 3 Lubrication Chart Check Battery Level 4 Clean Battery and Terminals Check Transaxle Cooling Check V-Belts Chec
4. Reassemble blade bolt, lock washer and flat washer in exact order as shown. 5. Tighten blade bolt securely (27-35 Ft. Lbs. torque). IMPORTANT: Blade bolt is heat treated. If bolt needs replacing, replace only with approve bolt shown in the Repair Parts. TRACTOR Trailing Edge Up Flat Washer Lock Washer Blade Mandrel Assembly 4 21 01 Always observe safety rules when performing any maintenance.
NOTE: The original equipment battery on your tractor is maintenance free. Do not attempt to open or remove caps or covers. Adding or checking level of electrolyte is not necessary. TO CHANGE ENGINE OIL Determine temperature range expected before oil change. All oil must meet API service classification SF-SJ. • Be sure tractor is on level surface. • Oil will drain more freely when warm. • Catch oil in a suitable container. 1. Remove oil fill cap/dipstick.
MUFFLER Inspect and replace corroded muffler and spark arrester (if equipped) as it could create a fire hazard and/or damage. CLEANING • Clean engine, battery, seat, finish, etc. of all foreign matter. • Keep finished surfaces and wheels free of all gasoline, oil, etc. • Protect painted surfaces with automotive type wax. We do not recommend using a garden hose or pressure washer to clean your tractor unless the engine and transmission are covered to keep water out.
SERVICE AND ADJUSTMENTS WARNING: TO AVOID SERIOUS INJURY, BEFORE PERFORMING ANY SERVICE OR ADJUSTMENTS: 1. Depress clutch/brake pedal fully and set parking brake. 2. Place gearshift lever in neutral (N) position. 3. Place attachment clutch in “DISENGAGED” position. 4. Turn ignition key to “STOP” and remove key. 5. Make sure the blades and all moving parts have completely stopped. 6. Disconnect spark plug wire from spark plug and place wire where it cannot come in contact with plug.
TO LEVEL MOWER HOUSING Adjust the mower while tractor is parked on level ground or driveway. Make sure tires are properly inflated (See “PRODUCT SPECIFICATIONS” section of this manual). If tires are over or underinflated, you will not properly adjust your mower. • Before making any necessary adjustments, check that both front links are equal in length. • If links are not equal in length, adjust one link to same length as other link.
TO REPLACE MOWER BLADE DRIVE BELT The mower blade drive belt may be replaced without tools. Park the tractor on level surface. Engage parking brake. 2. Measure distance between brake operating arm and nut “A” on brake rod. 3. If distance is other than 1-1/2", loosen jam nut and turn nut “A” until distance becomes 1-1/2". Retighten jam nut against nut “A”. 4. Road test tractor for proper stopping distance as stated above. Readjust if necessary.
Engine Pulley Washers Retaining Ring Axle Cover Clutching Idler Stationary Idler Center Span Keeper 3 0066 Square Key (Rear Wheel Only) Transaxle Pulley TO START ENGINE WITH A WEAK BATTERY WARNING: Lead-acid batteries generate explosive gases. Keep sparks, flame and smoking materials away from batteries. Always wear eye protection when around batteries. If your battery is too weak to start the engine, it should be recharged. (See "BATTERY" in the MAINTENANCE section of this manual).
REPLACING BATTERY WARNING: Do not short battery terminals by allowing a wrench or any other object to contact both terminals at the same time. Before connecting battery, remove metal bracelets, wristwatch bands, rings, etc. Positive terminal must be connected first to prevent sparking from accidental grounding. 1. Lift seat pan to raised position. 2. Disconnect BLACK battery cable first then RED battery cable and carefully remove battery from tractor. 3.
STORAGE Immediately prepare your tractor for storage at the end of the season or if the tractor will not be used for 30 days or more. WARNING: Never store the tractor with gasoline in the tank inside a building where fumes may reach an open flame or spark. Allow the engine to cool before storing in any enclosure. TRACTOR Remove mower from tractor for winter storage. When mower is to be stored for a period of time, clean it thoroughly, remove all dirt, grease, leaves, etc. Store in a clean, dry area. 1.
TROUBLESHOOTING CHART PROBLEM Will not start CAUSE 1. Out of fuel. 2. Engine not “CHOKED” properly. 3. Engine flooded. CORRECTION 1. Fill fuel tank. 2. See “TO START ENGINE” in Operation section. 3. Wait several minutes before attempting to start. 4. Bad spark plug. 4. Replace spark plug. 5. Dirty air filter. 5. Clean/replace air filter. 6. Dirty fuel filter. 6. Replace fuel filter. 7 Water in fuel. 7. Empty fuel tank and carburetor, refill tank with fresh gas oline and replace fuel filter. 8.
TROUBLESHOOTING CHART PROBLEM Loss of power (continued) CAUSE 3. Build-up of grass, leaves and trash under mower. 4. Dirty air filter. 5. Low oil level/dirty oil. 6. Faulty spark plug. CORRECTION 3. Clean underside of mower housing. 4. Clean/replace air filter. 5. Check oil level/change oil. 6. Clean and regap or change spark plug. 7. Dirty fuel filter. 7. Replace fuel filter. 8. Stale or dirty fuel. 8. Empty fuel tank and refill tank with fresh, clean gasoline. 9. Water in fuel. 9.
TROUBLESHOOTING CHART PROBLEM Poor grass discharge CAUSE CORRECTION 1. Engine speed too slow. 2. Travel speed too fast. 3. Wet grass. 4. Mower deck not level. 5. Low/uneven tire air pressure. 6. Worn, bent or loose blade. 7. Buildup of grass, leaves and trash under mower. 8. Mower drive belt worn. 9. Blades improperly installed. 10. Improper blades used. 11. Clogged mower deck vent holes from buildup of grass, leaves, and trash around mandrels. Headlight(s) not working (if so equipped) 1. 2. 3. 4. 5.
1. Fold this page along dotted line indicated above. 2. Hold page before you so that its left edge is vertically parallel to a tree trunk or other upright structure. 3. Sight across the fold in the direction of hill slope you want to measure. 4. Compare the angle of the fold with the slope of the hill. WARNING: To avoid serious injury, operate your tractor up and down the face of slopes, never across the face. Do not mow slopes greater than 15 degrees.