
Owner's Manual


10
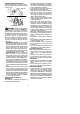
S After r emoving the wood from the not ch,
make the felling cut on the opposite side
of the notch. This is done by making a
cut about two i nches higher t han the
center of the notch. This wil l leave
enough uncut wood between the felling
cut and the notch to for m a hinge. This
hinge wil l help prevent the tree from fal-
ling in the wrong direction.
Opening
of felling
cut
Closing of
notch
Hing e holds tree on stump and
helps control fall.
NOTE: Before felling cut is complete,
use wedges to open the cut when
necessary to co ntrol the direction of fall.
To avoid kickback an d c hain da mage,
use wood or plastic wedges, but never
steel or iron wedges.
S Be alert to signs that the tree is ready to
fall : crackin g sounds, wideni ng of t he
felling cut, or movement in the upper
branches.
S As tree starts to fall, stop saw, put it
down, and get away quickly on your
planned retr eat path.
S
DO NOT use your saw to cut down a par-
ti all y fallen tree. Be extremely cautious
with partially fallen trees that may be
poorly supported. When a tree doesn’t
fall completely, set saw aside and pull
down tree with a cable winch, block and
tackle, or tractor .
CUTTING A FALLEN TREE
(BUCKING)
Buckin g is the term used for cutt i ng a fall-
en tree to the desired log size.
WARNING: Do not stand on the
log being cut. Any portion can roll caus-
ing loss of footing and co ntrol. Do not
stand d ownhill of the log being cut.
IMPORTANT POINTS
S Cut only one log at a time.
S Cut shattered wood very car ef ul ly;
sharp pieces of wood could be flung to-
ward operator.
S Use a sawhorse to cut small l ogs. Never
allow another person to hold the l og
while cutting and never hold the log with
your leg or foot.
S Do not cut in an are a where logs, lim bs ,
and roots are tangled. Drag logs into a
clear area before cutting them by pulling
out exposed and cleared logs fir st.
BUCKING TECHNIQUES
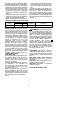
WARNING: If saw becomes
pinched or hung i n a l og, don’t tr y to for ce it
out . You can lose cont rol of the saw result-
ing in injury and/or damage t o the saw.
St op the saw, dri ve a wedge of plast ic or
wood into the cut until the saw can be re-
movedeasily.Restartthesawandcare-
full y reent er the cut. Do not use a metal
wedge. Do not attempt to restar t your saw
when it is pinched or hung in a log.
Use a wedge to remove pinched saw
Turn saw OFF and use a plastic or
wooden wedge to force cut open.
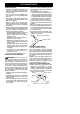
Overcutting begins on the top side of the
log wit h the bottom of the saw against the
log. When overcutti ng use light downward
pressure.
Overcutting Undercutting
Undercutt i ng involves cutting on the un-
derside of the log with top of saw against
the log. When under c utt ing use light up-
ward pressure. Hold saw fir ml y and main-
tain contr ol . The saw wi ll tend to push
back toward you.
WARNING: Never turn saw upside
down to und ercut. The saw cannot be
controlled in this position.
Alwa ys make your fi rst cut on the com-
pressions side of the log. The compres-
sion side of the log is where the pressure
of the log’ s weight is concentrat ed.
First cut on compression side of log
Second cut
First cut on compression side of log
Second cut
BUCKING WITHOUT A SUPPORT
S Over cu t through
1/3 of the diameter of
the log.
S Roll the log over and finish with a sec-
ond overcut .