
Owner's Manual


16
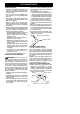
8. Pull guide bar forward until the chain
is snug in the guide bar groove. En-
sure all drive links are in the bar
groove.
9. Install bar clamp. Be s ure adjusting
pin is in the adjusting pin hole in the
guide bar.
CAUTION : It is very impor tant when ins-
talling the bar clamp that the adjusting pin
aligns i nt o t he adjusti ng pin hole in the bar.
Failure to install the bar clamp correctly
may result in permanent damage to your
chain saw.
Back
view of
bar
clamp
Adjusting pin
10. Install bar knob; finger tighten only.
Do not tighten any further at this
point. Proceed to
CHAIN ADJUST-
MENT.
CHAIN ADJUSTMENT
See
CHECK CHAIN TENSION in the MAIN-
TENA NCE
section.
CUSTOMER SERVICEABLE PARTS
WARNING: Use of any other ac-
cessory or attachment might present a
risk of injury to the operator.
REPLACEMENT PART PART NO.
Oil Cap 530053072
Chain Catcher 530029850
Screw 530016269
File (5/32″ dia.) T win Pak 952055085
Chain --18″ 952051338
Guide Bar -- 18″ 952044418
Bar & Chain Lubricant --1 qt. 952030203
Bar & Chain Lubricant --1 gal. 952030204
STORAGE
WARNING: Perform the following
steps after each use:
S Allow motor to cool before storing or
transporting.
S St ore chain saw and ext e nsion cord in a
well ventilated area
S St ore chai n saw wit h all guards in place
and position chain saw so that
any sharp object cannot accidentall y
cause injury.
S Store chain saw unplugged, well out of
the reach of children.
SEASONAL STORAGE
Prepare your unit for storage at the end of
the season or if it will not be used for 30
days or more.
If your chain saw is to be stored for a
peri od of time:
S Clean it thoroughl y befor e lengthy stor-
age.
S Stor e in a clean dry area.
S Lig htl y oil exter na l met al sur faces and
guid e bar.
S Oil the chain and wrap it in heavy
paperorcloth.