OPERATOR'S MANUAL DELUXE PUSH ROTARY LAWN MOWER • Assembly • Operation • Maintenance • Service and Adjustments • Storage • Troubleshooting 172782 Rev. 3 05.13.03 BY Printed in U.S.A.
Safety Rules .......................................... 2-3 Assembly ............................................... 4-8 Operation ............................................. 9-15 Maintenance ...................................... 16-18 Service and Adjustments ................... 18-20 Storage .............................................. 20-21 Troubleshooting ................................. 22-23 IMPORTANT: This cutting machine is capable of amputating hands and feet and throwing objects.
I1. SLOPE OPERATION Slopes are a major factor related to slip and fall accidents which can result in severe injury. All slopes require extra caution. If you feel uneasy on a slope, do not mow it. DO: • Mow across the face of slopes: never up and down. Exercise extreme caution when changing direction on slopes. • Remove obstacles such as rocks, tree limbs, etc. • Watch for holes, ruts, or bumps. Tall grass can hide obstacles. DO NOT: • Do not trim near drop-offs, ditches or embankments.
TO REMOVE MOWER FROM CARTON • Remove all loose parts from carton. • Remove lawn mower housing with care. Avoid touching blade under housing. wear gloves or other protection when working under or lifting mower. THINGS TO KNOW BEFORE YOU ASSEMBLE MOWER Do I have a side or rear discharge lawn mower? Look for the grass discharge opening on your mower. If the opening is on the right side of the mower housing, it is a side discharge mower.
3 POSITION "QUICK" HANDLES • Raise lower handle section to operating position and squeeze the bottom ends of lower handle towards each other until the pin in handle can be inserted into one of the three height adjustment holes. Operator control bar UP LIFT UF 3 POSITION "QUICK" Handle pin Mowing position Lower handle SQU Handle adj bracket \ 3 POSITION "EURO" / "EZ" HANDLES • Raise lower handle section to operating position and align hole in handle with one of three height positioning holes.
HINGE BRACKET MOUNTED ASSEMBLE GRASS CATCHER (REAR DISCHARGE MOWERS ONLY) IMPORTANT: If your model lawn mower is mulcher ready, the mulcher plate or plug must be removed before using mower as a bagger. To convert mower to bagging or discharging, see the Operation section in this manual. Look at the different grass catcher illustrations that follow. Determine which type of grass catcher you have and follow the appropriate instructions.
"HARDTOP"GRASS ASSEMBLE FRAME CATCHER • Install two (2) blunt pointed screws in front holes and tighten securely. AND BAG • Thread upper tubular frame into hem of bag as shown. Be sure angled ends of frame point downwards. • Slip lower frame into tubular upper frame as shown. • Slip vinyl bindings over frame. Sharp pointed screws (Rear and side holes) Catcher bag and frame Catcher top Blunt pointed screws (Front holes) TO ATTACH HARD TOP CATCHER • Open the rear door on mower housing.
SPARK PLUG BOOT On some models a spark plug boot is packed loose in the parts bag. If your model has the boot, install on spark plug wire and reconnect spark plug wire to spark plug. Spark plug IMPORTANT: The engine alternator will not charge a discharged battery. ALL UNITS: At the end of the mowing season the battery should be charged for 48 hours to protect the battery during winter storage.
BRIGGS & STRATTON CLASSIC or SPRINT ENGINE MOUNTED SPEED CONTROL The operation of any lawn mower can result in foreign objects thrown into the eyes, which can result in severe eye damage. Always wear safety glasses or eye shields while operating your lawn mower or performing any adjustments or repairs. We recommend standard safety glasses or a wide vision safety mask worn over spectacles.
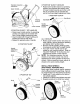
TO ADJUST CUTTING HEIGHT Adjust cutting height to suit your requirements. Medium position is best for most lawns. Raise wheels for low cut and lower wheels for high cut. MODELS WITH MANUAL BOLT-ON WHEELS ADJUST • Remove wheel, bolt, and hardware and reassemble in desired adjustment hole. • Reinstall wheel components in the same order as they were before removal. Tighten securely. • Make sure all wheels are at the same height.
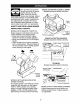
MULCHER PLUGBUILTINTOREARDOOR • Position lock lever over hinge bracket as shown and raise lever to lock mulcher plug in place. • Allow discharge guard to rest against lock lever. • To return to discharging or bagging operation, simply lower lock lever and remove mulcher plug from mower. ACi, CAUTION: Do not run your lawn mower without discharge guard, approved grass catcher or mulcher plate or plug in place.
MULCHER PLUG TYPE "B" To convert to mulching operation, mulcher plug must be installed into discharge opening of mower. • Open discharge guard. • Insert tab of mulch plug into housing opening. • Align hooks of mulch plug over hinge rod of discharge guard. Push mulch plug down until mulch plug is seated in housing opening. _kCAUTION: Do not run your lawn mower without discharge guard, approved grass catcher or mulcher plug in place.
Open mulcher door Discharge deflector GRASS CATCHER (REAR BAGGING MODELS TO EMPTY GRASS CATCHER • Simply open rear door and lift grass catcher up and away from mower. NOTE: Do not drag the bag when emptying. It will cause unnecessary wear. _iI,CAUTION: Under normal usage, the catcher material is subject to deterioration and wear and should, therefore, be checked frequently for replacement. Any replacement catcher should be checked to ensure compliance with original manufacturer's specifications.
BEFORE STARTING ENGINE Read the engine manual packed with your mower. FILL ENGINE WITH OIL TO START ENGINE _CAUTION: The mower blade rotates whenever the engine is running. • Move engine speed control to FAST position (or to CHOKE/START position on models equipped with choke feature). • If your mower has a primer, to start a cold engine, push primer as many times as instructed in the engine manual packed with your mower. Use a firm push.
MOWING TIPS • For most cutting conditions and better bagging performance, the engine speed should be set in the FAST position. • Under certain conditions, such as when mowing very tall grass, raise the mower height on the first cut to reduce pushing effort, to avoid overheating the engine, and to avoid leaving clumps of grass clippings. Make the second cut to the desired height. • For extremely heavy cutting, reduce the width of cut.
j ,,..°o.s AT ,sYou COMP, E sE °v.oE SE.
LAWN MOWER Always observe safety rules when performing any maintenance. TIRES • Keep tires free of gasoline, oil, or insect control chemicals which can harm rubber. • Avoid stumps, stones, deep ruts, sharp objects and other hazards that may cause tire damage. BLADE CARE For best results, mower blade must be kept sharp. Replace bent or damaged blades. TO REPLACE BLADE • Turn lawn mower. See engine manual for proper direction of turning over the engine.
MUFFLER Inspectand replacecorroded muffleras it could create a fire hazard and/ordamage. SPARK PLUG Replace spark plug at the beginning of each mowing season or after every 100 hours of operation, whichever occurs first. Set spark plug gap according to engine manual specifications. CLEANING IMPORTANT: For best performance, keep mower housing free of grass build-up and trash. Clean the underside of your mower after each use.
3 POSITION"EURO"OR"EZ" The handleon your lawn mowerhas three (3) heightpositions - adjust to height that suits you. • Removeknoband carriage bolt on one side of the lowerhandle. • While holding handleassembly,remove knoband carriage bolt from opposite side, align hole in handlewith desired hole in handle bracketand reassemble bolt and knob and tightensecurely. • Align oppositeside of handlewith same positioninghole and securewith bolt and knob.
ENGINE CARBURETOR The carburetor has been preset at the factory and adjustment should not be necessary. However, minor adjustment may be required to compensate for differences in fuel, temperature, altitude or load. • The air filter must be assembled to the carburetor when running engine. • Best carburetor adjustment is obtained when fuel tank is 1/4 full. • In order for the engine to run, the operator presence control bar must be held in the operating position.
3 POSITIONHANDLES fuel hose, or tank during storage. Also, When setting up your handlefrom the stor- experience indicates that alcohol blended age position, the lower handlewill require fuels (called gasohol or using ethanol or manuallylockinginto the mowingposition. methanol) can attract moisture which leads 3 POSITION "EURO" Handle adjustment Knob Bolt Knob J Handle bracket 3 POSITION "QUICK" to separation and formation of acids during storage.
TROUBLESHOOTING - See appropriate to an authorized Service Center. PROBLEM Does not start section CAUSE unless directed CORRECTION 1. Dirty air filter. Out of fuel. 3. Stale fuel. = 1. Clean/replace air filter. Fill fuel tank. 3. Drain fuel tank and refill tank with fresh, clean gasoline. 4. Drain fuel tank and refill tank with fresh, clean gasoline. 5. Connect wire to plug. = 4. Water in fuel. 5. Spark plug wire is disconnected. 6. Bad spark plug. 7. Loose blade or broken blade adapter. 8.
TROUBLESHOOTING to an authorized PROBLEM Poor cut uneven - See appropriate Service section in manual unless directed Center. CAUSE CORRECTION 1. Worn, bent or loose blade. 2. Wheel heights uneven. 3. Buildup of grass, leaves and trash under mower. Excessive vibration 1. Worn, bent or loose blade. 2. Bent engine crankshaft. Starter rope hard to pull Engine flywheel brake is on when control bar is released. 2. Bent engine crankshaft. 3. Blade adapter broken. 4. Blade dragging in grass. 1.