ENGLISH R Please do not return unit to retailer. Por favor, no devuelva el aparato al lugar de compra. Veuillez ne pas retourner l’outil au détaillant. 1--800--554--6723 www.poulan.com Instruction Manual Manual de Instrucciones Manuel d’Instructions For Occasional Use Only ESPAÑOL P3314 / P3314WS / P3314WSA P3416 / P3516PR / P4018 P4018WM / P4018WT / P3818AV P4018AV / P4018AV BH WARNING: Read and follow all Safety Rules and Operating Instructions before using this product.
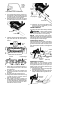
IDENTIFICATION OF SYMBOLS WARNING! This chain saw can be dangerous! Careless or improper use can cause serious or even fatal injury. Read and understand the instruction manual before using the chain saw. Always wear appropriate ear protection, eye protection and head protection. Always use two hands when operating the chain saw.
gloves; eye protection such as non-fogging, vented goggles or face screen; an approved safety hard hat; and sound barriers (ear plugs or mufflers) to protect your hearing. Regular users should have hearing checked regularly as chain saw noise can damage hearing. Secure hair above shoulder length.
S Begin and continue cutting at full speed. If the chain is moving at a slower speed, there is greater chance of kickback occurring. S Cut one log at a time. S Use extreme caution when re-entering a previous cut. S Do not attempt cuts starting with the tip of the bar (plunge cuts). S Watch for shifting logs or other forces that could close a cut and pinch or fall into chain. S Use the Reduced--Kickback Guide Bar and Low--Kickback Chain specified for your saw.
KICKBACK SAFETY FEATURES WARNING: WE DO NOT REPRESENT AND YOU SHOULD NOT ASSUME THAT THE CHAIN BRAKE WILL PROTECT YOU IN THE EVENT OF A KICKBACK. Kickback is a lightning fast action which throws the bar and rotating chain back and up toward the operator. Kickback can be caused by allowing contact of the bar tip in the danger zone with any hard object. Kickback can also be caused by pinching the saw chain along the top of the guide bar. This action may push the guide bar rapidly back toward the operator.
Computed kickback angle (CKA) Table BAR MODEL P3314 / P3314WS P3314WSA P3416 / P3516PR P4018 / P3818AV P4018WM / P4018WT P4018AV / P4018AV BH P/N Length CHAIN P/N CKA without chain brake 952044368 14″ 952051209 33_ 952044370 16″ 952051211 33_ 952044418 18″ 952051338 33_ NOTE: If this saw is to be used for com- California, Idaho, Maine, Minnesota, New Jersey, Oregon, and Washington require by law that many internal combustion engines to be equipped with a spark arresting screen.
Inside view of clutch cover Clutch Cover Adjustment located on clutch cover 4. Turn the adjusting screw by hand counterclockwise until the adjusting pin just touches the stop. This should allow the pin to be near the correct position. 5. Slide guide bar on bar bolts until guide bar stops against clutch drum sprocket. Adjusting Pin Lower Hole Guide Bar 12. Install bar nuts and finger tighten only. Once the chain is tensioned, you will need to tighten bar nuts.
3. Using bar tool, roll chain around guide bar to ensure all links are in bar groove. 4. Lift up tip of guide bar to check for sag. Release tip of guide bar, then turn adjusting screw 1/4 turn clockwise. Repeat until sag does not exist. Adjusting Screw -- 1/4 Turn 6. Use the screwdriver end of the bar tool to move chain around guide bar. 7. If chain does not rotate, it is too tight. Slightly loosen bar nuts and loosen chain by turning the adjusting screw 1/4 turn counterclockwise. Retighten bar nuts. 8.
THROTTLE LOCK--OUT CHAIN BRAKE The THROTTLE LOCK--OUT must be pressed before you can squeeze the throttle trigger. This feature prevents you from accidentally squeezing the trigger. The chain brake is a device designed to stop the chain if kickback occurs. The chain brake activates automatically in the event of kickback. The chain brake activates manually if the front hand guard is pushed forward.
Use only 15″ -- 18″ (40 -- 45 cm) of rope per pull. Hold saw firmly while pulling starter rope. Starter Rope Handle 5. Push the choke/fast idle lever in to the HALF CHOKE position. CHOKE/FAST IDLE LEVER OFF Left Hand on Front Handle Right Foot Through Rear Handle IMPORTANT POINTS TO REMEMBER When pulling the starter rope, do not use the full extent of the rope as this can cause the rope to break. Do not let starter rope snap back. Hold the handle and let the rope rewind slowly.
S If the brake is already activated, it is disengaged by pulling the front hand guard back toward the front handle as far as possible. S When cutting with the saw, the chain brake must be disengaged. Disengaged Engaged Braking function control CAUTION: The chain brake must be checked several times daily. The engine must be running when performing this procedure. This is the only instance when the saw should be placed on the ground with the engine running. Place the saw on firm ground.
FELLING LARGE TREES (6 inches (15 cm) in diameter or larger) The notch method is used to fell large trees. A notch is cut on the side of the tree in the desired direction of fall. After a felling cut is made on the opposite side of tree, the tree will tend to fall into the notch. NOTE: If the tree has large buttress roots, remove them before making the notch. If using saw to remove buttress roots, keep saw chain from contacting ground to prevent dulling of the chain.
Using a support stand 2nd Cut WARNING: Never turn saw upside down to undercut. The saw cannot be controlled in this position. Always make your first cut on the compression side of the log. The compression side of the log is where the pressure of the log’s weight is concentrated. 1st Cut First cut on compression side of log 1st Cut 2nd Cut Second cut Second cut LIMBING AND PRUNING First cut on compression side of log BUCKING WITHOUT A SUPPORT S Overcut through 1/3 of the diameter of the log.
PRUNING Second cut WARNING: Limit pruning to limbs shoulder height or below. Do not cut if branches are higher than your shoulder. Get a professional to do the job. S Make your first cut 1/3 of the way through the bottom of the limb. S Next make a 2nd cut all the way through the limb. Then cut a third overcut leaving a 1 to 2 inch (2.5 to 5 cm) collar from the truck of the tree.
S Clean the oil holes and bar groove after each 5 hours of operation. Remove Sawdust From Guide Bar Groove Oil Holes S Burring of guide bar rails is a normal process of rail wear. Remove these burrs with a flat file. S When rail top is uneven, use a flat file to restore square edges and sides. File Rail Edges and Sides Square ter with a new one after every 50 hours of operation, or annually, whichever comes first. 1. Loosen 3 screws on cylinder cover. 2. Remove cylinder cover. 3.
6. Reinstall spark arresting screen, exhaust outlet cover, and nut. Tighten nut securely. CHAIN ADJUSTMENT The spark plug should be replaced each year to ensure the engine starts easier and runs better. Ignition timing is fixed and nonadjustable. 1. Loosen 3 screws on cylinder cover. 2. Remove the cylinder cover. 3. Pull off the spark plug boot. 4. Remove spark plug from cylinder and discard. 5. Replace with Champion RCJ--7Y spark plug and tighten securely with a 3/4 inch (19 mm) socket wrench.
HELPFUL TIP During storage of your gas/ oil mixture, the oil will separate from the gas. We recommend that you shake the gas can weekly to insure proper blending of the gas and oil. ENGINE S Remove spark plug and pour 1 teaspoon of 40:1, 2-cycle engine oil (air cooled) through the spark plug opening. Slowly pull the starter rope 8 to 10 times to distribute oil. S Replace spark plug with new one of recommended type and heat range. S Clean air filter. S Check entire unit for loose screws, nuts, and bolts.
LIMITED WARRANTY Poulan warrants to the original purchaser that each new Poulan brand gasoline chain saw is free from defects in material and workmanship and agrees to repair or replace under this warranty any defective gasoline chain saw as follows from the original date of purchase. 1 YEAR - Parts and Labor, when used for Household purposes. 60 DAYS - Parts and Labor, when used for Commercial, Professional, or Income Producing purposes. 30 DAYS - Parts and Labor, if used for rental purposes.
have any questions regarding your warranty rights and responsibilities, you should contact your nearest authorized service center or call Poulan at 1--800--554--6723. WARRANTY PERIOD: Any warranted part which is not scheduled for replacement as required maintenance, or which is scheduled only for regular inspection to the effect of “repair or replace as necessary” shall be warranted for 2 years.