
User Manual

6
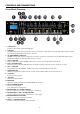
16. TONE CONTROL
Using the bass and treble knobs, the overall system frequency response can be adjusted. While rotating clockwise, the level
will be increased. Counter-clockwise turning will result in a level decrease. In center position, both are set to neutral level.
17. MASTER VOLUME CONTROL
Using the master volume control, the overal system volume will be adjusted in a range between minimum and maximum
level.
18. LED INDICATORS (VU-METER)
The current system operation is indicated on the 6 digit LED bar graph. The LED’s monitor the current output level within a
range of -18 dB and 0 dB, while the upper LED (red) illuminates when the output is clipping.
19. ZONE 1-4 OUTPUT SWITCHES
The different connected loudspeaker lines (1-4) can be switched on and off by pressing the switches with the corresponding
numbers. When a zone (1-4) is enabled, an orange light on the corresponding switch will show. When the ‘All’ switch is
pressed, all zone (1-4) outputs will be enabled.
20. ZONE 1-4 OUTPUT LEVEL CONTROL
The output level of different zones (1-4) can be adjusted by the band switches with the corresponding numbers.
21. ALL ZONE SWITCHES
When the ‘All’ switch is pressed, all zone (1-4) outputs will be enabled.
22. CHIME SWITCH
When the chime button is pressed, the selected chime tone as pre-announcement for paging will be played once.
23. FIRE SWITCH
When the fire button is pressed, the fire alarm goes through the loop until the fire button is pressed again.
24. ON / OFF POWER SWITCH
Use this switch to turn the unit on. Use the switch again to turn off the device. By switching on the device, the orange light
around the power button will illuminate. After powering on, the buzzer inside will ring three times and then the output
protection relay will be switched on (a click will be heard when this occurs), meaning the amplifier is ready.