
Operation Manual


4
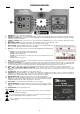
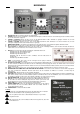
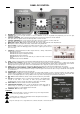
CONTROLPANEL
1. MASTER VOL: This knob controls the master volume.
2. FOLDER: Press this button to enter FOLDER selection, the character in the LCD display will flash, press again to engage the selection.
3. FOLDER + (STATION): Press this button to advance the folder selection in USB/SD mode.
Press to jump to the next available Radio station in Radio mode.
4. FOLDER - (STATION): Press this button to reserve the folder selection in USB/SD mode.
Press to jump to the previous available Radio station in Radio mode.
5. MODE (USB/SD/BT/FM): Toggle the audio source among the USB port, the SD card slot, FM radio and BT.
6. ID3 : Pressing the ID3 button scrolls the Title, Artist, Album on the LCD display.
7. REPEAT (SCAN): The REPEAT function allows you to REPEAT one track or the entire track list when in USB/SD mode. Press and hold
this button 2 seconds to search for a radio station.
8. DISPLAY : The LCD display indicates the Track/Time/Battery Level/Radio Station etc.
Area#1: shows the Track and Folder number.
Area#2: shows the Track elapsed time.
Area#3: shows the Battery Level
Area#4: shows the ID3 when in USB/SD mode and the radio station when in Radio
mode.
Area#5: shows the REPEAT function.
9. SEEK-: Pressing this button to go to the previous track. Press and hold to scan backward
within tracks.
10. BT SYNC (PLAY/PAUSE): Pressing this button will alternate between PLAY mode and PAUSE mode. Short press 1 second to turn on BT
and connect to the old paired device, or will search for new BT-device. Press and hold 2 seconds to enter “Discovering” mode, new device
can be connected to “DJ device 03”.
11. SEEK + : Pressing this button to go to the next track. Press and hold to scan forward within tracks.
12. MIC 1 AND 2, GAIN AND TONE/ECHO CONTROL: This connector can either take a Jack ¼’’ balanced or a XLR balanced cable. With the
Gain you can increase the microphone volume. The smaller knob is echo control for the microphone.
13. SD CARD SLOT: Used to insert a SD card.
14. USB PORT: Used to connect a USB memory stick and also you can connect your USB charging device (e.g. smart phone,
iPod/iPhone/iPad) to this port for charging (Note : for charging you must be in USB mode). This port is not suited to Portable hard drives
unless the hard drive has its own power source.
15. MP3/FM TUNER GAIN: This knob controls the level of the USB/SD and FM Tuner.
16. AUX IN: This stereo RCA input and 3.5mm (Stereo) mini jack can be used to connect a CD, MP3, or other audio source. (You cannot use
both inputs simultaneously. Doing so may cause damage to the input devices).
17. AUX IN GAIN: This knob controls the level of the aux-in input.
18. POWER CONNECTOR: Insert the included power cord here to charge the unit. Note
that the PA203 can run off the power adaptor while it simultaneously charges the
battery.
19. POWER ON/OFF: Turn ON or OFF.
ATTENTION:
Before the device the first time is actuated, please charge the battery at least 12
hours and max. 72 hours!
Battery should be regularly charged. For optimal battery life the battery should be
charged at least 1x per month.
Please note that if you do not load within 6 weeks, the battery becomes defective !!