
Replacement Part List

SAFETY INFORMATION
Do not attempt to make any adjustment or modications not
listed in your trimmer operator’s manual or this instruction sheet.
Follow the manufacturer’s safety and operating instructions.
Unauthorized modications to your trimmer may result in the
failure of your trimmer or trimmer head and cause serious
personal injury.
• Before installing the trimmer head read your entire string
trimmer operator’s manual.
• Make sure all bystanders are at least 50 yards away while
operating trimmer.
• Keep feet and hands away from trimmer head during
operation.
• Always wear personal protective safety equipment while
using the trimmer head.
• Never change line or head while trimmer engine is running –
make sure the trimmer is in the OFF position.
• Prior to trimming, inspect entire area and remove any foreign
objects such as glass, wire, rocks, cans, metal, etc.
• Never operate trimmer while under the inuence of drugs or
alcohol.
• Operator and any bystanders must wear eye protection or
face shield. Objects are thrown and ricochet even
with trimmer shield in place. Failure to wear eye protection
can result in blindness.
• Always wear proper clothing to protect feet, legs or any other
exposed areas of your person.
• Never wear open-toed shoes or shorts while trimming. Heavy
boots are recommended. (Preferably hip waders.)
• If any unusual vibration occurs during use, stop the trimmer
immediately to check for damage.
Failure to follow this instruction sheet or any warnings could
result in serious injury.
HELPFUL TIPS
Thank you for your purchase of the Hybrid Universal Head.
Weare sure you will be happy with its performance and we
welcome your feedback. The following tips may help you
maximize its performance and protect you and your trimmer:
• Read ALL instructions and safety information prior to use.
• Operating your trimmer at lower RPM often results in better
performance and longer line life.
• This head is designed to operate with line: min. diameter
.080" (2.0 mm) / max diameter .105" (2.7 mm).
• If the trimmer seems to be under strain or has difculty
getting to full speed, try one or all of the followings steps:
∙ Use a smaller diameter line such as .080" (2.0 mm).
∙ Trim the nylon lines 1" - 2" shorter before installation.
∙ Ensure no foreign objects such as string or long vegetation
have wrapped around the shaft.
• During installation remember that some trimmers are
REVERSE threaded and tighten counterclockwise.
TROUBLE SHOOTING
In order to serve you with superior customer service we have
provided two helpful ways for you to troubleshoot the installation
process of your trimmer head.
1. Reference the instructions provided in this packet, go back
through and make sure you did not miss a step.
2. Call us at 833-459-9405 and talk to our helpful support staff as
they walk you through any installation issues or questions you
might have.
Do not return to retailer! Simply call our support staff at
833-459-9405.
THD-Hybrid Universal Head_00
Hybrid Universal Head
Safety Information
Please read before attempting to install and use Hybrid Universal Head
Plastic Spacer
(Straight Shaft Stihl & Husqvarna)
Head
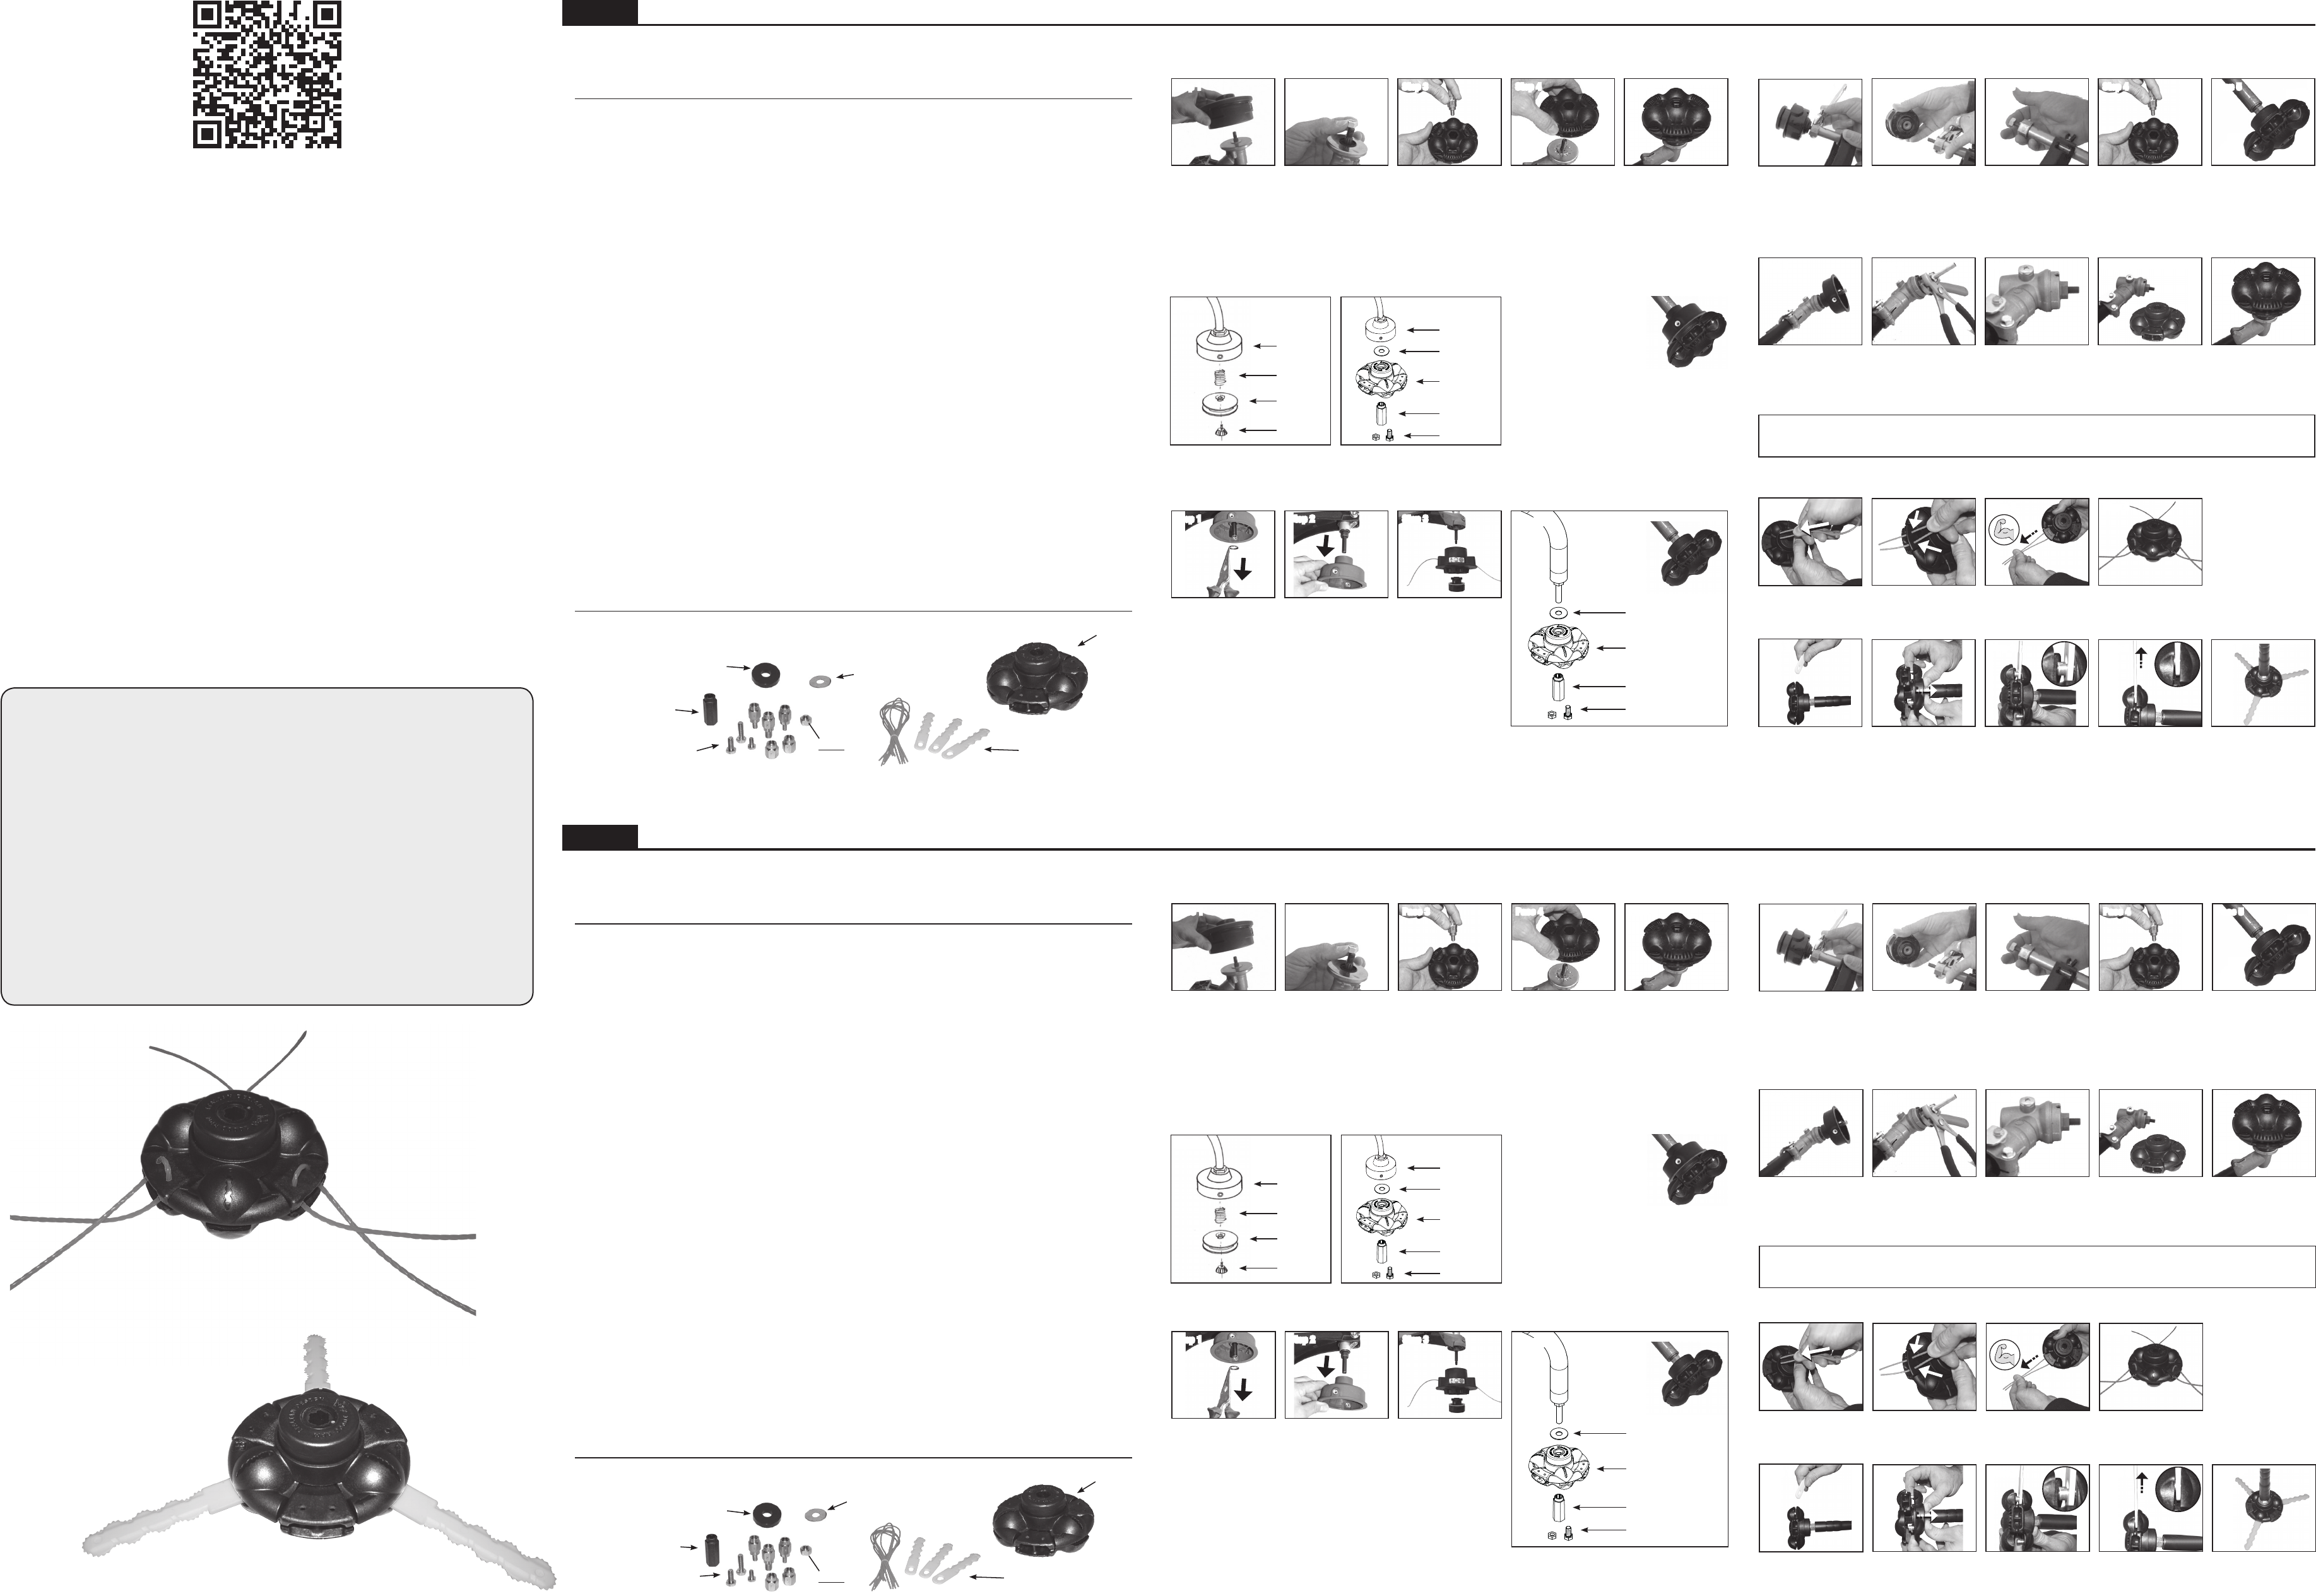
INSTALLATION INSTRUCTIONS
FIRST READ SAFETY INSTRUCTIONS! Then determine which method your trimmer requires.
Your hardware package contains the following:
(YOU WILL ONLY NEED 1 NUT OR 1 BOLT)
Plastic Adapter
Metal Washer
Lines and Blades
12 Nuts/Bolts
(7 left-hand, 5 right-hand)
(Stihl)
1. Unscrew knob and remove
ONLY the knob, spool, and
spring. Leave spool housing
intact. (See Fig. A.)
2. Identify which bolt OR nut
easily threads into your
trimmer.
3. Insert METAL WASHER into original spool
housing. (SeeFig.B.)
4. Insert identied bolt or nut into recessed
hexagonal cavity of the trimmer head.
5. Hold bolt or nut in place with nger and turn
trimmer head to snug entire assembly. DO NOT
OVERTIGHTEN.
METHOD 1: MOST STRAIGHT SHAFT TRIMMERS (Except Ryobi, Homelite & Toro)
Note: Consult your operator's manual to determine method to lock shaft rotation (could be a key hole or require a wrench).
1. Unscrew entire trimmer head assembly by hand to expose threaded shaft (may be left-hand threads).
2. Identify which nut from the package threads easily onto the shaft.
3. Place identied nut into recessed hex cavity of the trimmer head.
*Use ¼" PLASTIC WASHER on Stihl & Husqvarna models.
4. Hold nut in place with nger, and securely tighten the trimmer head onto the shaft by turning the head with shaft rotation locked.
Step 1 Step 2 Step 3 Step 4 Step 5
Fig. A
Housing
Spool
Knob
Spring
Fig. B
Housing
Fixed Head
Nut/Bolt
Metal Washer
Adapter
METHOD 2-A: MOST CURVED SHAFT TRIMMERS (Except Weed Eater, Poulan, Echo & Craftsman)
1. Unscrew knob and remove the entire trimmer head assembly (Step 1 - 2 - 3).
A pair of pliers may be needed to remove the lock washer from the spool
housing.
2. Identify which bolt or nut easily threads into your trimmer (Fig. C).
3. Place the identied nut or bolt into the adapter and then place the hex
adapter into the recessed hex cavity of the trimmer head.
4. Place the metal washer onto the trimmer shaft. Then while holding the nut or
bolt in the recessed hex cavity with one nger, turn the Upper Body to thread
the nut or bolt onto the trimmer shaft with the shaft rotation locked.
5. Once the Upper Body is secured onto the trimmer, place the Spool inside the
head and clip on the Lower Body.
6. Once trimmer head is fully assembled see Trimmer Line Loading section of
this manual for loading replacement trimmer line.
METHOD 2-B: MOST CURVED SHAFT TRIMMERS (Except Weed Eater, Poulan, Echo & Craftsman)
Step 1 Step 2 Step 3
Fig. C
Fixed Head
Nut/Bolt
Adapter
Metal Washer
METHOD 3: OTHER CURVED SHAFT TRIMMERS (Weed Eater, Poulan, Echo & Craftsman)
1. Secure hex-nut with wrench to lock shaft rotation.
2. Unscrew entire trimmer head spool assembly to expose threaded shaft.
3. Identify which nut from the package threads easily onto the shaft.
4. Place identied nut into recessed hexagonal cavity of the trimmer head.
5. Hold nut in place, and securely tighten the trimmer head onto the shaft by turning the head.
METHOD 4: OTHER STRAIGHT SHAFT TRIMMERS (Ryobi, Toro & Homelite)
1. Unscrew knob and remove entire trimmer head assembly.
2. Unscrew SHAFT EXTENSION (Part 1) to expose primary shaft (may turn counterclockwise).
3. Identify which nut from the package threads easily onto the shaft.
4. Place identied nut into recessed hex cavity of the trimmer head.
5. Hold nut in place, and securely tighten the trimmer head onto the shaft by turning the head.
Step 1 Step 2 Step 3 Step 4 Step 5
Do not attempt to make any adjustment or modications not listed in your trimmer operator’s manual or this instruction sheet.
Follow the manufacturer’s safety and operating instructions. Unauthorized modications to your trimmer may result in the
failure of your trimmer or trimmer head and cause serious personal injury.
TRIMMER LINE LOADING:
.065" (1.6 mm) – .080" (2.0 mm) – .095" (2.4 mm) – .105" (2.7 mm)
Feed line through holes. Make sure line ends are
the same.
Pull line strongly.
TRIMMER BLADE LOADING:
Raise up the upper part
head.
Insert blade into the pin. Ensure that the head is
closed.
Pull the blade to ensure
it is secure.
Step 1
Step 2 Step 3 Step 5
Step 4
Step 1
Step 2 Step 4
Step 3
Step 5
Step 1
Step 2 Step 4Step 3
INFORMACIÓN DE SEGURIDAD
No intente hacer ningún ajuste ni modicación que no gure
en el manual del operador de la recortadora o en esta hoja de
instrucciones. Siga las instrucciones de seguridad y operación del
fabricante. Las modicaciones no autorizadas a su recortadora
pueden resultar en la falla de su recortadora o cabezal y causar
lesiones personales graves.
• Antes de instalar el cabezal lea completamente el manual del
operador de la recortadora de hilo.
• Asegúrese de que todos los transeúntes estén al menos a 46
metros de distancia mientras opera la recortadora.
• Mantenga los pies y las manos alejados del cabezal de la
recortadora durante el funcionamiento.
• Siempre use el equipo de protección personal mientras usa el
cabezal de la recortadora.
• Nunca cambie el hilo ni el cabezal mientras el motor de la
recortadora esté en funcionamiento. Asegúrese de que la
recortadora esté en la posición OFF.
• Antes de recortar, inspeccione el área entera y retire cualquier
objeto extraño como vidrio, alambre, piedras, latas, metal, etc.
• Nunca opere la recortadora mientras esté bajo la inuencia de
drogas o alcohol.
• El operador y los espectadores deben usar protección ocular
o pantalla facial. Hay objetos que son despedidos y rebotan,
aún con el blindaje de la recortadora colocado. Si no se usa
protección ocular, puede producirse ceguera.
• Siempre use ropa adecuada para proteger los pies, las
piernas o cualquier otra área expuesta de su persona.
• Nunca use zapatos con punta abierta ni pantalones cortos
mientras recorta. Se recomienda usar botas gruesas,
preferiblemente botas de pescador.
• Si se produce alguna vibración inusual durante el uso,
detenga la recortadora inmediatamente para vericar si hay
daños.
El incumplimiento de esta hoja de instrucciones o de cualquier
advertencia podría causar lesiones graves.
CONSEJOS ÚTILES
Gracias por su compra Hybrid Universal Head. Estamos
seguros de que le encantará su desempeño, y agradecemos
sus comentarios. Los siguientes consejos pueden ayudarle a
maximizar su rendimiento y protegerle a usted y a su recortadora:
• Lea TODAS las instrucciones y la información de seguridad
antes de usar.
• El funcionamiento de la recortadora a una velocidad (rpm)
más baja a menudo resulta en un mejor rendimiento y una
mayor vida útil del hilo.
• Este cabezal está diseñado para funcionar con un hilo: min.
diámetro .080" (2.0 mm) / max. diámetro .105" (2.7 mm).
• Si la recortadora parece estar bajo tensión o tiene dicultad
para llegar a la velocidad máxima, pruebe uno o todos los
siguientes pasos:
∙ Utilice un hilo de menor diámetro, como 0.080" (2.0 mm).
∙ Antes de la instalación, recorte los hilos de nilón a una
longitud de 1" a 2" menor.
∙ Asegúrese de que no haya objetos extraños, como hilo o
vegetación larga, envueltos alrededor del eje.
• Durante la instalación, recuerde que algunas recortadoras
tienen rosca INVERSA y se ajustan en sentido antihorario.
RESOLUCIÓN DE PROBLEMAS
Para atenderlo con un excelente servicio al cliente, le ofrecemos
dos maneras útiles para que resuelva los problemas del proceso
de instalación del cabezal de su cortadora.
1. Consulte las instrucciones proporcionadas en este empaque,
revíselas nuevamente y asegúrese de no omitir ningún paso.
2. Llámenos al número 833-459-9405 para hablar con nuestro
equipo de apoyo si tiene cualquier problema o pregunta de
instalación.
¡No devuelva el producto al minorista! Simplemente llame a
nuestro personal de atención al cliente al 833-459-9405.
Hybrid Universal Head
Información de seguridad
Por favor, lea antes de intentar instalar y usar Hybrid Universal Head
Cabezal
INSTRUCCIONES DE INSTALACIÓN
¡PRIMERO LEA LAS INSTRUCCIONES DE SEGURIDAD! A continuación, determine qué método requiere su recortadora.
Su paquete de accesorios de montaje contiene lo siguiente:
(SOLAMENTE NECESITA 1 TUERCA O 1 PERNO)
Espaciador de plástico
(Stihl y Husqvarna)
Adaptadora deplástica
Arandela metálica
Hilo y Blades
12 Tuercas/Tornillos
(7 izquierda, 5 derecha)
(Stihl)
THD-Hybrid Universal Head_00
MÉTODO 1: MAYORÍA DE LAS RECORTADORAS DE EJE RECTO (excepto Ryobi, Homelite y Toro)
Nota: Consulte el manual del operador para determinar el método para bloquear la rotación del eje (podría ser una chaveta o requerir
una llave).
1. Desenrosque el conjunto completo del cabezal a mano para exponer el eje roscado (pueden ser roscas izquierdas).
2. Identique qué tuerca del paquete se enrosca fácilmente en el eje.
3. Coloque la tuerca identicada en la cavidad hexagonal rebajada del cabezal.
* Use la ARANDELA PLÁSTICA de 1/4" en los modelos de Stihl y Husqvarna.
4. Sujete la tuerca en su lugar con el dedo y apriete rmemente el cabezal en el eje haciéndolo girar con la rotación del eje bloqueada.
MÉTODO 2-A: MAYORÍA DE LAS RECORTADORAS DE EJE CURVO (excepto Weed Eater, Poulan y Craftsman)
1. Desenrosque la perilla y
quite SOLAMENTE la perilla,
el carrete y el resorte. Deje
el alojamiento del carrete
intacto (vea la Fig. A).
2. Identique qué perno
O tuerca se enrosca
fácilmente en su recortadora.
3. Inserte la ARANDELA METÁLICA en el alojamiento
del carrete original (vea la Fig. B).
4. Inserte el perno o tuerca identicado en la
cavidad hexagonal empotrada del cabezal.
5. Sujete el perno o la tuerca en su lugar con
el dedo y gire el cabezal para ajustar todo el
conjunto. NO APRIETE EN EXCESO.
1. Desenrosque el mando y retire todo el montaje del cabezal de la cortadora
(Paso1 - 2 - 3). Puede necesitar unas pinzas para retirar la arandela de
bloqueo de la carcasa de la bobina.
2. Identique qué perno o tuerca se enrosca fácilmente en su recortadora
(Fig.C).
3. Coloque la tuerca o perno identicados en el adaptador y luego coloque el
adaptador hexagonal en la cavidad hexagonal empotrada del cabezal de la
cortadora
4. Coloque la arandela de metal en el eje de la cortadora. Luego, mientras
sostiene con un dedo la tuerca o perno en la cavidad hexagonal empotrada,
gire todo Parte superior del cuerpo para roscar la tuerca o perno en el eje de
la cortadora con la rotación del eje bloqueada.
5. Una vez que la parte superior del cuerpo esté asegurada en la cortadora, coloque la bobina dentro del cabezal y sujétela en la parte
inferior del cuerpo.
6. Una vez que el cabezal de la cortadora esté completamente montado, consulte la sección Carga de la línea de la cortadora de este
manual para obtener información sobre cómo cargar la línea de repuesto de la cortadora.
METHOD 2-B: MAYORÍA DE LAS RECORTADORAS DE EJE CURVO (excepto Weed Eater, Poulan y Craftsman)
Paso 1 Paso 2 Paso 3 Paso 4 Paso 5
Fig. A
Alojamiento
Carrete
Perilla
Resorte
Fig. B
Alojamiento
Cabezal
dejo
Tuerca/Perno
Arandela
metálica
Adaptadora
Step 1 Step 2 Step 3
Fig. C
Cabezal de jo
Tuerca/Perno
Adaptadora
Arandela metálica
MÉTODO 3: OTRAS RECORTADORAS DE EJE CURVO (Weed Eater, Poulan, Echo y Craftsman)
1. Asegure la tuerca hexagonal con la llave para bloquear la rotación del eje.
2. Desenrosque el conjunto del carrete del cabezal completo para exponer el eje roscado.
3. Identique qué tuerca del paquete se enrosca fácilmente en el eje.
4. Coloque la tuerca identicada en la cavidad hexagonal empotrada del cabezal.
5. Sujete la tuerca en su lugar y apriete rmemente el cabezal en el eje haciéndolo girar.
MÉTODO 4: OTRAS RECORTADORAS DE EJE RECTO (Ryobi, Toro y Homelite)
1. Desenrosque la perilla y quite el conjunto de cabezal completo.
2. Desatornille la EXTENSIÓN DEL EJE (Parte 1) para exponer el eje primario (puede girar en sentido antihorario).
3. Identique qué tuerca del paquete se enrosca fácilmente en el eje.
4. Coloque la tuerca identicada en la cavidad hexagonal empotrada del cabezal.
5. Sujete la tuerca en su lugar y apriete rmemente el cabezal en el eje haciéndolo girar.
No intente hacer ningún ajuste ni modicación que no gure en el manual del operador de la recortadora o en esta hoja
de instrucciones. Siga las instrucciones de seguridad y operación del fabricante. Las modicaciones no autorizadas a su
recortadora pueden resultar en la falla de su recortadora o cabezal y causar lesiones personales graves.
Paso 1 Paso 2 Paso 3 Paso 4 Paso 5
Paso 1
Paso 2 Paso 3 Paso 5
Paso 4
CARGA DEL HILO:
.065" (1.6 mm) – .080" (2.0 mm) – .095" (2.4 mm) – .105" (2.7 mm)
TRIMMER BLADE LOADING:
Paso 1
Paso 2 Paso 4
Paso 3
Feed line through holes. Make sure line ends are
the same.
Pull line strongly.
Raise up the upper part
head.
Insert blade into the pin. Ensure that the head is
closed.
Pull the blade to ensure
it is secure.
Paso 5
Paso 1
Paso 2 Paso 4Paso 3
EN
ES
P00801459_R00
Warning!
Only use the nuts and bolts supplied with this
product. Do not substitute nuts & bolts
from other sources.
¡Advertencia!
Use únicamente las tuercas y pernos que
vienen con este producto. No use tuercas ni
pernos de otras fuentes.
Customer Service
NEED ANY HELP?
WE ARE HERE FOR YOU, DON’T GO BACK TO THE STORE,
CALL US AT:
833-459-9405
(FREE Number)
INSTALLATION AND HELP LINE & CUSTOMER SERVICE
Scan with smart phone to view installation
Para ver la instalación, escanee con un teléfono inteligente