
User's Manual


User Manual
WCG91501 – 915 MHz Wireless Charging Grip
Rev 1 – 2019/11 User’s Manual – WCG91501 Grip Page 3
www.powercastco.com
SET-UP AND OPERATION
1. Mount or place the RF transmitter in the desired location with the Powercast logo and
status LED facing the direction of where the WCG91501 will be placed.
2. Turn the WCG91501 upside-down and flip the switch to the on position.
3. Slide the Joy-Con controllers downward into the brackets. The Joy-Cons will lightly click
into place once secured.
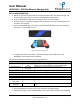
4. Place the WCG91501 within 2 ft of the transmitter with the USB-C connector facing the
transmitter, as seen below in Fig. 2.
Fig.2: WCG91501 recharging orientation
5. Charging performance and status is communicated by the LED indicator on the
WCG91501. See the table below for details.
The status LED indicates the following operating conditions:
LED
Status
Description
Off
Not Charging or
Off
WCG91501
is not charging
,
is powered off
via the rear
switch, or the internal battery is extremely discharged
Single blink
Green
Preferred
Charging
WCG91501
is charging
wirelessly
at a high
rate
Single blink
Yellow
Fair
Charging
WCG91501
is charging
wirelessly
at a fair rate
Si
ngle blink
Red
Poor
Charging
WCG91501
is charging
wirelessly
at a low
rate
Blue
Wired Charging
WCG91501
is charging via the USB
-
C port
Double blink Green
Fully Charged
WCG91501
internal battery
is fully charged
Double blink Red
Low Battery
WCG91501
internal battery is low
and recharging is needed
Blue with Double
blink Green
Fully Charged
WCG91501
is fully charged with USB
-
C connected
Blue with Double
blink Red
Low Battery
WCG91501
internal battery is low
and charging via USB
-
C
port
6. Use the WCG91501 to house the Joy-Con controllers during game play.
7. When done playing, return the WCG91501 to the front of the transmitter for recharging.