Owner’s Manual M89897A.3 ITEM NUMBER: 89897 SERIAL NUMBER: 2.6 GPM, 3200 PSI Pressure Washer — EPA, CARB-Compliant Instructions for Installation/Set-up, Operation, Maintenance, & Storage This pressure washer produces cold water high pressure spray. Cleaning chemicals may be incorporated into the spray if desired. The pressure pump for this equipment is powered by a gasoline internal combustion engine.
Table of Contents Equipment Protection Quick Facts......................................................................................................................................... 1 TABLE OF CONTENTS ................................................................................................................................................ 2 ABOUT YOUR PRESSURE WASHER .........................................................................................................................
PARTS LIST - MODEL 89897 – REV A.3 ................................................................................................................... 30 PUMP EXPLOSION 801742 - REV A.3...................................................................................................................... 31 PUMP PARTS LIST 801742 - REV A.3...................................................................................................................... 32 PUMP KIT PARTS LIST 801742 - REV A.3...............
About Your Pressure Washer Thank you for purchasing a Powerhorse Pressure Washer! It is designed for long life, dependability, and top performance. Site Location. Intended for outdoor use only. Personal Protection. Wear safety apparel during operation, including safety glasses with side and top protection. Ear protection is also recommended if working near any operating engine. Other safety apparel includes waterproof insulated gloves, and non-slip protective footwear.
Specifications Model # 89897 FLOW OUTPUT PSI (bar) 3200 (220) GPM (l/min) 2.6 (9.8) Max Water Temp 104F (40C) ENGINE Engine Powerhorse Horsepower 212CC DIMENSIONS / COMPONENTS Length 25.5” Width 21” Height 38.
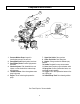
Component Identification 10 9 12 13 4 7 11 1 6 5 3 2 14 8 1. Pressure Washer Pump: Inspect for loose/broken parts prior to each use. 2. Pump (Water) Inlet: Attach garden hose here. 3. Pump (Water) Outlet. Connect high pressure hose here. 4. Chemical Injector: Push chemical hose onto injector to route chemical from onboard soap tank into pump. 5. Thermal Protector: Valve that regulates water temp in the pump 6. Engine: The air-cooled engine powers the pump. 7. Upper Gun Holder: Store gun here. 8.
Safety Hazard Signal Word Definitions This is the safety alert symbol. It is used to alert you to potential personal injury hazards. Obey all safety messages that follow this symbol to avoid possible injury or death. DANGER DANGER (red) indicates a hazardous situation, which if not avoided, will result in death or serious injury. WARNING WARNING (orange) indicates a hazardous situation, which if not avoided, could result in death or serious injury.
On Product Labels Decal Locations WARNING: ALWAYS make sure safety labels are in place and in good condition.
Decals 6 1 2 7 3 8 9 NORTHERN TOOL & EQUIPMENT COMPANY, INC. THIS ENGINE IS CERTIFIED TO OPERATE ON UNLEADED GASOLINE THIS ENGINE MEETS 2019 MODEL YEAR U.S. EPA AND CALIFORNIA EXH AND EVAP EMISSION REGULATIONS FOR SORE. EXH ENGINE FAMILY: KCDPS.
Decals Continued 11 12 13 14 15 To order replacement safety labels, call Powerhorse Product Support at 1-866-443-2576 10
Initial Set-Up Step 1. Inspect & Unpack Upon receiving your item check for missing or damaged parts. See “Component Identification” section of this manual for a diagram of the pressure washer and its components. • For missing or damaged components, please contact Product Support at 1-866-443-2576. • If complete, fill out product serial number information. See “Limited Warranty” section of this manual.
Step 2. Assembly Handle to Base Assembly Note: Remove contents from box and assembly can occur at this time. 3. Install handle to the pressure washer base. The handle snaps into place. Wheel to Base Assembly 1. Install wheels on the pressure washer base using: • (2) Axles • (2) Hair Pins Handle Gun Hook Assembly 4.
Step 3. Select Suitable Location Hose Holder Hook 6. Attach the hose holder hook to the handle. Moving and Handling • (4) Self-Tapping Screws Moving your pressure washer around • Use the handles to manually move the pressure washer. • Push the pressure washer in front of you has you walk. • To turn, push down slightly on the handles and pivot the pressure washer on its wheels.
3. Positioning: 1. The pressure washer should be positioned on a firm, level (less than 3 degree slope), heat-resistant surface with good drainage and a nearby water supply. 2. The pressure washer should be placed within garden hose distance of a continuous water supply. Ensure that the pressure washer sits level and will not slide or shift during operation. If applicable, block the pressure washer's wheels to prevent movement. 4.
Operation Safety Rules for Operation NOTICE After you have checked and fueled the equipment and positioned it in a suitable worksite, it is time to start your pressure washer. The following are the procedures necessary for safe, successful operation of your pressure washer. Before starting the pressure washer, review the following general safety rules for operation: Conditions for Use Know how to stop. Be thoroughly familiar with proper use of the equipment and all controls and connections.
Preparing of Operation Never pull by hose. Do not move this machine by pulling on the hose. Hose or connections could fail and result in catastrophic high pressure release of fluid as well as hose whipping. Avoid sharp objects. Keep hose away from sharp objects. Bursting hoses may cause injury. No load bearing. Do not use the pump to support other items of equipment that impose unacceptable loads on the pump. Do not attempt to use this machine as a prop. Lock trigger safety latch when not spraying.
Add Fuel • If possible, move the pressure washer away from spilled fuel on the ground. • Wipe up spilled fuel and wait 5 minutes for excess fuel to evaporate before starting engine. • Fuel soaked rags are flammable and should be disposed of properly. • If fuel is spilled on your skin or clothes, change clothes and wash skin immediately. WARNING: Fuel Fire/Explosion Hazard Gasoline is highly flammable and explosive.
Fill Engine Fuel Tank WARNING: High Pressure Fluid Injection Hazard Check the gasoline tank level. If needed, fill tank with fresh unleaded gasoline from a portable container: 1. Remove engine gas cap. 2. Add gasoline through the fill opening: • Use only a UL-listed portable gasoline container to transfer the gasoline to engine's tank. • Do NOT overfill the gasoline tank. Allow at least 1/2" of empty space below the fill neck to allow for fuel expansion. 3. Replace gas cap securely before starting engine.
3. The water supply garden hose must have an inside diameter of at least 5/8”. If the hose is more than 100 ft. long, the diameter must be at least 3/4”. 4. Never use a reservoir tank as a water source. Drawing water out of a tank may cause pump cavitation and damage to your pump. This pressure washer is designed for a pressurized water source such as a city water faucet. However, the water source pressure must not exceed 115 psi (8 bar). 5. Always use a flexible rubber hose for your water supply.
CAUTION: Chemicals Containing Muriatic Acid Certain chemicals, such as bleach or those containing muriatic acid, will cause pump damage if introduced upstream through the pump's water inlet. It mixes the cleaning chemical into a low pressure spray. Cleaning chemicals applied under low pressure adhere better to the surface being cleaned, allowing the formula time to react and remove dirt more effectively.
Pump Components Start-Up Procedures Start the Engine to Power the Pump. 1. Make sure water supply is connected and primed. CAUTION: Warranty Void Running the pump dry will cause damage and void the warranty. 2. To prevent accidental spraying, engage the safety latch on spray gun trigger by rotating it to the locked position. 3. Follow the instructions in the “Engine Manual” section of this manual for starting the engine. - If the engine doesn't start on the first try, pressure may build up in the pump.
Procedure: 1. Install one of the high-pressure spray nozzle (always relieve system pressure first and follow instructions for attaching a nozzle). 2. Clear the cleaning area of all persons. Keep children and pets away. 3. Hold the spray gun firmly with two hands and a sturdy stance -- Gun kicks back when triggered. 4. Wash from the bottom to the top, using side-toside motions. This washes away heavy dirt and allows the detergent to soak as you work toward the top. 5.
Storage When you are finished using the pressure washer, you must prepare the sprayer for storage and store it in a proper location. 1. Drain the water from the high pressure hose and spray gun by depressing the trigger on the spray gun until all water drains out. 2. Disconnect the plumbing that connects to the pump outlet. 3. Obtain the materials you will need: • 12" piece of garden hose or equivalent • funnel • approximately 6 oz. of RV antifreeze 4.
Prepare Engine for Long Term Storage Prepare Pressure Washer for Storage Prepare the pressure washer for storage. 1. Make sure the engine start switch is OFF. 2. Disconnect the engine spark plug wire if you haven't already done so. 3. Disconnect the high-pressure hose, garden hose, and spray gun. First prepare the engine for long term storage if you will not be using the pressure washer for more than 30 days. Fuel can become stale when stored over 30 days.
Maintenance & Repair WARNING: Maintenance Hazards ALWAYS shut off water supply, bleed water pressure, turn off engine and disconnect the spark plug wire before cleaning, adjusting, or servicing the pressure washer. After servicing, make sure all guards and cover shields are replaced before using.
Inspect Spray System Inspect Fuel System Inspect spray system for damage and leaks before each use. Do not start pressure washer until all needed repairs have been completed. Inspect the engine fuel system and check for leaks before each use. Do not start pressure washer until all needed repairs have been completed. WARNING: High Pressure Fluid Injection Hazard WARNING: Filter Disposal Gasoline fuel is highly explosive and fuel leaks can result in fire or explosions.
COMMERCIAL USERS: All mechanical equipment, no matter how well designed, will need maintenance and repairs. A Powerhorse pressure washer is no exception. At times, a Powerhorse pressure washer may become inoperable because repairs are required.
Troubleshooting This section provides a list of the more frequently encountered pressure washer malfunctions, their causes and corrective actions. Some corrective actions can be performed by the operator or maintenance personnel, and others may require assistance of a qualified electrician or Service Center.
Parts Explosion- Model 89897 – Rev A.
Parts List - Model 89897 – Rev A.
Parts List - Model 801742 – Rev A.
Parts List - Model 801742 – Rev A.3 Item Description Kit Number Qty Item Description 1 Swashplate Box Not Available 1 37 O-ring 14 2 3 4 5 6 7 8 9 10 11 12 13 14 Oil sealB35528 Bearing 2 Holding frame Assy. 2 Bearing 3 Swashplate Bearing 1 Retaining ring 12 Not Available Not Available Not Available Not Available Not Available Not Available Not Available Clamp Back spring Plunger O-ring 73X2.65 Plunger base Screw M8X25 10.9 Reciprocating oil seal TC4/12X20X6 Cushion O-ring22.4X1.
Parts List - Model 801742 – Rev A.3 Kit # Description 1 Seal Kit 2 Valve Kit 3 Outlet Kit w/ Injector 4 Unloader Manifold Kit Inlet Kit 5 6 Thermal Relief Item # 15 16 17 18 19 20 21 22 23 24 25 26 27 35 37 59 60 61 62 63 64 65 66 67 68 69 32 70 35 37 38 39 40 41 42 43 44 45 46 47 48 49 50 51 52 53 54 55 56 36 58 71 28 29 30 31 32 72 Items Included Reciprocating oil seal TC4/12X20X6 Cushion O-ring22.4X1.
Engine Explosion (799841)-Rev E 34
Engine Parts List (799841)-Rev E Ref# 1 2 3 4 5 6 Part # N/A Kit #14 N/A Kit #5 7 8 9 10 11 12 13 14 15 Kit #14 N/A N/A N/A N/A N/A 16 Kit #14 17 18 19 20 21 22 23 24 25 26 795598 795613 N/A N/A N/A N/A N/A N/A N/A N/A N/A 27 28 29 30 31 32 33 34 35 36 37 38 39 40 41 42 43 44 45 46 47 48 49 50 Kit #1 N/A Kit #13 Kit #15 Kit #13 Kit #10 Kit #10 Kit #5 Kit #5, Kit #10 N/A N/A Kit #14 N/A N/A Kit #14 N/A N/A 795592 N/A N/A Kit #2,Kit #4 Kit #6,Kit #9 Kit #4 Kit #4 Description CRANKCASE BALL BEARING
Engine Kit List (799841)-Rev E Kit #1 Kit #2 Kit #3 Kit #4 Kit #5 Kit #6 Kit #7 Kit #8 Kit #11 Kit #12 Kit #14 Kit #13 Kit Ref # Kit Part # 1 2 3 4 5 6 7 8 9 10 11 12 13 14 15 795597 795606 795616 795593 796199 795608 795653 795596 795599 799842 795620 795595 798136 795615 795617 Kit #10 Kit #9 Kit #15 Description Qty Drain Bolt Kit Throttle Kit On/Off Switch Kit Valve Cover Kit Governor and Spring Kit Recoil Kit Air Cleaner Kit Recoil Starter Fan Kit Oil Level Kit Tank Kit Carbon Canis
Engine Manual WARNING BEFORE operating the engine, be sure to read this section of the manual, otherwise injury to personnel or damage to equipment may occur. Engine 1. Fuel Valve When the fuel valve is in the ON position, fuel is allowed to flow from the fuel tank to the starting carburetor. Be sure to return the fuel valve to the OFF position after stopping the engine. components 2. Choke Lever The choke is used to provide an enriched fuel mixture when starting a cold engine.
Maintenanc e schedule REGULAR SERVICE PERIOD Engine oil Check level First month or 20 Hrs. Every 3 months or 50 Hrs. Every 6 months or 100 Hrs. ○ ○ ○ Clean ○(1) ○(1) Replace Fuel Valve Sediment Cup Spark plug Engine oil recommend ations ○ Clean ○ Check-adjust ○ Replace ○ Spark arrester Clean Idle speed Check-adjust Valve clearance Check-adjust Cylinder head Clean After every 500Hrs.
Oil draining and checking oil level WARNING: Burn hazard Never open oil port while engine is running. Hot oil can spray over face and body. 1. Operate the pressure washer for 3 to 5 minutes to thin oil for easier draining. 2. Ensure that the engine is stopped and on a level surface. 3. Remove the drain bolt and washer; drain the oil into an approved container. 4. 5. 6. 7. Spark plug removal, cleaning and replacement Reinstall washer and drain bolt. Remove the dipstick and clean it.
Clean air filter WARNING Never run the pressure washer without the air filter. Rapid engine wear will result. 1. Remove the air cleaner outside cover (A). Be careful to prevent dirt and debris from falling into the air cleaner assembly. 2. Separate the Air Filter (A) from the Air Filter Housing (B). 3. Inspect the air filter. Clean dirty air filter with warm water and mild soap. Allow air filter to dry thoroughly before re-installation. 4.
Removal WARNING from storage Gasoline is highly flammable and explosive, and you can be burned or seriously injured when handling fuel. Storage time Within one month One-two months Two months - one year One year or longer Service item Use Drain original fuel and refuel. Drain original fuel and refuel; Empty and clean the fuel valve sediment cup. Drain original fuel and refuel; Empty and clean the fuel valve sediment cup; Empty and clean the carburetor bowl. Draining fuel: 1. 2. 3. 4. 5.
Limited Warranty Dear Valued Customer: The Powerhorse Product you just purchased is built with the finest material and craftsmanship. Use this product properly and enjoy the benefits from its high performance. By purchasing a Powerhorse product, you show a desire for quality and durability. Like all mechanical equipment this unit requires a due amount of care. Treat this unit like the high quality piece of machinery it is. Neglect and improper handling may impair its performance.
This page left intentionally blank 43
WARNING: This product can expose you to chemicals including gasoline engine exhaust, which is known to the State of California to cause cancer, and carbon monoxide, which is known to the State of California to cause birth defects or other reproductive harm. For more information go to www.P65Warnings.ca.gov. Distributed by Northern Tool & Equipment Company, Inc. Burnsville, MN 55306 www.northerntool.