
User guide

REV XP Windshield Installation Instructions
Before you begin, read these instructions and check to be sure all parts and tools are accounted for.
Please retain these installation instructions for future reference and parts ordering information.
Kit Components:
Qty. Part Description Tools required for installation:
1 Windshield T-30 Torx screw driver
4 Screws Phillips Screw driver
4 Washers
INSTALLATION INSTRUCTIONS
1. Remove the stock windshield by gently unsnapping the trim from the instrument dash. There are
three places the stock windshield snaps into the dash. One at the very tip of the trim and one at each
end of the trim. Once all three are unsnapped both the trim and the windshield can be removed.
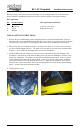
2. Remove four screws from the dash using a T-30 Torx screw driver. Two of the screws are located
just above each headlight (Figure 1). The other two are located on each side of the instrument dash
(Figure 2). These will be the mounting points for your new windshield.
3. Install windshield to your machine by using the 4 screws and washers that came with the Cobra
windshield. Start with one of the front mounting points just above the headlights. Slide the screw
through the windshield. The washer goes between the windshield and the dash. It acts as a spacer
so the windshield will mount flush with the hood. For now, just get the screw started. Install the
other front mounting screw and washer in the same way. Again, do not tighten the screw just yet.
Install the two screws and washers on the side mounting points the same as the two front mounting
points – washer between the shield and the dash.
4. Tighten all four screws.
Figure 1 Figure 2
IN10341010 1 Printed in the USA