
User Manual


4 - ENG
P
P
AINTING TIPS
AINTING TIPS
CLEANING INSTRUCTIONS
CLEANING INSTRUCTIONS
IMPORTANT: Keep the air brush clean. To avoid clogging the air and paint passages and possibly ruining
the air brush, clean the air brush immediately after each use. NOTE: Paint and other material will dry quickly in the
small passages rendering the air brush useless due to the difficulty of removing hardened paint from the passages
inside the air brush. If the passages become clogged and the air brush stops working, follow the instructions in
“TO CLEAN PASSAGES” below.
After Each Use
Shut off the air supply to the tank and release the pressure in the tank before cleaning
to avoid injury.
1. Drain and clean the paint jar. To clean the air brush passages, fill the paint jar about 1/2 full with thinner or
approved solvent. Attach the jar to the air brush and spray the liquid through the air brush until it sprays
clear. Hold a soft cloth over the fluid cap and force air and thinner back and forth thru needle, cap and tip. If
the air brush becomes clogged, see “to clean clogged passages” below.
To avoid the risk of fire and/or explosion, place cleaning rags and other flammable
waste materials in a secured metal container. The container should be disposed of
properly in accordance with local, state and federal regulations.
When blowing thinner through the air brush, the tip should be aimed away from any
person to avoid blowing solvent into the eyes or onto skin causing possible injury.
One of the most characteristic and important functions of the airbrush is its ability to apply color in soft, sub-
tle tonal graduations which may range from the lightest of tints to complete opaque coverage. Any amount of con-
trol can be obtained, so that color can be applied in patterns ranging from a thin pencil line to a broad spray.
1. Prepare the object to be painted by masking off any area that is not to be painted.
2. Clean the object so that it is free of grease, dust, etc.
3. If the item is small, place on a pedestal or hang with a piece of wire so there is access to all areas to be
painted.
4. Hold the nozzle about 6 inches from the surface of the object to be painted.
5. Using short strokes, move the air brush constantly at a steady pace, parallel to the surface.
6. Do not spray too heavy. Apply light coat, let dry, etc., until desired coverage is achieved.
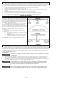
Hold your air brush much the same you would a pen
but with your index finger on the trigger. You can drape the
air hose over your forearm to keep it out of your way. The air
brush should feel comfortable in your hand and your hand
and upper body should be relaxed. Hold the air brush per-
pendicular to your painting surface
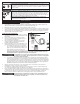
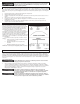
To avoid blobs, runs and sags, keep the air brush in
motion at all times, before, after and while the trigger is
depressed. If air brush motion is uneven, paint finish will be
uneven (see figure 2). Practice painting on a piece of scrap
material or cardboard until the test coating results are
acceptable.
Runs and sags are caused by one or more of the
following errors:
1. “Freezing” or forgetting to release trigger at the
end of stroke.
2. Holding the air brush still or moving too slowly.
3. Holding the air brush too close to the surface.
NOTE: Always keep the air brush parallel to the surface.
LEARN T
LEARN T
O TRIGGER
O TRIGGER
Figure 2