
User Manual


5 - ENG
TROUBLESHOOTING
TROUBLESHOOTING
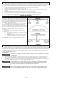
CLEANING INSTRUCTIONS (continued)
CLEANING INSTRUCTIONS (continued)
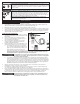
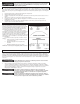
To Clean Clogged Passages
1. Disassemble the air brush by using the following procedure (see figure 3):
a. Hold fluid cap (P) and locknut (Q) with the thumb and index finger.
b. Using the wrench provided (S), place on the flat surface of the fluid needle (R) and turn counter
clockwise.
c. Remove fluid needle (R).
d. Clean the fluid needle (R), fluid cap (P) and air tip (O) with a piece of cotton dipped in thinner or
approved solvent. A fine bristled brush will also work.
e. Reassemble the air brush by reversing the above procedure.
NOTICE: Never use metal objects to clean precisely drilled passages. Damaged passages will cause
improper spraying.
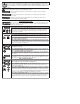
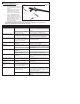
SYMPTOM POSSIBLE CAUSES CORRECTIVE ACTION
Grainy spray Paint too thick
Dried paint in the fluid needle or air tip
Add water, thinner or approved solvent (depending on
the paint used) sparingly to the paint.
Clean the airbrush. Refer to the “clean clogged pas-
sages” section.
Buckling paper Paint too thin
Painting to heavily in one area
Add pigment to thicken the mixture.
Move the airbrush more rapidly or lessen the spray.
Paint blobs at
ends of stroke
Starting to spray before moving your
hand and stopping the movement
before shutting off the paint flow.
Start motion before pressing the trigger and follow
through motion after releasing the trigger.
Flared ends Turning the wrist while airbrushing The whole forearm should move horizontally across
the surface.
Centipedes Spraying too much paint too close to
the surface
Hold the nozzle of the air brush about 6 inches from
the surface.
Adjust the paint flow by turning the fluid cap.
Splattering Permitting the trigger to snap back
Dried paint in the fluid tip or fluid needle
Always release the trigger gently.
Clean the airbrush. Refer to the “clean clogged
passages” section.
Curved stroke Caused by arching arm too close to the
surface
Arm should always be parallel to work, unless this
effect is desired.
Restricted spray The fluid tip tightened too far counter-
clockwise
Turn the fluid tip clockwise a turn or two.
Bubbles through
color cup
The fluid tip loosened too far clockwise Turn the fluid tip counter-clockwise a turn or two.
Color spray can-
not be shut off
Fluid tip may be clogged; this is recog-
nized by a “spongy” feel when the fluid
needle is set into tip.
Clean the airbrush. See the “to clean clogged pas-
sages” section.
Spitting Caused by residue on the fluid needle
or in the paint jar.
Paint may be too thick to operate prop-
erly.
Clean the airbrush. See the “to clean clogged pas-
sages” section. Drain, wash and refill the jar with fresh
strained paint.
Add water, thinner or approved sol vent (depending on
the paint used) sparingly to the paint.
Figure 3